

Filter Forge is an incredibly powerful Photoshop Plugin. It’s simply amazing. It gives you the power to create your own filters (you must run them from inside Filter Forge though) without any programming knowledge at all. Some technical knowledge about procedural textures and image processing helps a lot but it is not indispensable.
Just go to FilterForge web site and download the latest demo version. It will be fully functional for 30 days.
Just a quick note about Filter Forge: It is an educational program in terms of how you can visualize a diagram of the components of a texture or an effect. Most of the times, we use Photoshop following step by step instructions without really knowing why things happen. This program, instead, displays, in a single view, all the steps or components used to build the texture or filter and you can tweak them in a non-linear way. This feature alone is worth the program’s price in educational terms.
Filter Forge Main Window
After you successfully applied to Filter Forge Beta and afterwards installed it, lets create a 500×500 pixels blank image in Photoshop. Then go to the top menu bar and select FILTER > Filter Forge (located near the bottom of the Filter pull down menu).
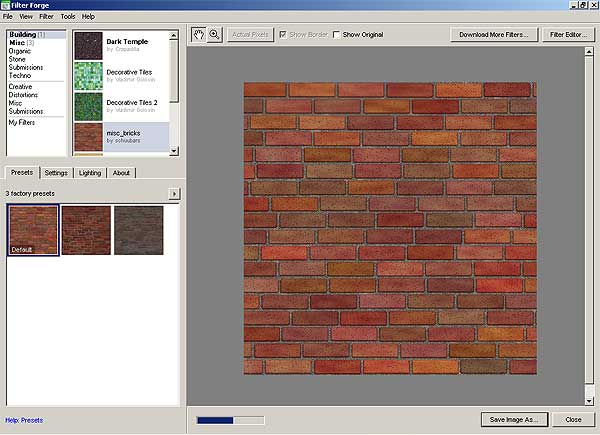
This main window shows the list of the default filters plus the ones you created and the ones you downloaded from the Filter Forge repository. Here you can preview the texture or filter and tweak it with each filter’s interface controls. Now, lets start creating our own filter. Click on the Filter Editor button at the top right corner of the screen. Select “Create a new filter” and press “Open filter editor”. You will now enter the Filter Editor window:
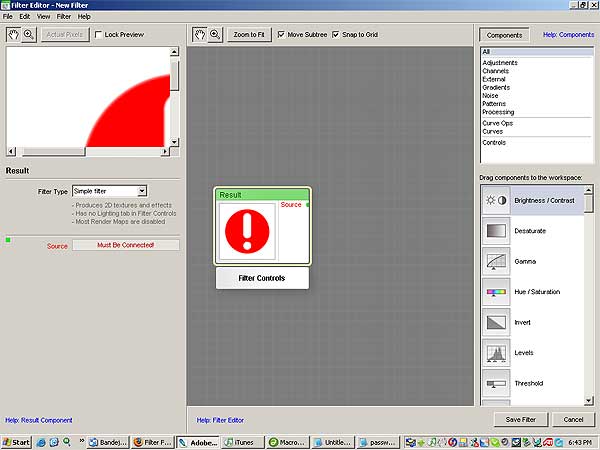
The Filter Editor Window has a preview area at the top left corner, a component settings area on the left, a components list on the right and a working area on the center. Inside the working area you will see a small rectangle with rounded corners. This rectangle is a component and has a small preview window. You can also see a Hand icon and a Loupe icon on top of the preview and work area. Use these tools to zoom and move components in the work area or to zoom and move the image in the preview window.
In Filter Forge you work by placing Components in the work area and connecting them. Each component has its own settings. When you change any of those settings, the rest of the connected components reflect those changes.
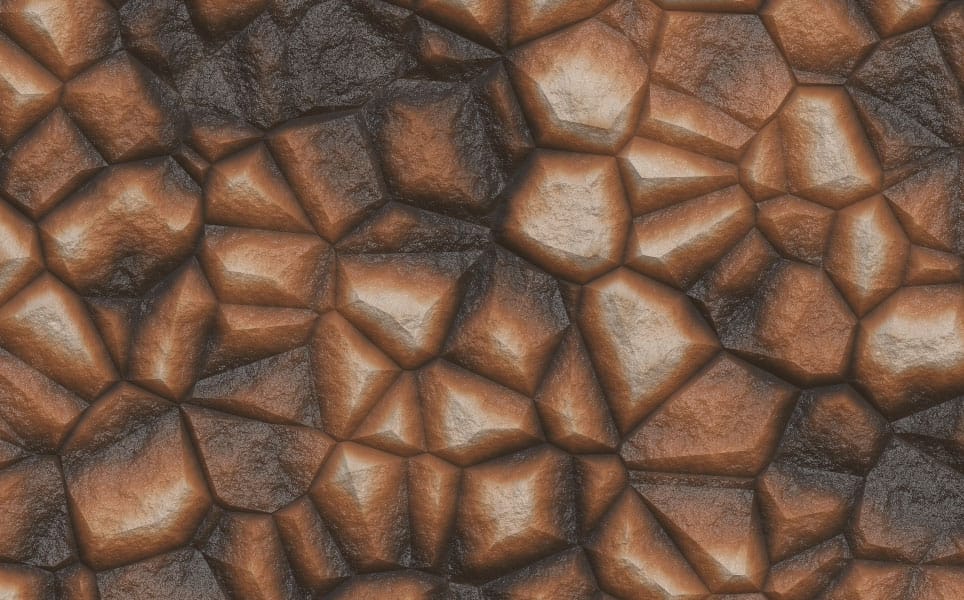
With Filter Forge you can create images effects (called Simple Filters) to modify an existing image or totally new textures (called Surfaces) to apply over a blank document or a layer. In this tutorial I will show you how to create this texture:
So, let’s choose Surface from the Filter Type pull down menu at the left of the screen. You will notice that the small rectangle now shows some different options with green dots on their right side. These dots are present in all components and are used to connect each option with another component. This Component is called the Result component and it is the last component of the whole chain of components.
Adding Components to the Work Area
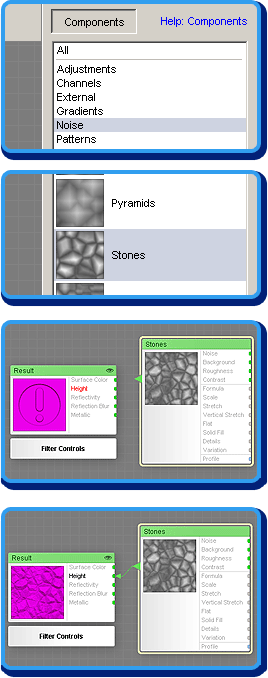 |
Step 1: Go to the top frame of the Components list and select Noise. A list of different noises will appear on the bottom frame of the list. Step 2: Now double click on Stones. Another rectangle will be placed in the work area and probably it will block the existing rectangle Step 3: Move the Stones component to the right side of the Result component Step 4: Click and drag on the green arrow of the Stones component and drag to the Height parameter of the Result component. |
And now you have successfully connected your first two components. The preview window at the top left corner of the screen will show a preview of the selected component. Click on each of the two components and the preview will be displayed. Also, each time you click on a component, that component’s settings are displayed at the left of the screen. Keep an eye on that window always!
As you can see, the Result rectangle has five settings. The first two are the most important because they control the Surface color and the relief (Height) of the texture. Every component that ends up linked to the Height parameter, will be shown as a relief. Very much alike as an emboss but better and more realistic.
The other settings of the Result rectangle are related to the texture’s reflection properties.
Constructing the relief of the texture
So, now we have to start tweaking the Stones and start adding more components to build our wet and muddy rock ground texture.
As you can see in the current state, the rocks have no roughness, they are totally flat like a crystal surface. The best way to add a rock alike roughness is to mix this Stones texture with a Perlin Noise texture, commonly known as Clouds effect.
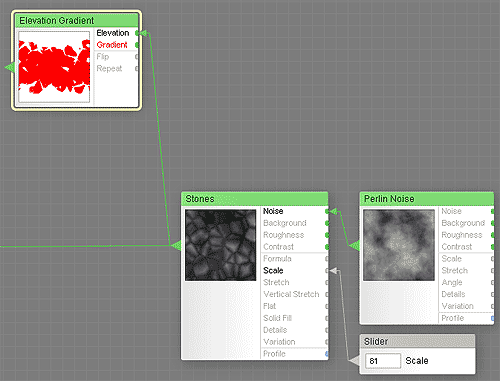
From the same list that we selected the Stones, double click on the Perlin Noise icon and it will appear on the working area. Move that rectangle to the right of the Stones rectangle. Then, clicking on the green arrow, connect it to the Noise setting of the Stones component. It is hard to explain in written words, but it is very easy to do. You will also have to start panning and zooming in or out the work area to work with the components diagram.
Next, select from the components list the Controls subcategory, and a list of Controls will replace the list of the Noise components. Then, double click on the Slider icon and place it below the Perlin Noise. Check the images below to see how they should be connected and the settings you have to enter for each component.
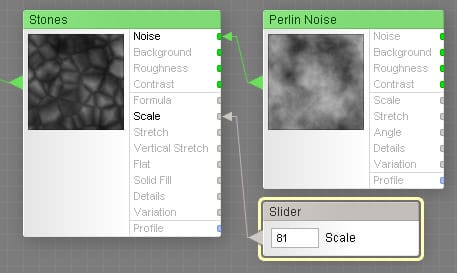
Now click on each component and enter the settings you see in the image below:
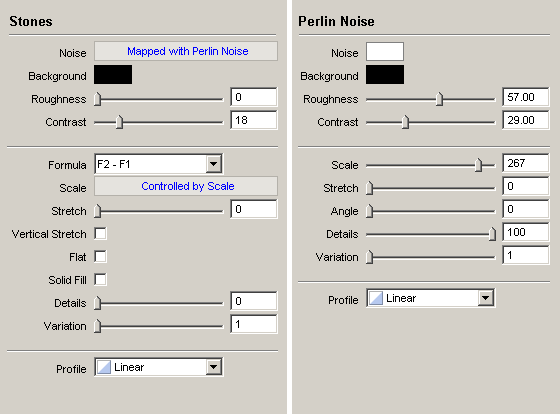
In the Stones settings you can see that two of the controls are replaced with the following references: “Mapped with Noise” and “Controlled by scale”. This is the way Filter Forge shows when a setting is connected to a component.
Select the Slider, name it Scale, enter 81 in the Value field and leave Use Remapping unchecked.
But, why do we use Controls such as Sliders if we can enter that value in each component’s settings window?
Just because each time you use a Control component you are telling Filter Forge to show that control in the finished filter interface. This way you can decide which parameters the users can modify when using your filter.
In this case, we are making the rocks scale parameter adjustable by the end user. If you don’t want that, then delete the Slider component and enter 81 directly in the Scale parameter of the Stones component.
Adding color to the texture
This is what we’ve done so far: We created a new Surface Filter. We added a Stones noise as the base of the texture. Since it was flat and dull, we disturbed it with Perlin Noise to add roughness to the rocks. Last, we created a Scale Slide control to let the end user change that value in the finished filter interface.
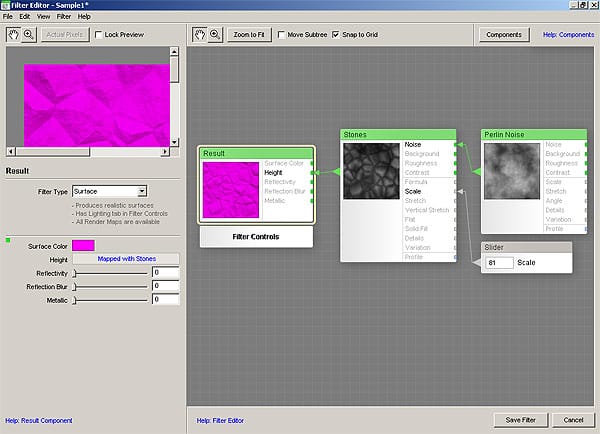
The image below shows the state of the Filter Editor window. Notice that I’m using a Magenta color that is the default color in my Filter Forge installation. Perhaps you will see a different color.
Also, notice that there is no components pane in this window. You can toggle it on or off using the Components button at the top right of the screen.
We’ve created the texture relief so far. No matter what color you choose in the Results rectangle, it will be applied as a single color all over the surface and will make it far from realistic. It is time to do some magic with the components.
To make this texture realistic we have to apply a color scheme over the rocks. This color scheme has to be of a random or uneven appearance as it is in nature. There are several ways to do that, and each one will result in a different color distribution. In this case we will use the Elevation Gradient component. This component works like the Gradient Map Layer effect in Photoshop. It uses a grayscale image and colorizes it using a gradient. So, each level of gray will be replaced by one color of a gradient.
Lets start with the coloring phase. Go to the components list and select Gradients. Then double click on the Elevation Gradient icon. The component will appear in the working area. Move this component above the Stones component.
The first two settings of this components are: 1) Elevation and 2) Gradient. The Elevation setting is the one that has to be connected to a grayscale map and the Gradient setting has to be connected to a gradient.
Most of the times, the easiest and safest way is to connect the Height map of the texture to the Elevation setting of the Elevation Gradient. In this case we will connect the Stones component to the Elevation setting. You can connect a single component to several other components just by clicking on the green arrow and dragging it to another component. The green arrow will show two lines coming out of it.
If you are lost, see the picture below to see how everything is connected.
See how the Stones component is connected to both the Results rectangle (out of the image) and to the Elevation Gradient rectangle.
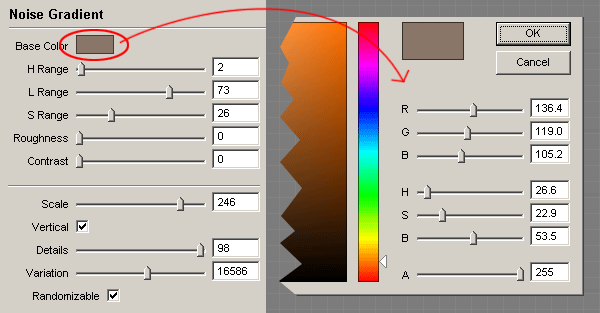
Now lets add some color to the Elevation Gradient. Select Gradients from the components list and then double click on the Noise Gradient icon. Align the component to the right of the Elevation Gradient rectangle and connect it to the Gradient setting.
I hope you are getting used to this component manipulation thing by now.
Creating a noise gradient is a bit long to explain, so I will skip that part and will show you the settings I chose for this Noise Gradient:
Make sure that you have connected the Noise Gradient to the Gradient setting of the Elevation Map.

After that, connect the Elevation Map to the Color setting of the Result rectangle and there you are! A nice rock ground.
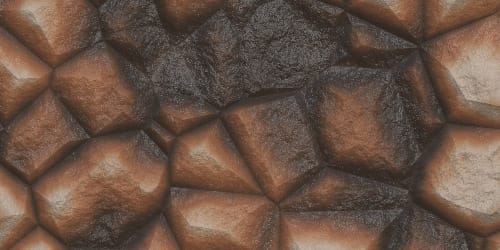
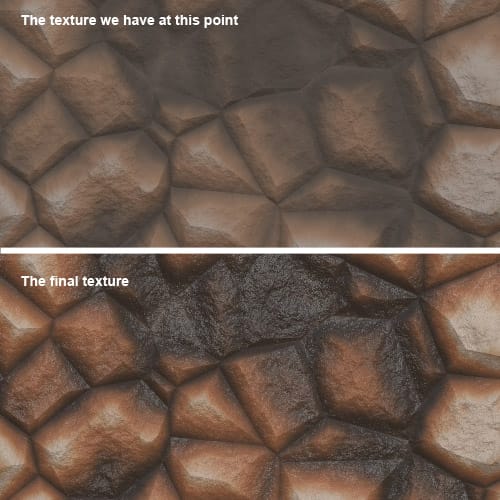
Quite good, isn’t it? But we are not finished. We will add some reflection to make it look wet, and also we will give it a more dramatic look to it. Check the image below to see what we have so far:
Adding reflections and drama to the texture
Adding reflections is very easy: Click on the Results rectangle and on the left side of the screen you will notice two sliders:
- Reflection.
- Reflection Blur.
Set the Reflection slider to 100 and the Reflection blur to 78. This gives the texture a wet and muddy look.
To add more drama to the texture, we will use an old Photoshop trick. The trick goes this way:
- You have an image or photograph.
- Then you copy the image into another layer above the original one.
- Then you set the Layer blending to Overlay. The image now has an enhanced illumination and more contrast. The overall contrast, lighting and saturation gives the image a dramatic look.
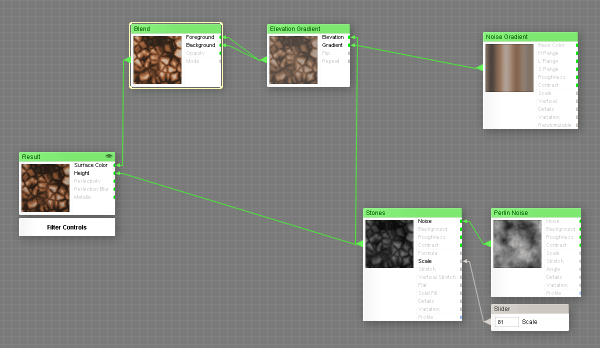
So now we will do the same to this texture. Go to the components list and select Operations. Then double click on the Blend icon and align it in front (to the left) of the Elevation Map rectangle.
Disconnect the Elevation Map from the Result rectangle. To disconnect it you have to drag the arrow away from the Surface Color settings of the Result rectangle and both components will be disconnected.
Then, connect the Elevation Map twice to the Blend rectangle. Once to the Background setting and the second one to the foreground setting.
Click on the Blend rectangle and go to the settings on the left side of the screen. Set the opacity to 100 (no transparency between the foreground and background) and the Mode to Overlay.
And the final touch: Connect the Blend Map to the Results component and we are done!
The image below illustrates the final diagram of the filter.
Press the Save Filter button at the bottom right of the screen and you will be returned to Filter Forge’s main window. There you will be able to see the final rendered texture in a much bigger preview and you will also be able to play with the settings. In this case, as the image below shows, the only setting we left for the end user is the Scale setting. The other settings you see, are default for every filter.
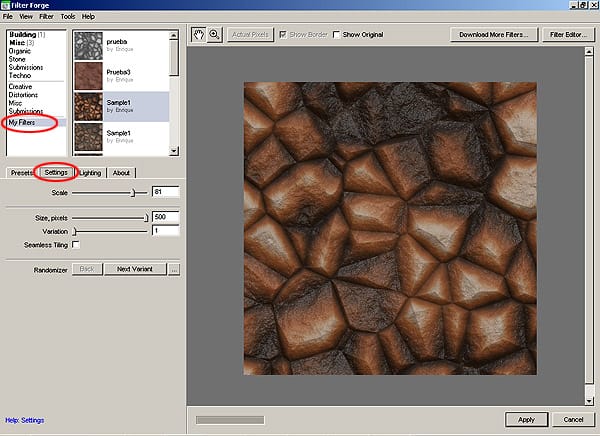
It is important to notice the differences between the Scale slider and the Size pixels slider. Due to the way we constructed the texture, the Scale slider controls the rocks size ONLY. The color map remains the same scale, so if you make changes to the Scale of the texture, you will get a different colorization which results in a different texture.
If you want to change the overall scale of the texture (color map and image at the same time) you can use the Size pixels slider.
The Variations slider is used to apply randomness to the texture, but be aware that the original concept will be lost.
The Seamless tiling checkbox is, perhaps, one of the most useful controls. It converts any texture into a seamless tile to create infinite patterns.
After making all the settings modifications you wanted, press the Apply button at the bottom right of the screen and your finished texture will be applied to your Photoshop document.


