ADVERTISING
There is plenty of software to build virtual Lego models with your Mac or PC. These applications use properly defined Lego parts data in the form of 3d objects to help you create a lego scene or instruction booklet of a Lego model. Just for fun, I decided to render some of those bricks and turn them into Photoshop brushes.
These are the programs I used : LDraw (not exactly a program but it is long to explain), MLCad (to distribute a group of bricks all over a virtual floor), L3P and L3PAO (to translate MLCad file into a POVRay file) and POVRay (to render the scene). These applications are free, but they are somewhat difficult to use if you are technically challenged.
After rendering the scene, I opened it with Adobe Photoshop and started to create each brush.
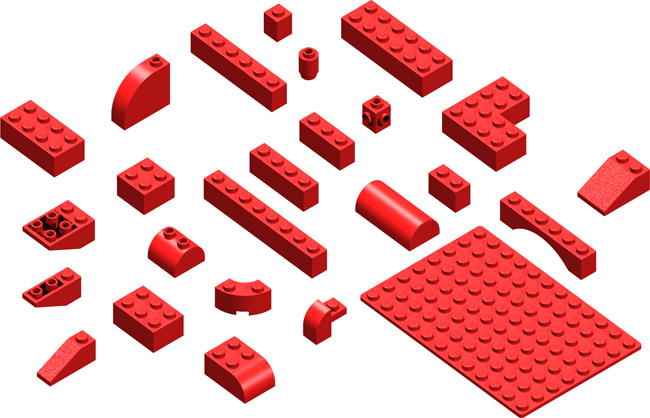
Base image of rendered Lego Bricks
This is a low resolution version of the original image. Download the high resolution Lego bricks image here.
The process of creating the Photoshop brushes
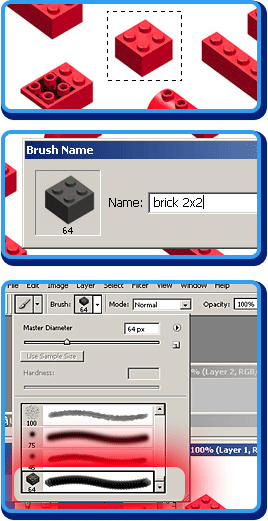 |
Step 1Using the marquee tool, select a brick Step 2Go to: EDIT > DEFINE BRUSH PRESET…, type in the brush name and press OK Step 3Select the brush tool from the tool palette. Then go to the brushes pulldown menu at the top of the screen and check at the bottom of the brushes list to see the newly added brush tip. |
Installing the Lego Bricks brushes
Following the steps mentioned above, I created two high resolution versions of the Lego bricks brushes: A normal set and a negative set. Download the Lego bricks Photoshop brushes here.
There are many ways to install a set of brushes in Photoshop. I will show you only one. This method will append the brushes to the current list, instead of replacing them.
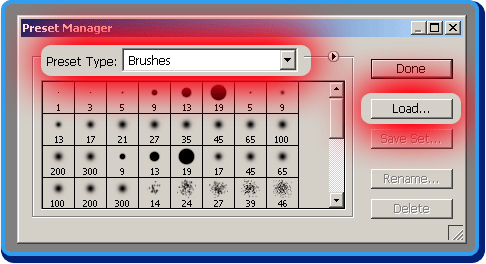
Go to EDIT > PRESETS MANAGER and choose Brushes in the Presets pulldown menu. After that, the current set of brushes will show. Then, click on the LOAD button and select the set of brushes you want to install. As mentioned before, the new set will be added to the current set.
Painting with the Lego Bricks brushes
The difference between the two sets of brushes is how they paint according to the background. The process of creating the negative version although easy at first sight is a bit more tricky. Since it involves the usage of the rendering program, it is beyond the scope of this tutorial to teach you that process.
Just download the already built sets and concentrate on how you can use them to create different effects.
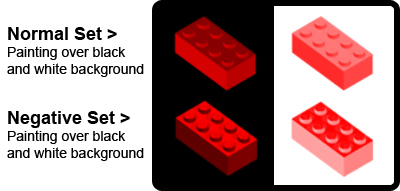
The normal set will paint a washed out brick like some sort of “Andy Warhol” illustration. The negative set, when used on a dark background, will paint a near exact version of the rendered brick.
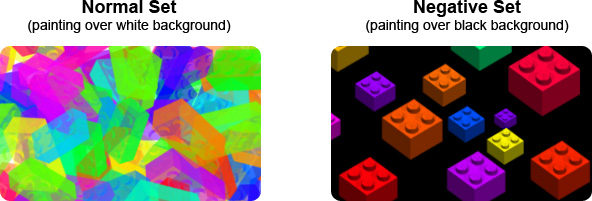
Due to the transparent nature of Photoshop brushes, in the image on the left I intentionally superimposed the bricks to create an interesting effect, while on the right image, I took care of leaving enough space between bricks to create a more realistic composition.
Playing with brushes settings
Now the fun part begins. Using the presets control palette (see image below) you can customize the way the brush tool paints.
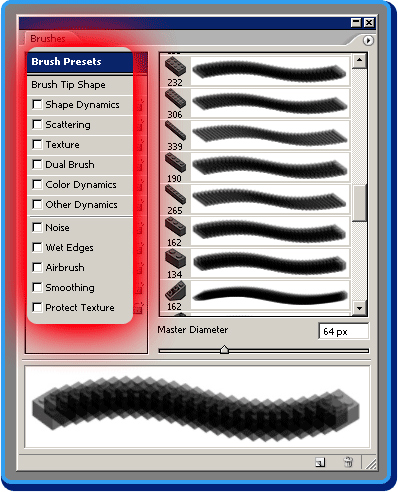
The following chart will show you how to achieve interesting effects just by tweaking a couple of basic settings. Play with these settings and explore new ones to make the most from this powerful tool
 |
< Brush Tip Shape: Diameter: 65px Since we are using a high resolution brush, we lower the original size for this example. < Brush Tip Shape: Spacing: 71%. This setting controls the brush tip spacing within a single stroke. < Shape Dynamics Size Jitter: 100%. The brick changes its size randomly within the same stroke. < Shape Dynamics Angle Jitter: 100%. Flip X Jitter & Flip Y Jitter: Checked. We rotate and flip the brick to give a more natural look (lighting is incorrect, but that’s not much of a problem). < Scattering Scatter: 300%. This setting gives a chaotic look to the stroke < Color Dynamics Hue Jitter: 100%. Purity: 100%. Now the best part. Using Color Dynamics controls you can have random colors without changing the foreground color in the tool palette. < Color Dynamics. Brightness Jitter : 100%. Randomly changing the brightness can give you more depth. Try different combinations to avoid a “dirty” or “unsaturated” look to your bricks.
|
Paint with real Lego colors
Although this may seem somewhat geeky, besides using brushes based on real Lego bricks, you can also paint with official Lego colors. Just check this color table from Peeron and start painting
If you liked this article please leave a comment below. I will probably soon be building more brushes with Lego minifigs or other themes like Lego Technic or Lego Bionicle.

