

For those who never heard about it, Relief Shading is a cartography rendering technique where a three dimensional appearance is given to the topography of a map. The execution of this technique is quite complex and it is usually achieved using special map rendering software.
Despite of that, many articles have been written about Relief Shading in Photoshop. These articles are somewhat complex and are usually directed to cartographers and map artists. That’s because they use very precise topological data and any change in the representation can result in misleading cartographic information.
This tutorial will attempt to bring Shaded Relief to the rest of us who sometimes need to create a fancy map for a brochure or a terrain for a video or board game without the need of an exact topological data representation.
Some examples of maps created with Shaded Relief technique
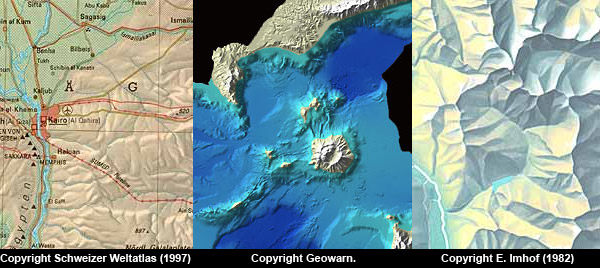
The images above belong to ReliefShading.com web site.
Initial step: Obtaining the elevation data of the map
In the case that you have to render an existing location, the first thing you have to do is to get the elevation data of the map, which is know as DEM (Digital Elevation Map).
Currently, Adobe Photoshop can’t open DEM files directly. You have to open them as RAW files. Of course, you have to know the size of the image and other information to do so.
DEM files are available all over the net but they are mostly commercial. Of course, there are lots of free resources which are mainly from .gov web sites. The problem with DEMs is that they are available in many different formats and they are huge 16bit files. So, you’ll have to make a research for the map you are looking for and ask how it can be opened with Adobe Photoshop.
Luckily there is an easier and free way to obtain ready to use DEM maps using the USCG seamless data distribution online application, but I will explain that at the end of this article. For this tutorial, I will use the following image I extracted from that application. Don’t worry about the location. For this example it is not important to be precise with the real geography, we’ll just concentrate in the relief of the map. I’ve even retouched the image to make the water bodies and rivers more visible.
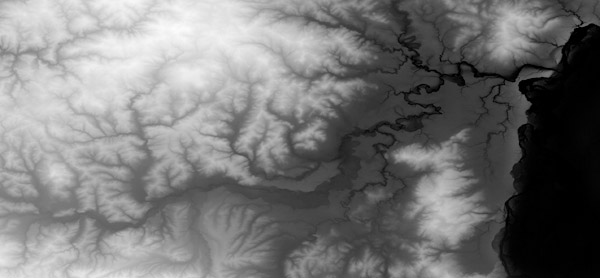
In this image, each shade of gray represents a height in the final rendered map, being white the highest height and black the lowest height. In fact, any grayscale image can be used as a Digital Elevation Map. It is just that real height maps look better than faked height maps, unless you are trying to achieve a “unreal” look.
Creating the relief map
Creating a map with relief shading is by no means an automated task you can perform using a Photoshop Action. This process involves lots of retouching and color correction man hours. Nevertheless, the most difficult part of this process (the map relief itself) will be created using a plugin bundled with Photoshop: Lighting Effects. Download the example image, open it in Photoshop and make sure that it is in RGB format. Now, lets start to create the map relief:

Step 1
Select the image (CTRL/COMMAND+A) and copy it to the clipboard (CTRL/COMMAND+C).
Step 2
Go to channels palette and create a new empty channel (click on the new channel icon, the one marked in red) without changing the default settings. Paste (CTRL/COMMAND+V) the image inside the newly created channel. Click on the RGB channel and return to the Layers Palette.
Step 3
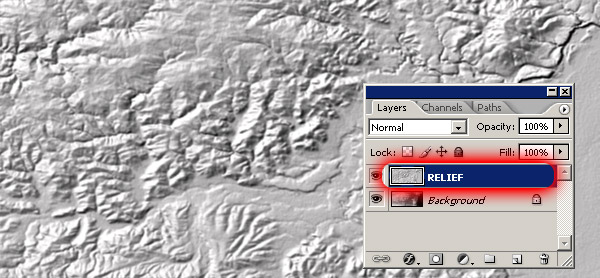
Create a new layer. Fill it with white and rename it RELIEF.
Now that we have everything set up lets create the relief with the Lighting Effects plugin. Go to FILTER > RENDER > LIGHTING EFFECTS…

The Lighting Effects plugin has a powerful feature that allows us to create relief (commonly known as bumps) in an image using an alpha channel. In this case we will be using the previously created Alpha channel where the a copy of the height map lies. Lighting Effects plugin will use this elevation information to create the relief. Be prepared to repeat this process several times until you get exactly what you want. But for this first time you will be doing fine by using the same settings shown in the image above.
Just a quick tip: Adjust the light position so it is pointing from the upper left corner to the middle of the image with an approximate angle of -135 degrees and modify the distance until the image shows something like an overall 50% gray tone with highlights and shadows on the relief part. Click OK and we are done!
Adding color to the Map
The relief shaded image we created looks pretty dull without any color on it. When creating a map, the chosen color scheme is very important. Cartographers use lots of color schemes to represent regions, population, topology, urban concentrations, transportation and more. In this case we will concentrate in only one color scheme: the Hypsometric color palette. Check the mini guide at the end of this tutorial for more information on other color schemes.
The Hypsometric color palette uses colors to represent the elevation of the map, just like the DEM map we used as a base of this tutorial, but instead of using a grayscale palette, we use a color (Hypsometric) palette to represent different heights.
Using Hypsometric color palette
Step 1
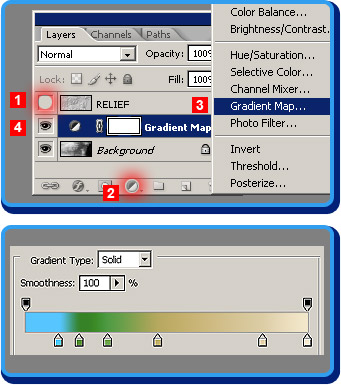
1 – Make the RELIEF layer invisible and click on the BACKGROND layer
2 – Click on the ADJUSTMENT LAYERS icon.
3 – Select GRADIENT MAP from the pop up menu
4 – A new layer will be inserted and the GRADIENT MAP window will open.
Click on the gradient and and the GRADIENT EDITOR will open.
Step 2
In the GRADIENT EDITOR window reproduce the gradient on the right. Try to copy it as accurately as you can. Concentrate more on the position of the arrows than on the exact color. After that, press the NEW button to add the gradient to the list. Then, press OK. If you know how to load a gradient, then download this gradient here and install it.
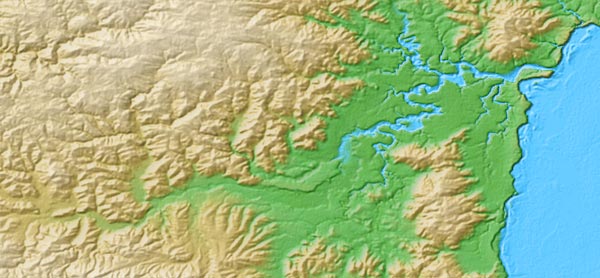
After creating or loading the gradient, your image should look like this one below. Remember that Hypsometric colors are used to represent heights, not nature. But in this case, this Hypsometric palette intentionally tries to simulate the natural colors of a imaginary topography. Notice how the light blue simulates the water, the green colors simulate the vegetation in the plains, and the brown colors represent the mountainous topography.

Now the best part. Make the RELIEF layer visible, and choose LUMINOSITY as the layer blending type and voila! we have a shaded relief map.

But the map doesn’t look that good. So lets make some adjustments. Change the RELIEF layer opacity to 50% and apply the SHARPEN filter (FILTERS > SHARPEN > SHARPEN) to the RELIEF layer once. Now things look much much better.
To finish the map, I made some manual retouching, specially in the rivers, shore and sea, and added a frame to make it look as a printed map.

I wanted to keep the whole process free of external applications, but I can recommend you to take a look at AufoFX Crease Plugin to give the map a “folded” look. Also, AvBros PageCurl Pro can add some magic to the final image.
Relief Shading resources
With this tutorial we only scratched the surface of this technique. To be honest, this was just an example showing how to create a good looking map, but that’s all. There was no precision in the application of color, there was little care on how the topography was rendered, and the elevation data was totally modified to fit the needs of the tutorial. So, if you want to get serious in this subject, take a look at these resources:
» Shaded Relief, a web site with lots of information and tutorials about relief shading. I was inspired by this article to write this tutorial. Other great web site is Relief Shading, with lots of detailed information and great images. This post on the Carto Talk forums is illustrative about the steps of creating a map with shaded relief
» If you need to render a map from a specific location, free data can be obtained in the USCG seamless data distribution online application, just read this tutorial to know how to work with it.
» No serious cartographer can’t do Relief Shading only with Adobe Photoshop for this task. Take a look at these Relief Shading software comparison tables. It is was compiled in year 2002, but it is a good starting point.
» Feel like reading? Then these two books will keep you busy: Elements of Cartography and Mapping Hacks: Tips & Tools for Electronic Cartography. Also, take a look at this huge Cartography books listing.
» Some fonts and symbols: Linotype Carta and Pixymbols USmap.
» Are you artistically challenged or lazy? Take a look at these stock maps and maps posters.
That’s all. If you liked this tutorial or have any questions, please leave a comment and share it with others using the social bookmarks links below.


