Dripping Paint Effect in Photoshop

Dripping Paint Effect in Photoshop

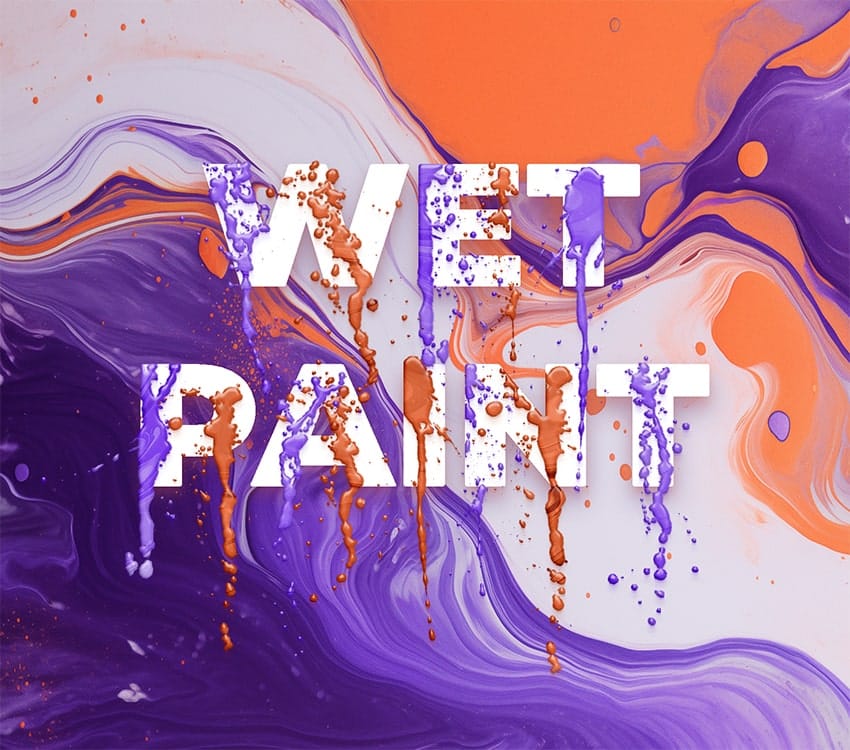
Unleash a captivating visual aesthetic by learning how to create a dynamic dripping paint effect in Photoshop. This technique transforms ordinary text and logos into artistic, fluid designs that command attention. Discover a unique method that relies on Photoshop's powerful filters, rather than traditional hand-painting.

This tutorial provides a step-by-step guide to achieve this stunning effect, enabling you to apply it to various design projects. Elevate your creative work with a professional touch that looks intricate but is surprisingly easy to master.

Watch the Video

Video by Texturelabs. Any links or downloads mentioned by the creator are available only on YouTube

Understanding the Displace Filter for Creative Effects

The foundation of this unique dripping paint effect lies in the intelligent application of Photoshop's Displace filter. This powerful tool uses a separate image, known as a displacement map, to distort the main artwork. By carefully crafting this map, designers can achieve highly specific and controlled distortions, creating the illusion of fluidity and movement. The key is to understand how grayscale values in the map influence the direction and intensity of the displacement.

This method allows for a procedural approach to design, where effects are generated through a series of filter applications rather than manual drawing. It opens up possibilities for creating complex visual textures and transformations that are easily repeatable and adjustable. The technique emphasizes a systematic workflow, ensuring consistent and professional results across different projects.

  • Displace Filter: Core engine for image distortion.
  • Displacement Map: A separate image dictating distortion.
  • Grayscale Values: Determine distortion direction and intensity.
  • Procedural Design: Filter-based creation for complex effects.
  • Repeatable Results: Achieve consistent output with systematic steps.

Practical Tips for Dripping Paint Effects

  • Set default colors before applying the Fibers filter by pressing D, as the filter generates its look based on current foreground and background colors.
  • Convert the displacement map background to a Smart Object to keep filters live, allowing for non-destructive adjustments later.
  • Use 50% gray values in your displacement map to ensure no distortion, as only darker values push the image in one direction (downward for drips).
  • Reapply the Displace filter multiple times using Command/Control + F to build up the dripping effect and create intricate details.
  • Invert the selection of the original text layer (Command/Control + Shift + I) to apply filters like Wave only to the drips, preserving the main text.

Explore additional resources to further enhance your skills in creating dynamic and artistic paint-related effects in Photoshop.

How to create a dripping paint text effect in Photoshop
In this tutorial, you will discover how to create a striking paint-dripping effect using Adobe Photoshop. This guide breaks down the process into clear, manageable steps, making it easy for you to follow along, regardless of your skill level. First, you will start by preparing the base image, where you will add the paint element. Then, you’ll learn how to manipulate and position the paint to achieve the desired dripping effect. Each step includes helpful tips and tricks to enhance your work. F
Colorful Painted 3D Text Effect Tutorial in Photoshop
In this tutorial by Angelo Konofaos, you'll explore how to create a 3D-style text effect in Photoshop, alongside techniques like adding shadows, highlights, shines, and colors. Utilizing a variety of Photoshop tools such as the Mixer Brush, Pen Tool, clipping masks, and adjustment layers, the tutorial demonstrates the process of refining text to achieve a polished and dimensional look. For optimal results, Konofaos recommends using a pen tablet like the Wacom Intuos to enhance precision and fl
Create a Paint Splash Effect in Photoshop
In her visually striking conceptual portraits, Natalia Seth (@escapingyouth on Instagram) often incorporates a mesmerizing paint splash effect. In a recent tutorial, the talented artist shared her process, guiding viewers step-by-step through the creation of this captivating technique. Natalia begins by capturing dynamic photos of paint splatters, carefully selecting the best moments to layer into her portrait compositions. Through strategic adjustments of color and light, she masterfully blend
Grungy Ink Bleed Text Effect Tutorial in Photoshop
Street art and underground design capture attention through their raw, imperfect textures that feel authentic and rebellious. The ink bleed effect transforms clean typography into something that appears weathered and organic, as if ink has spread naturally on wet paper. This technique combines blur effects with texture overlays to create text that looks genuinely distressed and handcrafted, perfect for urban-themed designs, band merchandise, or any project needing gritty character. Watch the

Get tutorials & freebies delivered to you.

Subscribe to the Photoshop Roadmap newsletter, a weekly roundup of new tutorials, insights and quality downloads, trusted by 6500+ readers.

You might also like

Create Realistic Rim Light Effects on Portraits in Photoshop

Rim lighting transforms ordinary portraits into dramatic, professional-looking images by adding bright highlights around the edges of your subject. This technique simulates light hitting the outer contours of a person, making them stand out from their background with a natural, glowing effect. The key to convincing rim light lies in...

How to Use Photoshop's Layer Cleanup Tool to Organize Messy Projects

Complex editing projects with Generative Fill and Expand often result in dozens of unnamed layers cluttering your workspace. The new Layer Cleanup tool automates the tedious process of renaming layers and removing empty ones, transforming chaotic layer panels into organized, manageable structures. This workflow improvement saves significant time during post-production...

How to Use Curves for Composite Color Matching in Photoshop

Curves adjustments are essential for making composite elements look natural and cohesive. Understanding how curves manipulate light values and color channels gives you precise control over matching different elements to their new backgrounds. The key to successful color matching lies in analyzing the color temperature and brightness relationships between your...

How to Fix Color Fringing in Subject Cutouts Using Clipping Masks

Perfect layer masks can still produce disappointing results when color fringing appears around hair and fur edges. This common problem isn't caused by poor masking technique—it's the original background bleeding through at the edges. Clipping masks offer a powerful solution by allowing you to paint...

Create Beautiful Floral Oval Frames for Portraits in Photoshop

Transform ordinary portraits into elegant artwork with decorative floral oval frames that blend seamlessly with your subject. This technique combines traditional framing with digital floral elements, creating a painterly effect that's perfect for fine art prints and creative portraits. The process involves creating an oval cutout, adding custom...

You’ve successfully subscribed to Photoshop Roadmap
Welcome back! You’ve successfully signed in.
Great! You’ve successfully signed up.
Success! Your email is updated.
Your link has expired
Success! Check your email for magic link to sign-in.