How To Easily Change The Sky In Photoshop

How To Easily Change The Sky In Photoshop

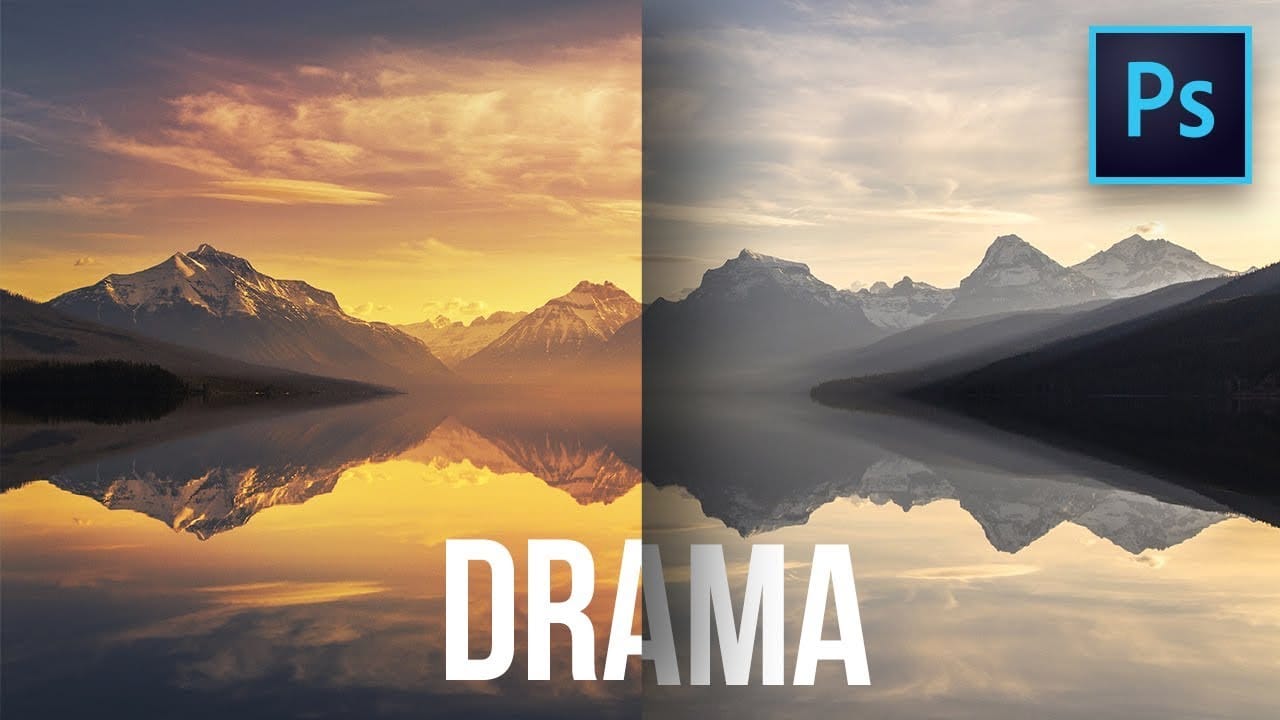
Transforming the mood and visual impact of a photograph often begins with its sky. A drab or overexposed sky can diminish the overall appeal of an otherwise great image, leaving it feeling flat or uninspired. Replacing the sky can dramatically enhance the scene, introducing vibrant colors, dramatic clouds, or a serene atmosphere.

This tutorial provides a straightforward method for updating skies in Photoshop, allowing creators to effortlessly blend new atmospheric elements into their photos. It simplifies a complex editing task, ensuring cohesive and visually stunning results for any landscape or outdoor scene.

Watch the Video

Video by Brendan Williams. Any links or downloads mentioned by the creator are available only on YouTube

Enhancing Visual Cohesion with Sky Adjustments

The sky plays a critical role in establishing the overall tone and lighting of an image. When replacing a sky, careful consideration of how the new element integrates with the existing foreground is essential for maintaining visual cohesion. Simply swapping out one sky for another can result in an artificial appearance if not properly adjusted for lighting, color, and perspective.

Photoshop's sky replacement features go beyond mere substitution, offering tools to refine the blend between the new sky and the original scene. Parameters such as brightness, temperature, and scale allow for fine-tuning the sky's appearance to match the ambient conditions of the original photo. Furthermore, adjustments can be made to the foreground to reflect the new sky's light and color, enhancing the sense of realism.

Successfully integrating a new sky means addressing subtle details like reflections in water, which are not automatically generated by the primary tool. Manual adjustments for reflections and blurring can significantly improve the realism, ensuring that the entire image feels unified rather than a composite of disparate elements. This attention to detail elevates the quality of the final composite, making the transformation truly seamless.

Practical Tips for Sky Replacement

  • Use the Sky Replacement tool under the Edit menu for automated sky selection and replacement, saving time on manual masking.
  • Refine sky edges with the Shift Edge and Fade Edge sliders to improve the mask's blend, especially around intricate details.
  • Adjust sky brightness and temperature to match the original photo's lighting and mood for a cohesive look.
  • Set the output to New Layers in the Sky Replacement panel to retain editable adjustment layers for further customization.
  • Manually create reflections in water by duplicating the sky layer, flipping it vertically, and applying a perspective transform and blur for realism.

Explore more resources and techniques for transforming your images by mastering sky replacement in various scenarios.

Add clouds to a sky in Photoshop
In this Photoshop tutorial by Phlearn, you’ll learn how to replace the sky in an image, ensuring it complements the original photo in terms of color, contrast, and tone. Start by using the Move Tool to drag and drop the new sky onto your image, then turn off the layer. Select the old sky using a selection tool like the Magic Wand Tool. Once the selection is refined, turn the new sky layer back on and click the Layer Mask button to mask in just the sky. Unlink the layer from its mask to position
Use Simple Selection Tools to Replace a Sky in Photoshop
In this tutorial, Aaron Nace demonstrates how to effectively use basic selection tools in Photoshop to replace the sky in landscape photos. Selections are crucial for isolating specific areas in your image, and this tutorial breaks down their fundamental functions and applications. Aaron guides you through the process of making precise selections to isolate the sky from the rest of the image. He then shows you how to seamlessly replace it with a new sky, enhancing the overall mood and impact of
Learn how to replace the sky in a landscape photo
Photography often presents challenges with lighting conditions, especially when a bright sky overexposes and loses detail. Replacing a sky can dramatically transform the mood and visual impact of an image, turning a washed-out scene into a captivating landscape. This video tutorial demonstrates a comprehensive method for replacing a sky in Photoshop, guiding viewers through the process of selecting, refining, and integrating a new, vibrant blue sky complete with custom-rendered clouds. Watch
Create colorful dramatic skies with a simple blending trick in Photoshop
In this Photoshop tutorial by Unmesh Dinda from PiXimperfect you will learn how to extract amazing details from the sky, bring out the clouds, and add brilliant colors just using the Blend If sliders in Photoshop. Learn how to add drama, mood, and details to your skies by utilizing the power of Blending Options, Blend Modes, and Layers. In this video, we will simply paint the sky with the colors we desire and the details will simply follow. Whether you want to add the colorful sunset lights or

Get tutorials & freebies delivered to you.

Subscribe to the Photoshop Roadmap newsletter, a weekly roundup of new tutorials, insights and quality downloads, trusted by 6500+ readers.

You might also like

How to Use the New Color, Clarity, Dehaze, and Grain Adjustment Layers in Photoshop

Three powerful new adjustment layers bring Camera Raw's most popular tools directly into your layers panel. Color and Vibrance, Clarity and Dehaze, and Grain adjustments now work as standard adjustment layers with full masking capabilities and non-destructive editing. These tools eliminate the need for smart objects when applying...

How to Apply Patterns and Tattoos to Skin in Photoshop

Creating realistic skin patterns and tattoos requires more than simply overlaying images onto photographs. The key lies in using proper blending techniques and layer settings to make decorative elements appear naturally integrated with skin texture. This technique works for everything from Japanese kintsugi-inspired cracks to floral tattoo designs, transforming flat...

How to Transform Photos into Digital Paintings Using Photoshop Brushes

Busy backgrounds and photographic detail can overwhelm your artistic vision. This technique shows how to prepare photos for digital painting by strategically overpainting backgrounds and replacing photographic elements with painterly textures. The approach combines subject isolation, textured brush work, and color sampling to create a foundation that bridges photography and...

How to Use Textures for Color Grading in Photoshop

Textures offer a powerful way to color grade images beyond traditional adjustment layers. By layering colored textures with specific blend modes, you can create unique tonal shifts, add visual depth, and achieve artistic looks that standard color correction can't match. This technique works by using the color information...

Complete Guide to Digital Photo Compositing in Photoshop

Creating fantasy digital artwork requires mastering the art of photo compositing, where multiple elements come together to form a cohesive scene. This comprehensive tutorial demonstrates how to build a dramatic composition featuring a wolf and human figure in a mystical nighttime setting. The process covers every aspect of professional compositing,...

Understanding Blend Modes, Curves, Channels, and Fill vs Opacity in Photoshop

Most users cycle through blend modes randomly or avoid the curves panel entirely, missing out on precise control over their edits. These fundamental tools become intuitive once you understand the logic behind their organization and function. This tutorial breaks down four essential concepts that separate casual users from confident editors:...

You’ve successfully subscribed to Photoshop Roadmap
Welcome back! You’ve successfully signed in.
Great! You’ve successfully signed up.
Success! Your email is updated.
Your link has expired
Success! Check your email for magic link to sign-in.