Create a Professional Color Grade in 90 Seconds in Photoshop

Create a Professional Color Grade in 90 Seconds in Photoshop

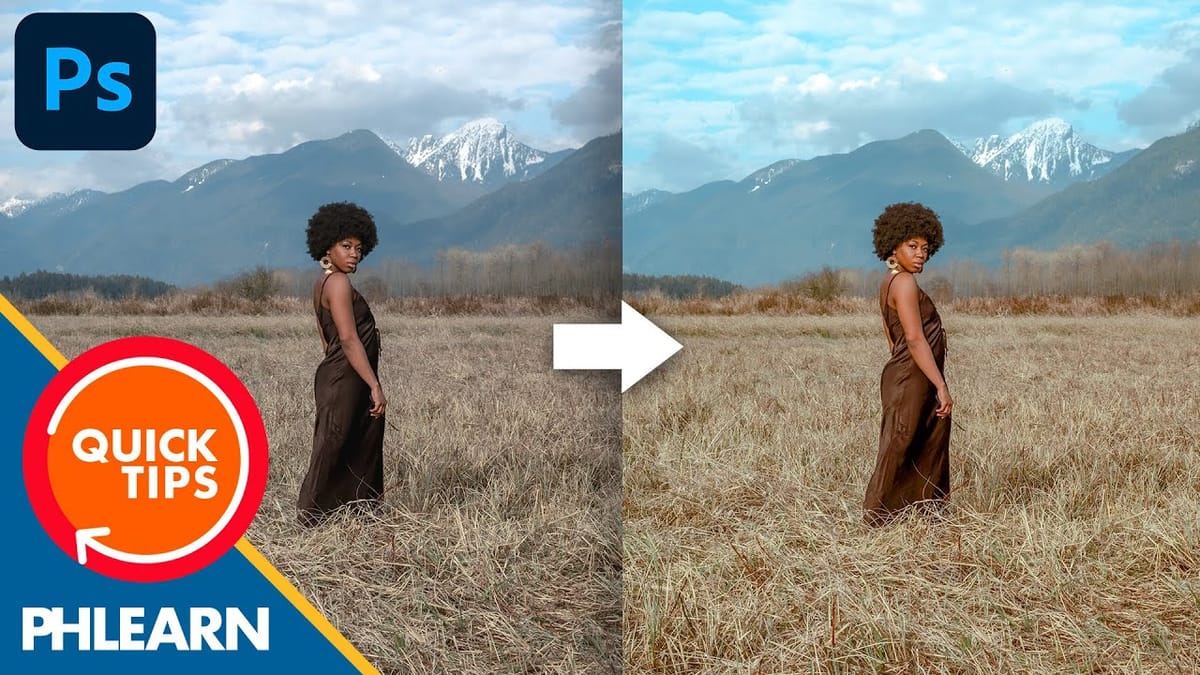
Cinematic color grading transforms ordinary photos into visually compelling narratives, creating mood, directing focus, and enhancing storytelling. This subtle yet powerful technique allows photographers and digital artists to infuse their images with the atmospheric depth and professional finish often seen in film.

In this concise tutorial, you'll discover a rapid workflow for achieving a cinematic color grade directly within Photoshop. The method leverages the powerful Camera Raw filter as a smart filter, giving you precise control over highlights, shadows, midtones, and overall light, all while maintaining the flexibility to adjust settings non-destructively later.

Watch the Video

Video by PiXimperfect. Any links or downloads mentioned by the creator are available only on Youtube

Unlike basic color correction, which aims for technical accuracy, cinematic color grading is an intentional artistic choice designed to evoke specific emotions. It often involves creating a cohesive color palette that can range from cool, desaturated blues to warm, golden hour tones, or complementary contrasts that draw the viewer's eye. The goal is to support the image's narrative or desired atmosphere.

This process frequently relies on manipulating the relationship between the image's tonal ranges—the highlights, midtones, and shadows. By subtly infusing different hues into these distinct areas, you can model the light, enhance depth, and create visual interest that feels deliberate and sophisticated. Mastery involves understanding how color interactions impact perception.

Tools like Photoshop's Camera Raw filter provide a highly efficient playground for this creative work. Its dedicated color grading wheels offer precise control over luminance and hue for each tonal range, enabling complex adjustments that would be difficult and time-consuming using simpler color balance tools. This structured approach is key to achieving a polished, cinematic look efficiently.

Practical Tips for Cinematic Color Grading

  • Duplicate & Convert: Always duplicate your background layer and convert it to a Smart Filters before applying Camera Raw; this preserves the original image and allows for non-destructive editing later.
  • Target Tonal Ranges: Use the dedicated Color Gradingcode> wheels within Camera Raw to separately adjust the hue and luminance of Highlights, Midtones, and Shadows, moving the center circle away from the center point to shift the color.
  • Balance the Amount: Adjust the slider next to each color wheel (Amount) to control the intensity of the color shift for that specific tonal range, ensuring changes remain subtle and believable.
  • Refine Light and Contrast: Navigate to the Light panel to fine-tune overall Contrast, Highlights, and Whites (consider decreasing whites slightly to preserve highlight color detail).
  • Enhance Texture Selectively: If the image benefits from it, a slight increase in Texture within the Effects panel can add definition and clarity without harshness.

More tutorials about color grading

Create a bright and beautiful color grade in Photoshop
Learn how to add a bright and beautiful color grade to your photos with the Camera RAW filter in Photoshop. Great for model photography and landscapes. Download the sample image here… More
One click instantly fixes color in Photoshop
Colin Smith shows another tool that fixes the color of a photo instantly in a single click. This quick photoshop tutorial shows how to make the color natural in photoshop and Lightroom. More
Create painterly backgrounds in Photoshop FAST!
Painting in Photoshop doesn’t have to be so FLAT. Take advantage of color dynamics to add life to your backgrounds – watch this 1-minute video to learn how! More
Clever Color transfer trick in Photoshop for astonishing color grade
Add spectacular color to photographs using this amazing trick Colin Smith discovered by hacking Color transfer in Photoshop 2022. This quick tip will help you color grade photos like a pro, but its so easy and quick. Every photographer will love this. More

Get tutorials & freebies delivered to you.

Subscribe to the Photoshop Roadmap newsletter, a weekly roundup of new tutorials, insights and quality downloads, trusted by 6500+ readers.

You might also like

Create Realistic Rim Light Effects on Portraits in Photoshop

Rim lighting transforms ordinary portraits into dramatic, professional-looking images by adding bright highlights around the edges of your subject. This technique simulates light hitting the outer contours of a person, making them stand out from their background with a natural, glowing effect. The key to convincing rim light lies in...

How to Use Photoshop's Layer Cleanup Tool to Organize Messy Projects

Complex editing projects with Generative Fill and Expand often result in dozens of unnamed layers cluttering your workspace. The new Layer Cleanup tool automates the tedious process of renaming layers and removing empty ones, transforming chaotic layer panels into organized, manageable structures. This workflow improvement saves significant time during post-production...

How to Use Curves for Composite Color Matching in Photoshop

Curves adjustments are essential for making composite elements look natural and cohesive. Understanding how curves manipulate light values and color channels gives you precise control over matching different elements to their new backgrounds. The key to successful color matching lies in analyzing the color temperature and brightness relationships between your...

How to Fix Color Fringing in Subject Cutouts Using Clipping Masks

Perfect layer masks can still produce disappointing results when color fringing appears around hair and fur edges. This common problem isn't caused by poor masking technique—it's the original background bleeding through at the edges. Clipping masks offer a powerful solution by allowing you to paint...

Create Beautiful Floral Oval Frames for Portraits in Photoshop

Transform ordinary portraits into elegant artwork with decorative floral oval frames that blend seamlessly with your subject. This technique combines traditional framing with digital floral elements, creating a painterly effect that's perfect for fine art prints and creative portraits. The process involves creating an oval cutout, adding custom...

You’ve successfully subscribed to Photoshop Roadmap
Welcome back! You’ve successfully signed in.
Great! You’ve successfully signed up.
Success! Your email is updated.
Your link has expired
Success! Check your email for magic link to sign-in.