Creating Complex Colorful Gradients Using Halftone Lines and Gradient Maps in Photoshop

Creating Complex Colorful Gradients Using Halftone Lines and Gradient Maps in Photoshop

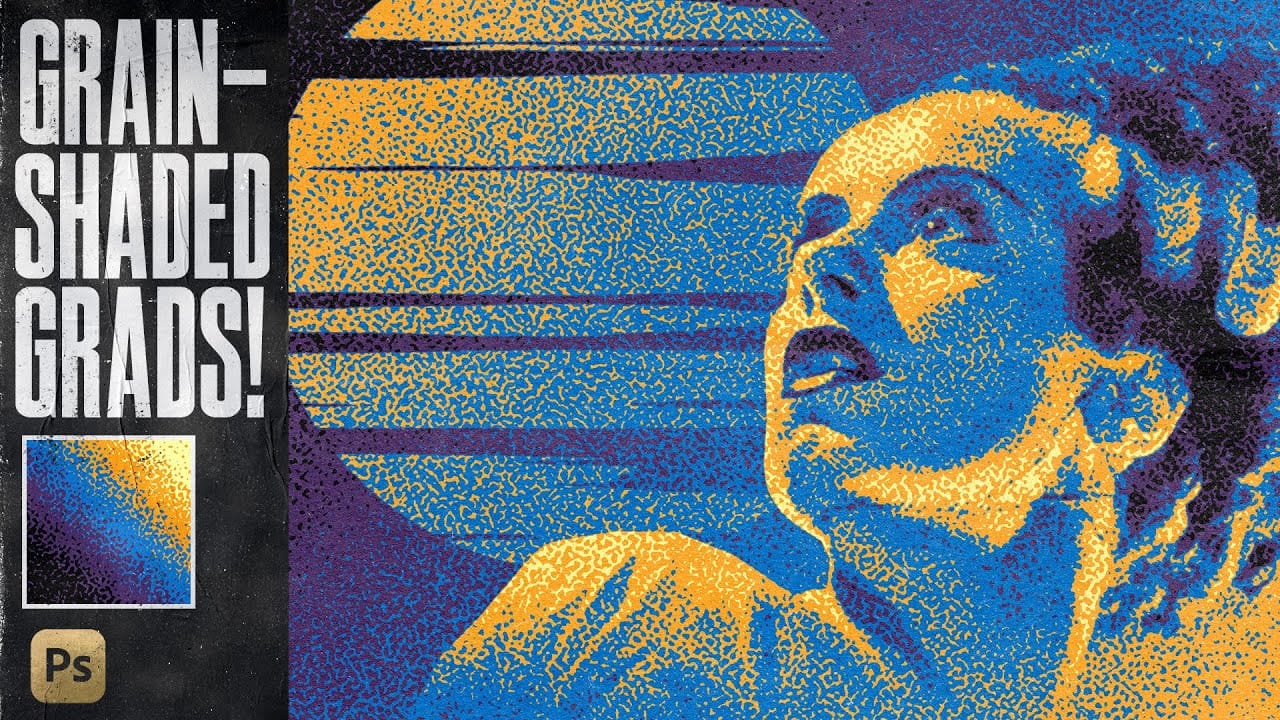
Advanced gradient techniques can transform ordinary portraits into vibrant, stylized artwork that catches the eye immediately. When combined with halftone patterns and noise-based gradient maps, these effects create unexpected color combinations that would be nearly impossible to achieve through traditional methods.

This technique opens up entirely new creative possibilities by leveraging Photoshop's hidden gradient map features to generate randomized, complex color schemes over textured line patterns.

Watch the Tutorial

Video by P A N T E R. Any links or downloads mentioned by the creator are available only on YouTube

Understanding Noise Gradients and Halftone Integration

Traditional gradient maps work with smooth color transitions, but Photoshop's noise gradient option generates randomized color patterns that create entirely different visual effects. This feature has been overlooked by many designers despite its potential for creating unique color schemes that would require extensive manual work to achieve otherwise.

Halftone patterns historically come from print production, where continuous tones were converted into dots of varying sizes to simulate grayscale values. In digital design, these patterns add texture and visual interest while maintaining the underlying image structure. The combination works because:

  • Halftone lines preserve the original image contrast
  • Noise gradients apply complex color mapping to those contrast values
  • The randomization feature generates countless variations instantly

The technique relies on proper contrast adjustment before applying the gradient map, ensuring that the noise colors map correctly to the light and dark areas of the composition.

Practical Tips for Halftone Gradient Effects

  • Use Ctrl+Alt+T then Ctrl+Shift+Alt+T to quickly duplicate halftone lines with consistent spacing
  • Set halftone line opacity to around 30% and blend mode to Hard Light for optimal texture without overwhelming the image
  • Apply Black and White adjustment before gradient mapping to ensure proper contrast distribution
  • Use Selective Color adjustments on whites, neutrals, and blacks to fine-tune contrast before adding the gradient map
  • Click the Randomize button multiple times and use the Inverse option to find the best color combinations for your specific image

More Tutorials About Gradient Effects

Explore additional gradient techniques and creative applications in Photoshop.

Revolutionary Technique: Photoshop's Grain Shaded Gradient Maps
In this tutorial, TextureLabs presents a revolutionary technique to enhance your Photoshop projects using grain-shaded gradient maps. This method offers a fresh approach to creating noise effects that can add depth and interest to your artwork. By utilizing Adjustment Layers, along with specially designed noise patterns and custom gradient presets, you can achieve stunning results. The tutorial walks you through the essential steps to manipulate these elements effectively, allowing for greater
Epic gradient trick for beautiful light rays in Photoshop
In this tutorial, Jesus Ramirez teaches you how to create stunning light rays in Photoshop using an ingenious gradient trick. By utilizing a Gradient Fill layer in an unconventional way, you can achieve a mesmerizing light ray effect that adds a dramatic touch to your photos. This method is straightforward and effective, making it accessible even for beginners. Part of the Photoshop in-app tutorials, this guide allows you to open the tutorial image directly from Photoshop and follow along with
Create lighting effects using Gradient Maps in Photoshop
In this Photoshop tutorial by Unmesh Dinda from Piximperfect you will learn an interesting technique to completely mold and control light in Photoshop using Gradient Maps along with amazing light effects to add drama, depth, and dimension. In this video, learn how to manipulate multiple levels of light. Whether you want to remove shiny flash hotspots or add more shine, make harsh light soft or soft light harsh, with Gradient Maps, you can control almost everything. Gradient Map allows you to co
Ultimate Halftone Effect in Photoshop
Halftone effects can transform ordinary photos into striking graphic designs, but many designers struggle with creating patterns that blend naturally with their images. The traditional approach often results in rigid, uniform dots that don't adapt to the underlying image tones and details. This tutorial demonstrates how to create flexible halftone effects using multiple pattern types and blending techniques. You'll learn to build reusable workflows that can be applied to any image instantly, pl

Get tutorials & freebies delivered to you.

Subscribe to the Photoshop Roadmap newsletter, a weekly roundup of new tutorials, insights and quality downloads, trusted by 6500+ readers.

You might also like

How to Use Gemini 2.5 Nano Banana AI in Photoshop 2026

Photoshop 2026 introduces Gemini 2.5 Nano Banana, a powerful AI model that transforms how you edit images. This advanced tool maintains scene coherence while allowing dramatic changes to poses, backgrounds, and camera angles. The technology understands context and lighting, creating realistic results that feel naturally integrated into your original...

How to Access Adobe's Free Stock Photos in Photoshop and Create Photo Collages

Adobe now includes thousands of free stock photos directly in Photoshop, making it easier than ever to find professional images for your projects. These royalty-free images work perfectly for creating dynamic photo collages without leaving the application. This tutorial covers three different methods to access these free stock images and...

Adding Atmospheric Texture Layers in Photoshop for Moody Images

Victorian London emerges from fog-shrouded streets in classic Sherlock Holmes films, where every shadow tells a story and atmosphere becomes a character itself. The interplay of light, mist, and aged textures creates that unmistakable cinematic mood that draws viewers into another world. This video demonstrates how texture layers transform ordinary...

Master Layer Comps in Photoshop for Faster Design Workflow

Design iterations can quickly spiral into chaos without proper version control. Layer Comps in Photoshop offers a powerful solution that most designers overlook, letting you save snapshots of your layer panel's visibility, position, and appearance at different stages of your project. This hidden feature transforms how you approach...

How to Create a Can Mockup in Photoshop Using Smart Objects and Masks

Professional can mockups transform flat designs into realistic product presentations that clients can instantly visualize. This technique combines precise measurement, smart object workflow, and blending modes to wrap your graphics seamlessly around curved surfaces. The process creates reusable templates that automatically apply proper perspective and lighting effects to any design...

Cutting Out Complex AI Images Using Channel Masking in Photoshop

AI-generated images often contain intricate details that challenge standard background removal tools. When automatic selection methods fail to capture complex edges and fine details, manual techniques become essential. This technique demonstrates how to use channel masking to create precise selections that preserve every detail of your AI artwork. Watch the...

You’ve successfully subscribed to Photoshop Roadmap
Welcome back! You’ve successfully signed in.
Great! You’ve successfully signed up.
Success! Your email is updated.
Your link has expired
Success! Check your email for magic link to sign-in.