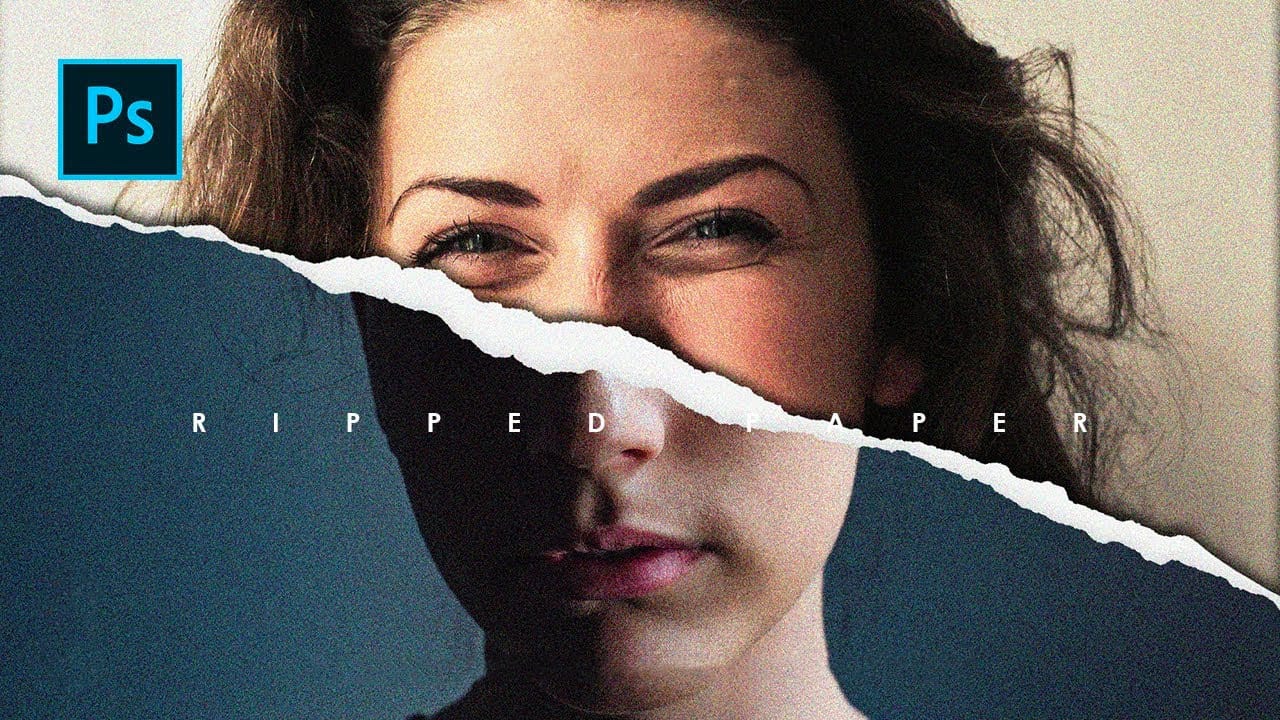
Torn paper portraits create dramatic visual storytelling by revealing layers of meaning beneath the surface. This artistic technique transforms ordinary portraits into compelling compositions that suggest hidden depths, contrasts, or dual perspectives.

The effect works particularly well when combining different treatments of the same subject—such as color and black-and-white versions—or when creating symbolic narratives about identity, memory, or transformation.

Watch the Video

Video by Photoshop Arthouse. Any links or downloads mentioned by the creator are available only on YouTube

Understanding Paper Texture in Digital Art

Paper textures in digital manipulation rely on authentic lighting and shadow patterns to convince the viewer. Real torn paper creates complex interactions between light and shadow—particularly where the paper curls and creates depth. The key lies in understanding how multiple light sources affect different layers of the composition.

Successful paper effects require careful attention to edge treatment and opacity relationships. The torn edges must appear naturally irregular while maintaining clean selections. Professional results depend on subtle color temperature shifts and realistic shadow casting between the paper and underlying image.

Smart Objects prove essential for this type of work because they allow non-destructive editing across multiple versions of the same portrait. This flexibility becomes crucial when fine-tuning the relationship between visible and hidden layers.

Practical Tips for Torn Paper Portraits

  • Use Alt/Option + drag when resizing to maintain proportions and center the transformation
  • Create multiple drop shadows with different distances and opacities for realistic depth
  • Apply New Smart Object via Copy to edit one version independently without affecting others
  • Set stroke properties to Exclusion blend mode to naturally hide harsh selection edges
  • Use clipping masks to ensure portrait elements appear only where the paper texture allows

Explore more creative paper manipulation techniques and photo restoration methods.

Create ripped paper portrait effect in Photoshop
This video will show you how to create a captivating ripped paper photo manipulation effect. Learn how to create a realistic tear that reveals a hidden image beneath, effectively layering two portraits into one unique composition. The video will guide you through using layer masks and selection tools to achieve a seamless tear effect, while also exploring techniques for adding texture and depth to the "paper" for a believable final outcome. Watch tutorial
Create an impressive torn paper effect in Photoshop
In this photoshop photo effect tutorial from Tutorials Junction you will learn how to create this somewhat popular torn paper effect. The effect is actually very simple to create, compared to how good it looks. All you have to do is apply some layers masks and use good quality torn paper brushes. You will need two portrait photos with slightly different poses to get the best effect. The author uses one black and white photo and another one in color to give more impact to the final image. Watch
How to repair an old torn photo in Photoshop
In this tutorial, you'll discover how to breathe new life into an old, torn photograph using Photoshop. Aaron Nace, the expert from Phlearn, will guide you through the process step by step. First, you'll learn how to assess the damage and create a plan for the restoration. Then, you'll dive into the various tools and techniques to repair the tears, scratches, and discoloration. By carefully blending layers and adjusting the image, you'll be able to seamlessly restore the photo to its former glo
Create a Crumpled Paper Effect in Photoshop
In this detailed tutorial, Aaron Nace walks you through the process of creating a realistic crumpled paper effect in Photoshop. This technique is perfect for adding texture and visual interest to your photos and poster designs. Aaron begins by demonstrating how to select and prepare your base image, which is crucial for achieving a convincing crumpled look. He then moves on to applying various distortions and adjustments that simulate the appearance of crumpled paper. Throughout the tutorial, A

Thanks for Reading — Want More Like This?

Subscribe to the Photoshop Roadmap newsletter for more expert tutorials and insights delivered directly to your inbox.