How to Paint Graphics onto a Face in Photoshop

How to Paint Graphics onto a Face in Photoshop

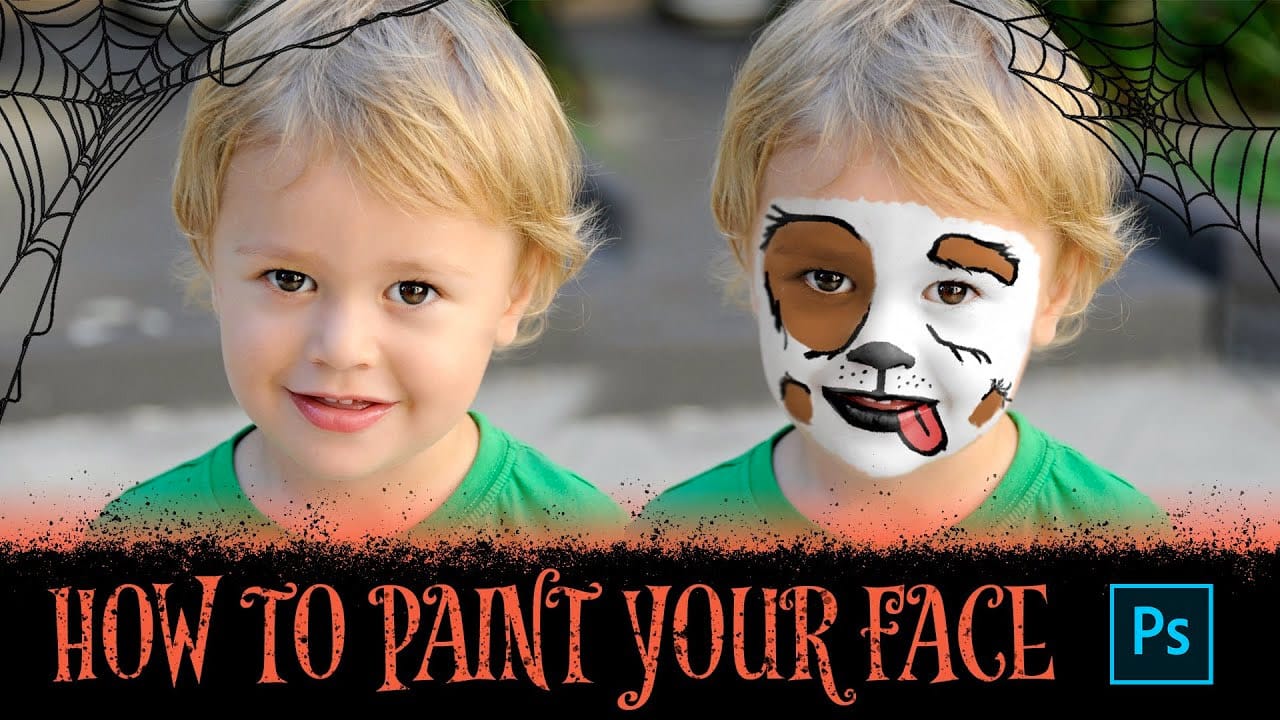
Achieving realistic digital face paint in Photoshop can transform portraits, bringing creative visions to life for various purposes. This technique is particularly effective for applying elements like flags, sports team logos, or intricate designs directly onto a subject's face, making it appear as if the graphic is truly painted on.

This video tutorial guides you through the process of seamlessly applying graphics to a face using Photoshop's powerful features. You will learn how to prepare your images, utilize displacement maps for realistic warping, and refine selections to create convincing digital face paint effects.

Watch the Video

Video by Blue Lightning. Any links or downloads mentioned by the creator are available only on YouTube

Integrating Graphics with Facial Contours

Applying a flat graphic onto a three-dimensional surface like a human face requires techniques that account for the natural curves and undulations of the skin. Merely overlaying an image would result in an unrealistic, flat appearance. This is where tools like Photoshop's Displace filter become invaluable, allowing the graphic to warp and conform to the underlying contours of the face, mimicking how actual paint would adhere.

The creation of a "displacement map" is central to this process. This map is essentially a grayscale representation of the subject's facial topography, where lighter areas indicate higher points and darker areas represent lower points. When applied, Photoshop uses this map to distort the graphic, pushing and pulling its pixels to align with the perceived depth and form of the face.

This method ensures that the painted graphic looks integrated rather than simply pasted on, making it suitable for applications such as:

  • Adding team spirit for sports fans
  • Creating theatrical makeup effects
  • Designing digital prototypes for real-world face painting

Proper blending modes and masks further enhance this illusion, ensuring the graphic interacts realistically with the skin's texture and color.

Practical Tips for Digital Face Painting

  • Convert your subject image into a Smart Object to allow for non-destructive modifications and easy replacement of the subject.
  • Create a "displacement map" from your subject's face by desaturating and blurring a duplicated layer, then saving it as a PSD file.
  • Use the Quick Selection Tool and Refine Edge to make a precise selection around the face, creating a layer mask to isolate the area for the graphic.
  • Apply the Pinch filter to the graphic to introduce an initial curve that approximates the face's natural shape before more precise warping.
  • Utilize the Displace filter with your saved displacement map to warp the graphic realistically around the contours of the face.
  • Adjust the graphic's blend mode, such as Color Burn, to integrate it naturally with the underlying skin tones.
  • Employ a Vibrance adjustment layer, clipped to the graphic, to enhance the graphic's color vibrancy without affecting the rest of the image.

Explore more techniques to enhance portraits and create stunning visual effects in Photoshop.

How to Paint Your Face in Photoshop
This exciting tutorial by PHLEARN dives into the world of digital face paint. Learn how to utilize a custom face paint brush (potentially included in the video) and Adjustment Layers to create vibrant and realistic designs, perfect for both adorable Halloween looks or spooky transformations. The video will guide you through the process, allowing you to unleash your creativity and design unique face paint effects for any project. Watch tutorial
Learn How to Create Beauty Makeup and Face Painting Effects in Photoshop
This guide is designed to help you learn how to create beauty makeup and face painting effects using Photoshop. With clear instructions, you'll discover how to apply makeup digitally, utilizing techniques that professional makeup artists rely on in their work. The focus is not limited to beauty makeup alone. You will also explore various effects, including horror themes, bruises, and scars. The content is suitable for anyone interested in enhancing their portrait skills, whether for personal pr
How to Create Facial Hair in Photoshop
This video by PHLEARN will teach you how to add realistic facial hair to your photos in Photoshop. Aaron Nace breaks down the process into clear steps. Whether you’re looking to fill in patchy beard areas or give someone a complete makeover with a mustache, goatee, or full beard, this tutorial will show you the ropes. You’ll even learn how to create your own custom hair brush from scratch using a single hair! In short, this video is perfect for anyone who wants to master the art of adding facia
Colorful Painted 3D Text Effect Tutorial in Photoshop
In this tutorial by Angelo Konofaos, you'll explore how to create a 3D-style text effect in Photoshop, alongside techniques like adding shadows, highlights, shines, and colors. Utilizing a variety of Photoshop tools such as the Mixer Brush, Pen Tool, clipping masks, and adjustment layers, the tutorial demonstrates the process of refining text to achieve a polished and dimensional look. For optimal results, Konofaos recommends using a pen tablet like the Wacom Intuos to enhance precision and fl

Get tutorials & freebies delivered to you.

Subscribe to the Photoshop Roadmap newsletter, a weekly roundup of new tutorials, insights and quality downloads, trusted by 6500+ readers.

You might also like

Create Realistic Rim Light Effects on Portraits in Photoshop

Rim lighting transforms ordinary portraits into dramatic, professional-looking images by adding bright highlights around the edges of your subject. This technique simulates light hitting the outer contours of a person, making them stand out from their background with a natural, glowing effect. The key to convincing rim light lies in...

How to Use Photoshop's Layer Cleanup Tool to Organize Messy Projects

Complex editing projects with Generative Fill and Expand often result in dozens of unnamed layers cluttering your workspace. The new Layer Cleanup tool automates the tedious process of renaming layers and removing empty ones, transforming chaotic layer panels into organized, manageable structures. This workflow improvement saves significant time during post-production...

How to Use Curves for Composite Color Matching in Photoshop

Curves adjustments are essential for making composite elements look natural and cohesive. Understanding how curves manipulate light values and color channels gives you precise control over matching different elements to their new backgrounds. The key to successful color matching lies in analyzing the color temperature and brightness relationships between your...

How to Fix Color Fringing in Subject Cutouts Using Clipping Masks

Perfect layer masks can still produce disappointing results when color fringing appears around hair and fur edges. This common problem isn't caused by poor masking technique—it's the original background bleeding through at the edges. Clipping masks offer a powerful solution by allowing you to paint...

Create Beautiful Floral Oval Frames for Portraits in Photoshop

Transform ordinary portraits into elegant artwork with decorative floral oval frames that blend seamlessly with your subject. This technique combines traditional framing with digital floral elements, creating a painterly effect that's perfect for fine art prints and creative portraits. The process involves creating an oval cutout, adding custom...

You’ve successfully subscribed to Photoshop Roadmap
Welcome back! You’ve successfully signed in.
Great! You’ve successfully signed up.
Success! Your email is updated.
Your link has expired
Success! Check your email for magic link to sign-in.