Realistic Water Reflection Effect Photoshop Tutorial

Realistic Water Reflection Effect Photoshop Tutorial

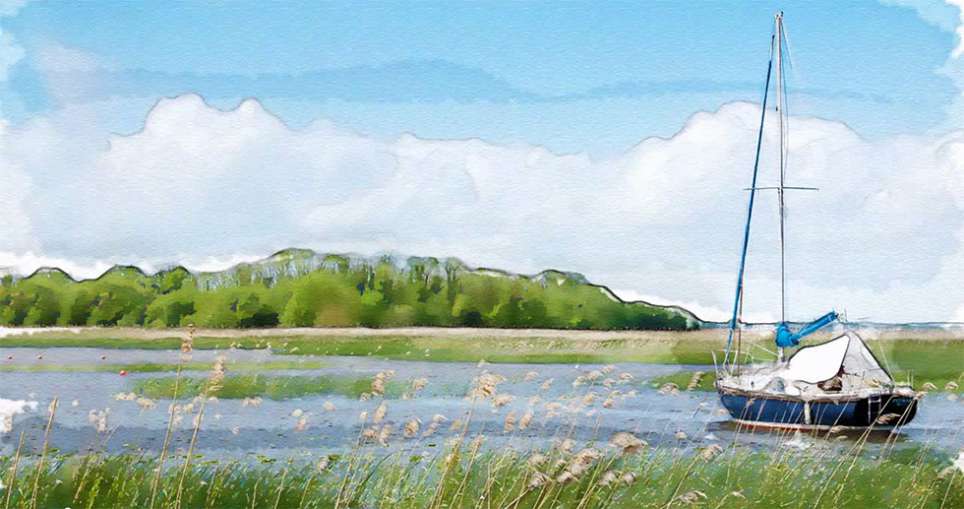
Creating realistic water reflections can transform a simple photo into a captivating scene. This effect adds depth and dynamic visual interest, making images more immersive and believable.

This tutorial provides a clear, step-by-step approach to master the art of digital water reflections from the ground up, ensuring your results look naturally integrated into your photos.

Watch the Video

Video by Blue Lightning. Any links or downloads mentioned by the creator are available only on YouTube

Understanding the Power of Displacement Maps in Digital Art

In digital image manipulation, achieving true realism often hinges on simulating natural phenomena, and water reflections are a prime example. Beyond simply duplicating and flipping an image, the key to creating a believable water surface lies in distorting the reflection to mimic the subtle, irregular movement of water. This is where displacement maps become indispensable.

A displacement map is a grayscale image where different shades of gray instruct Photoshop to shift pixels in the main image. For water, a map with varying noise and blur patterns can translate into ripples and waves. Darker areas might push pixels in one direction, while lighter areas push them in another, creating the illusion of depth and texture on a flat surface. This technique provides a level of detail and authenticity that simple filters cannot replicate.

The power of a displacement map extends beyond water, making it a versatile tool for various effects like fabric textures, glass distortions, or even creating digital terrain. It's a fundamental concept for artists seeking to add an organic, dynamic quality to their digital creations, allowing precise control over how light and form interact with simulated surfaces.

Practical Tips for Realistic Water Reflections

  • Set your image resolution to 150 pixels per inch to ensure sufficient detail and maintain image quality throughout the process.
  • Convert your photo into a Smart Object early on; this preserves the original image data and allows non-destructive modifications.
  • Utilize Photoshop's "Snap" feature (found under the View menu) for precise alignment when transforming and duplicating layers, ensuring clean edges.
  • Employ a Black to Transparent gradient on layer masks to control the blur and transparency of the reflection, allowing it to fade naturally as it approaches the "shoreline."
  • Create a dedicated displacement map PSD with noise, Gaussian blur, and embossing effects to generate realistic, organic ripple patterns for your water surface.

More Tutorials about Water Effects and Photo Manipulation

Explore additional techniques to enhance your images with captivating water effects and advanced photo manipulation.

Learn How to Create a Watercolor Photo Effect in Photoshop
In this tutorial by Blue Lightning TV, Marty demonstrates how to transform an ordinary photograph into a stunning hand-painted watercolor painting using Photoshop. This method surpasses the built-in watercolor filter in Photoshop by allowing users to hand paint the image, offering greater nuance and control. The process begins with setting up the document at 1280 by 720 pixels with a resolution of 72 pixels per inch, then renaming the initial layer to “base” and creating a copy named “smart blur
How to make epic reflections in Photoshop
This tutorial will teach you techniques to create captivating reflections and lifelike puddles in Photoshop. Renowned expert Colin Smith will guide you through the process, ensuring your images and designs achieve a heightened sense of realism and visual impact. You'll learn tips and strategies to craft reflections that seamlessly blend with your photographic elements or design compositions, whether replicating the surface of a lake, the facade of a skyscraper, or the rippling effect of a puddl
Photoshop Watercolor Photo Effect Tutorial
In this comprehensive tutorial by Arunz Creations, you'll discover how to transform a portrait into a beautiful watercolor painting using Photoshop. The process begins by organizing your layers into a group and temporarily hiding it. Next, you'll select specific colors from the portrait using the Color Range tool to create a precise selection. After applying the selection as a mask on the group and inverting it, you'll create a new empty layer beneath the group and fill it with white to serve a
Create an Amazing Water Drenched Photo Montage in Photoshop
In this tutorial, Nik Ainley demonstrates how to create a captivating underwater effect by blending two distinct images. The result is a stunning visual featuring a figure that appears to dissolve into water, showcasing the power of creative photo manipulation. Water-based effects are popular for their fresh and vibrant appeal. Ainley provides clear, step-by-step instructions that guide you through the process of achieving this dynamic look using Photoshop and carefully selected images. The tec

Get tutorials & freebies delivered to you.

Subscribe to the Photoshop Roadmap newsletter, a weekly roundup of new tutorials, insights and quality downloads, trusted by 6500+ readers.

You might also like

Complete Photoshop Editing Workflow: 5 Steps from Raw to Polished

Photoshop offers endless possibilities for photo enhancement, but many photographers never move beyond basic adjustments because the software feels overwhelming. This comprehensive workflow breaks down photo editing into five manageable stages that work consistently across different photography styles. The systematic approach covers everything from initial raw processing to advanced lighting...

Photoshop Workspace Basics: Navigation, Zooming, and Essential Interface Elements

Photoshop's interface can feel overwhelming when you first open the program. Dozens of panels, tools, and menus compete for attention, making simple tasks feel complicated. This tutorial breaks down the essential workspace elements and teaches fundamental navigation skills that form the foundation of efficient Photoshop work. Watch the...

How to Restore Old Damaged Photos Using Nano Banana in Photoshop

Old family photos with scratches, tears, and missing sections can seem beyond repair. Google's Nano Banana AI model, now integrated into Photoshop, makes full restoration possible in minutes rather than hours. This powerful tool excels at maintaining facial characteristics while automatically filling in damaged areas and adding realistic...

How to Get Higher Quality Results from Photoshop's Generative Fill Tool

Photoshop's Generative Fill creates impressive AI extensions, but the results often look blurry and pixelated when viewed at full size. This quality limitation makes many AI-generated areas unusable for printing or large displays. This technique shows how to work around the 1024x1024 pixel quality limit to create much...

How to Use Photoshop's Liquify Tool for Non-Destructive Portrait Retouching

Clothing wrinkles, hair that lacks volume, and awkward fabric bunching can distract from an otherwise great portrait. Photoshop's Liquify tool offers a powerful solution for smoothing out these issues while preserving the natural look of your subject. This tutorial demonstrates how to use the Liquify tool non-destructively with...

You’ve successfully subscribed to Photoshop Roadmap
Welcome back! You’ve successfully signed in.
Great! You’ve successfully signed up.
Success! Your email is updated.
Your link has expired
Success! Check your email for magic link to sign-in.