How to Add Color Depth Using Color Dodge Layers in Photoshop

How to Add Color Depth Using Color Dodge Layers in Photoshop

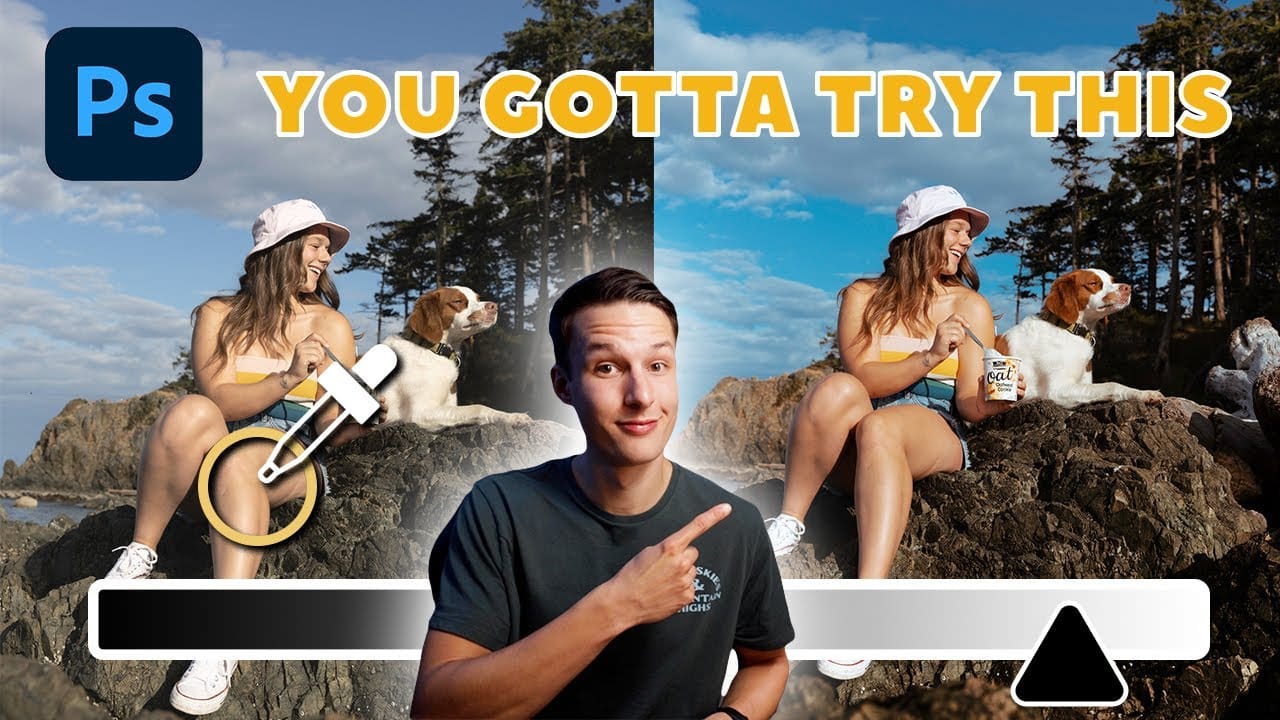
Color depth transforms flat images into rich, dimensional works that hold the viewer's attention. The secret lies in selectively enhancing specific areas rather than applying blanket adjustments that can muddy your colors.

The color dodge technique offers precise control over where and how you add vibrancy. This method works particularly well for portrait enhancement, bringing life to eyes, lips, hair, and jewelry without creating an over-processed look.

Watch the Tutorial

Video by SandraD Imagery. Any links or downloads mentioned by the creator are available only on YouTube

Understanding Non-Destructive Color Enhancement

The color dodge method relies on non-destructive editing principles that preserve your original image data. Each color enhancement exists on its own layer, allowing complete control over individual adjustments long after the initial edit.

This technique differs from traditional lighting adjustments because it focuses purely on color richness rather than brightness. The approach works by sampling existing colors from your image and applying them selectively with low flow settings.

  • Separate layers for each area (lips, eyes, hair, jewelry)
  • Low flow percentages (5-16%) for subtle application
  • Color sampling from existing image tones
  • Opacity adjustments for fine-tuning intensity

Practical Tips for Color Dodge Enhancement

  • Create a new blank layer for each area you want to enhance rather than working on a single layer
  • Keep brush flow between 5-16% to build color gradually and avoid harsh application
  • Sample colors from lighter areas within the same region for natural-looking highlights
  • Use the Alt/Option key to quickly switch between brush and eyedropper tools
  • Apply this technique at the end of your workflow after completing other color corrections

Explore more techniques for enhancing colors and adding depth to your Photoshop projects.

3 must-try techniques to enhance colors in Photoshop
When you're editing a photo in Photoshop, making your colors pop is likely on the top of your to-do list. There are a variety of great tools to use in Photoshop, but with these three techniques, you will be able to get more rich colors in your edits, while also having more control over how they appear. With the help of layer masks, blend if, and camera raw, you'll be surprised by how these lesser-known Photoshop tricks can improve the look of your edits. Watch tutorial
Add a splash of color using gradient maps in Photoshop
In this engaging tutorial, Adobe Evangelist Paul Trani reveals the power of Gradient Maps in Photoshop to introduce stunning colors to your designs. Gradient Maps are a versatile tool that applies color gradients to your images, enabling you to create striking visual effects with ease. Paul walks you through the process of applying and adjusting Gradient Maps, demonstrating how this technique can significantly enhance the depth and vibrancy of your designs. The tutorial covers essential tips an
Apply a nice saturated paint effect to your photos in Photoshop
This beginner-friendly Photoshop tutorial by Marcin Mikus will teach you how to transform a regular photo into a painting. Marcin begins by duplicating the background layer, enhancing the image's vibrance and saturation for a vivid look. Next, they convert the duplicated layer into a smart object and apply the "Oil Paint" filter, adjusting the settings to achieve the desired painted effect. The tutorial also suggests experimenting with other artistic filters like "Colored Pencil" for various st
Create a bright and beautiful color grade in Photoshop
In this tutorial, Aaron Nace from Phlearn demonstrates how to enhance your photos with a bright and vibrant color grade using the Camera RAW filter in Photoshop. This technique is particularly effective for model photography and landscape shots, offering a way to elevate the visual appeal of your images with a polished, professional finish. Aaron guides you through the process of applying and adjusting color grades, showing how the Camera RAW filter can be used to fine-tune colors and achieve a

Get tutorials & freebies delivered to you.

Subscribe to the Photoshop Roadmap newsletter, a weekly roundup of new tutorials, insights and quality downloads, trusted by 6500+ readers.

You might also like

Basic Photoshop techniques you really need to learn

Photoshop hasn’t changed as much as it looks. New features come and go, but the same core techniques keep showing up in real work. If you skip them, everything feels harder than it should. This post focuses on those basics, not as isolated tricks, but as skills you’ll...

How to Use Select Subject for Background Removal and Edge Refinement

Background removal becomes effortless when you know how to use the right tools. AI-powered selection can instantly isolate subjects from their backgrounds, but the real skill lies in refining those selections to create professional results. This guide covers the complete workflow from initial selection to edge refinement, plus creative techniques...

How to Wrap Text Around Any Shape in Photoshop

Creating text that flows naturally around irregular shapes transforms static layouts into dynamic, professional designs. This technique works particularly well for posters, magazine layouts, and editorial designs where text needs to integrate seamlessly with complex subjects rather than simply sitting in rigid rectangular boxes. The process combines selection tools, path...

How to Edit Text in Images Using Generative Fill

Changing text within existing images has traditionally required complex masking and reconstruction techniques. Modern AI-powered tools now make it possible to seamlessly replace words and phrases in photographs while maintaining realistic typography, lighting, and perspective that matches the original scene. This technique works particularly well for signs, storefronts, billboards, and...

How to Remove Dust and Sensor Spots Using Photoshop Tools

Dust spots and sensor particles are inevitable challenges in digital photography, appearing as dark specks that distract from otherwise clean images. Camera sensors collect dust over time, creating consistent spots that show up across multiple photos, particularly in bright sky areas or uniform backgrounds. Both Lightroom and Photoshop offer specialized...

Photoshop vs Affinity Photo: Feature Comparison and Professional Analysis

When choosing professional photo editing software, the decision often comes down to comparing features, performance, and value. This detailed comparison examines the core capabilities of both applications across noise reduction, smart selections, object removal, masking, and AI-powered tools. The analysis covers real-world scenarios that professionals encounter daily, from complex background...

You’ve successfully subscribed to Photoshop Roadmap
Welcome back! You’ve successfully signed in.
Great! You’ve successfully signed up.
Success! Your email is updated.
Your link has expired
Success! Check your email for magic link to sign-in.