How to Professionally Remove Glare from Eyeglasses in Photoshop

How to Professionally Remove Glare from Eyeglasses in Photoshop

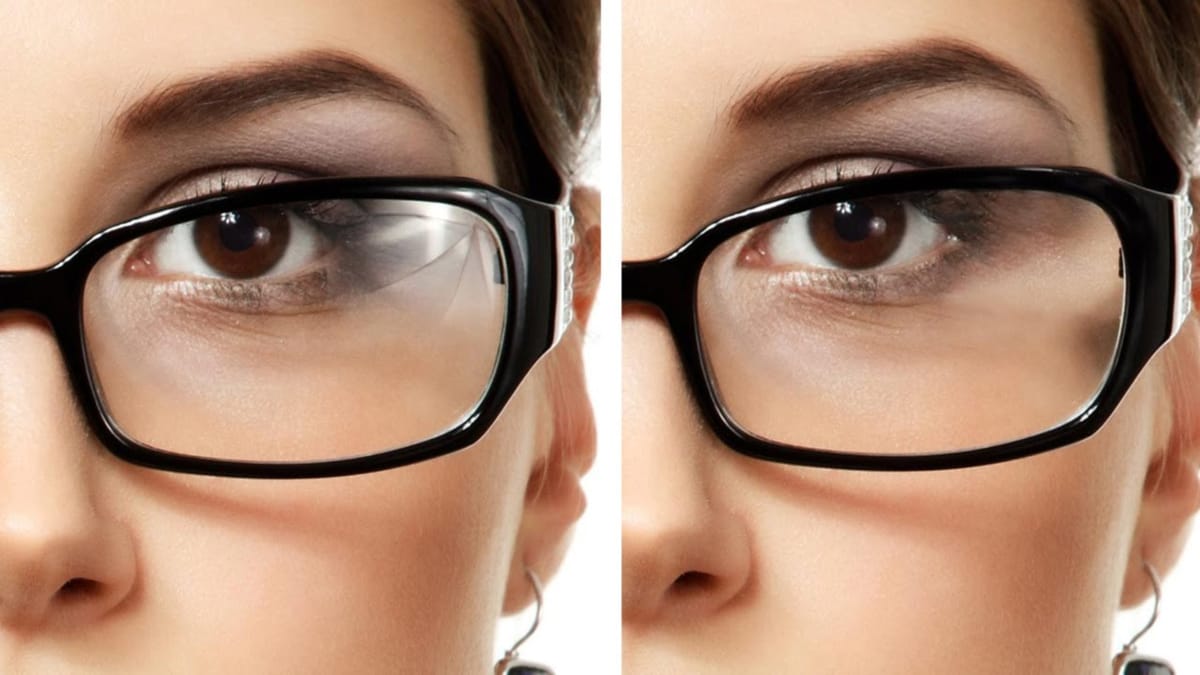
Glare on eyeglasses is a persistent and frustrating problem in photography, often obscuring the subject's eyes and facial features. This common issue can detract from an otherwise perfectly composed portrait, making it appear unprofessional or distracting due to bright reflections.

This tutorial demonstrates a robust hybrid approach to tackling eyeglass glare in Photoshop, combining the efficiency of AI-powered Generative Fill for minor touch-ups with the precision of the classic Clone Stamp tool for more critical areas. This methodology ensures natural-looking results, preserving original facial details and significantly enhancing photo editing workflows for portrait photographers.

Watch the video

Any links or downloads mentioned by the creator are available only on YouTube

Breaking It Down

The core strategy for glare removal in Photoshop involves a strategic combination of artificial intelligence and traditional manual tools.

For small, less critical areas of glare, such as those over an eyebrow or along the frame, Photoshop's Generative Fill can provide quick and acceptable results. However, for glare directly over sensitive facial features like the eyes, relying solely on AI risks generating entirely new features that do not resemble the subject, leading to unnatural outcomes.

For precise and realistic glare removal, particularly over the eyes, the Clone Stamp Tool is indispensable. This technique involves copying a glare-free section of the subject's face, typically the symmetrical area from the other eye or side of the face, onto the affected area.

This process is executed on a new layer, using Alt/Option to sample the source, followed by painting, transforming (Ctrl/Command + T), flipping horizontally, and optionally warping the cloned content to perfectly align with the underlying features.

Layer masks are crucial for blending the cloned content seamlessly. After cloning and positioning the glare-free section, a layer mask is applied to the new layer. Painting with black on this mask selectively conceals parts of the cloned image, allowing precise control over what is revealed and ensuring that only the glare is covered while the subject's original eye and facial contours remain visible.

This non-destructive method preserves image quality and allows for detailed adjustments.

Practical Tips

  • For minor glare areas not covering distinct facial features (e.g., over the frame or forehead), consider using Generative Fill for quick edits.
  • Always work on a new layer when using the Clone Stamp Tool, setting the Sample option to Current and Below for non-destructive editing.
  • Copy from a clean, symmetrical area of the subject's face (e.g., the unaffected eye) to ensure the cloned content integrates naturally and maintains realism.
  • After cloning, use Free Transform (Ctrl/Command + T) to accurately size and position the copied area, remembering to flip horizontally if copying from the opposite side.
  • Leverage layer masks extensively to precisely blend the cloned content, painting with black to reveal original features and using a soft brush for seamless transitions.

Explore more tutorials and access project files to enhance your Photoshop skills.

How to Remove Glare from Glasses in Photoshop
It’s always a sad time when you end up with unwanted reflections in someone’s glasses. Learn how to utilize the clone source dialogue to remove glare in Photoshop More
Magically remove glare from glasses in Photoshop
3 Simple Steps to Remove Complex Glare from Glasses in Photoshop! In this tutorial by PiXimperfect discover the best way to avoid and fix glare or reflections. Using advanced dodging and burning, in this tutorial, we will learn how to even out the brightness to make the glass completely transparent. Then, with the help of […] More
How to Color, Brighten and Sharpen Eyes in Photoshop
In this tutorial by Aaron Nace from Phlearn, learn how to enhance eyes in Photoshop to make them captivating and sharp. Techniques include coloring the eyes by sampling natural hues and adjusting lightness and saturation, using blending modes like “Soft Light” or “Overlay” for a natural look, and softening edges

Get tutorials & freebies delivered to you.

Subscribe to the Photoshop Roadmap newsletter, a weekly roundup of new tutorials, insights and quality downloads, trusted by 6500+ readers.

You might also like

7 Signs You're a Photoshop Pro - Skill Assessment Guide

Professional Photoshop mastery isn't about memorizing every menu or filter. It's about developing efficient workflows, understanding core concepts, and building muscle memory for essential techniques. Real pros focus on the right tools for their specific needs rather than trying to learn everything. This comprehensive assessment covers...

How to Use Generative Upscale with Multiple AI Models in Photoshop

Pixelated vintage photos and low-resolution images no longer need to stay small. Photoshop's Generative Upscale feature now offers multiple AI models to enlarge images up to 4x their original size while adding remarkable detail and clarity. This new feature includes three distinct AI models—Adobe's Firefly...

Create a Pointillism Effect in Photoshop

Pointillism, the late 19th-century painting technique that uses small dots of color to form images, creates a distinctive artistic look where colors blend optically when viewed from a distance. This digital recreation technique transforms ordinary photographs into artwork that mimics the style of masters like Paul Signac. The process combines...

How to Convert WebP to JPEG in Bulk Using Image Processor

Converting large folders of WebP images to JPEG format can be time-consuming when done manually. Image Processor provides an efficient solution for batch conversion, automatically handling multiple files while maintaining quality settings and organization. This method works with any image format conversion and creates organized output folders, making it ideal...

How to Use Generative Credits in Adobe Creative Cloud: Standard vs Premium Features

Adobe's generative AI features transform how creatives work, but understanding which tools consume credits can save you time and budget frustration. The credit system divides features into standard and premium tiers, with different consumption rates based on processing complexity. Knowing the difference between assistive AI tools that cost...

How to Create Realistic Car Reflections in Photoshop Using Manual and AI Methods

Car photography looks dramatically more compelling when there's a wet road reflection beneath the vehicle. When the pavement is dry and you don't have water available during the shoot, you can create convincing reflections in post-production. This tutorial demonstrates both traditional manual techniques and modern AI-powered...

You’ve successfully subscribed to Photoshop Roadmap
Welcome back! You’ve successfully signed in.
Great! You’ve successfully signed up.
Success! Your email is updated.
Your link has expired
Success! Check your email for magic link to sign-in.