How to Create a Realistic Paper Tear in Photoshop

How to Create a Realistic Paper Tear in Photoshop

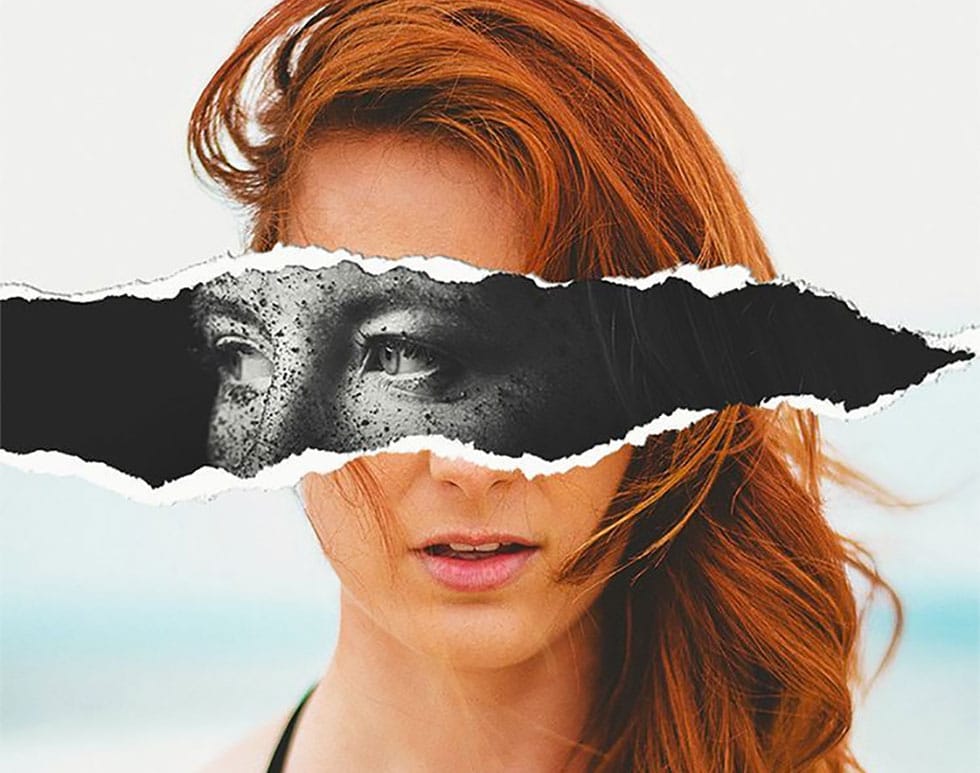
Movie posters with torn paper effects create a sense of mystery and depth that draws viewers in. The technique reveals contrasting elements beneath the surface — perhaps a gritty red background behind a clean portrait, or weathered textures that suggest hidden stories.

This approach transforms simple portraits into dramatic compositions that feel both vintage and contemporary. The key lies in creating realistic paper edges, strategic shadows, and layered textures that make the tear look authentic rather than digitally imposed.

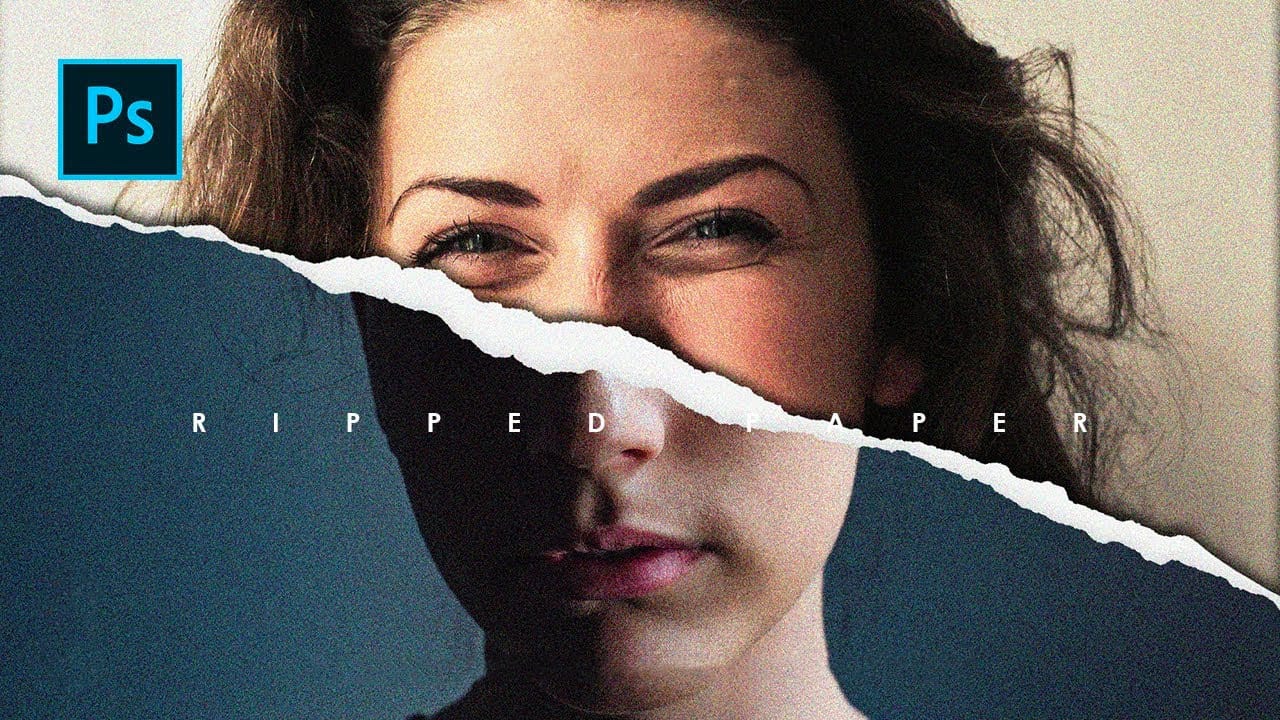
Watch the Video Tutorial

Video by Nucly • Photoshop and Creative Design Training. Any links or downloads mentioned by the creator are available only on YouTube

Understanding Paper Tear Techniques

The realistic paper tear effect relies on multiple crystallize filters applied at different intensities to create authentic-looking edges. Each application builds upon the previous one, starting with large tears and refining down to fine paper textures.

The fade command becomes crucial when controlling how these filters interact with your original mask. Setting the blend mode to multiply ensures the tear never expands beyond your intended boundaries while adding realistic irregularities.

Key techniques for authentic paper tears:

  • Layered crystallize effects — large, medium, and fine applications
  • Select and mask smoothing to refine jagged digital edges
  • Multiple shadow layers for depth and dimension
  • Grunge textures applied with multiply blend modes
  • Film grain overlays for surface authenticity

Practical Tips for Paper Tear Effects

  • Draw tear paths slowly with intentional hand jitter — the natural shakiness creates more believable paper edges than smooth, precise lines
  • Apply crystallize filters in three stages — high settings first (around 30), then medium (15), then fine details (4) for realistic paper fiber texture
  • Use multiply blend mode when fading crystallize effects — this prevents the tear from expanding beyond your original mask boundaries
  • Create multiple shadow layers with different transforms — one subtle internal shadow, one warped drop shadow, and one hard edge shadow for maximum depth
  • Add grunge textures above colored backgrounds — use curves to eliminate midtones and keep only the dark scratches and weathering marks

More Tutorials About Paper Effects

Explore additional techniques for creating compelling paper-based photo manipulations.

How to Create a Torn Paper Portrait Effect in Photoshop
Torn paper portraits create dramatic visual storytelling by revealing layers of meaning beneath the surface. This artistic technique transforms ordinary portraits into compelling compositions that suggest hidden depths, contrasts, or dual perspectives. The effect works particularly well when combining different treatments of the same subject—such as color and black-and-white versions—or when creating symbolic narratives about identity, memory, or transformation. Watch the Video Understandin
Create an impressive torn paper effect in Photoshop
In this photoshop photo effect tutorial from Tutorials Junction you will learn how to create this somewhat popular torn paper effect. The effect is actually very simple to create, compared to how good it looks. All you have to do is apply some layers masks and use good quality torn paper brushes. You will need two portrait photos with slightly different poses to get the best effect. The author uses one black and white photo and another one in color to give more impact to the final image. Watch
Create ripped paper portrait effect in Photoshop
This video will show you how to create a captivating ripped paper photo manipulation effect. Learn how to create a realistic tear that reveals a hidden image beneath, effectively layering two portraits into one unique composition. The video will guide you through using layer masks and selection tools to achieve a seamless tear effect, while also exploring techniques for adding texture and depth to the "paper" for a believable final outcome. Watch tutorial
Create a Crumpled Paper Effect in Photoshop
In this detailed tutorial, Aaron Nace walks you through the process of creating a realistic crumpled paper effect in Photoshop. This technique is perfect for adding texture and visual interest to your photos and poster designs. Aaron begins by demonstrating how to select and prepare your base image, which is crucial for achieving a convincing crumpled look. He then moves on to applying various distortions and adjustments that simulate the appearance of crumpled paper. Throughout the tutorial, A

Get tutorials & freebies delivered to you.

Subscribe to the Photoshop Roadmap newsletter, a weekly roundup of new tutorials, insights and quality downloads, trusted by 6500+ readers.

You might also like

How to Expand Photos Beyond Their Edges Using AI Generative Expand in Photoshop

Sometimes your best photos need more breathing room or a different aspect ratio. Generative Expand in Photoshop lets you extend your canvas beyond the original image boundaries, using AI to intelligently fill in missing areas with content that matches your scene. This technique works for changing portrait photos to landscape...

How to Create Digital Scrapbook Carousels in Photoshop

Digital scrapbook pages capture memories beautifully, but a single page limits your storytelling. Creating a carousel format lets you design multiple connected panels that work together as one cohesive piece while giving viewers more content to explore. This technique uses frames, custom shapes, and smart export settings to build templates...

How to Use Auto Align Layers in Photoshop for Perfect Layer Alignment

When working with multiple layers that need perfect alignment, manual positioning often falls short. Slight camera movement, different crops, or rotated images can make precise alignment seem impossible through visual adjustment alone. Auto Align Layers automatically handles rotation, scaling, and positioning to create perfect layer alignment, even when images have...

How to Use Nano Banana Pro in Adobe Firefly for Advanced AI Image Generation

Adobe Firefly now includes Gemini 3 with Nano Banana Pro, offering sharper 2K image generation with improved text clarity and precision blending. This advanced AI model works seamlessly within Firefly's generative workspace, enabling powerful workflows like multi-image composition and virtual try-on effects. The integration provides access to sophisticated...

Create Colorful Retro Text Compositions in Photoshop

Retro design trends continue to captivate audiences with their bold colors and geometric shapes. This tutorial demonstrates how to build a complete vintage-inspired composition using text, geometric elements, and vibrant color schemes that capture the essence of classic graphic design. You'll learn to combine typography with custom shapes,...

Photoshop's New Color and Temperature Tool for Advanced Color Grading

Photoshop's latest update introduces temperature and tint controls directly into the adjustment layer panel, bringing white balance tools from Camera Raw into the main editing workspace. This addition transforms color grading workflows by enabling precise local adjustments with custom brushes and blend modes. The new Color and Vibrance...

You’ve successfully subscribed to Photoshop Roadmap
Welcome back! You’ve successfully signed in.
Great! You’ve successfully signed up.
Success! Your email is updated.
Your link has expired
Success! Check your email for magic link to sign-in.