How to Use Photoshop's Smudge and Blur Tools for Perfect Masking

How to Use Photoshop's Smudge and Blur Tools for Perfect Masking

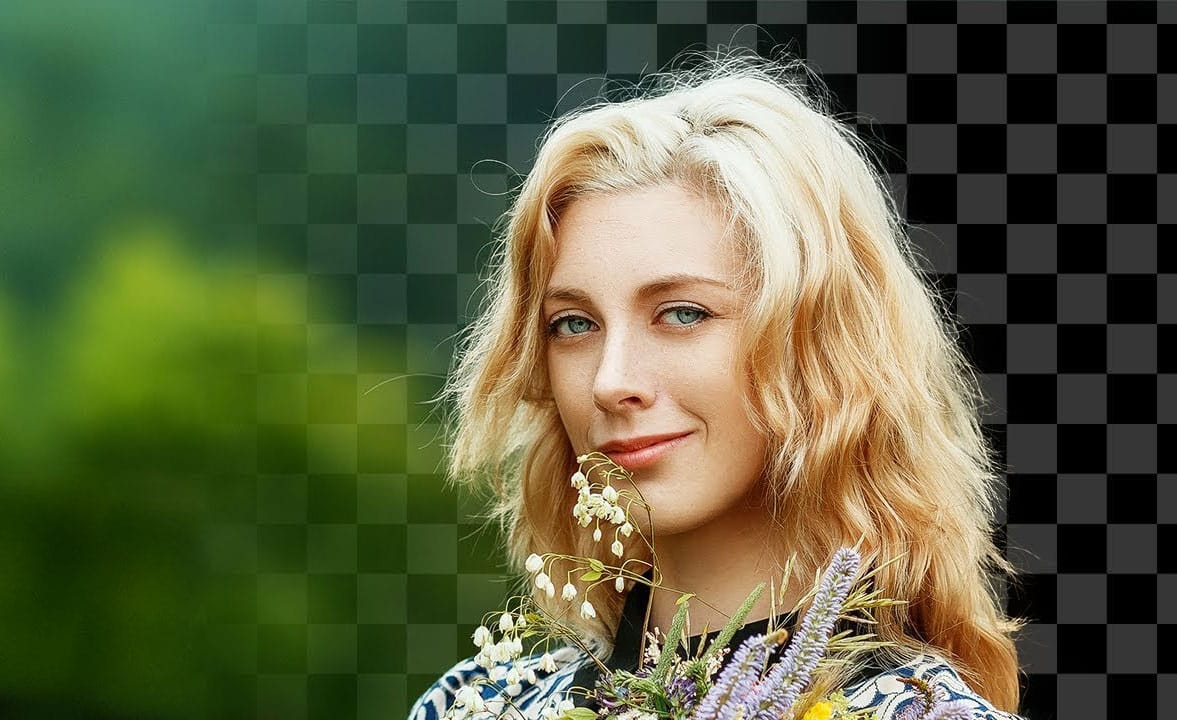
Professional photo composites often fall apart at the edges. Sharp selection lines and harsh transitions make even the best cutouts look artificial and fake. The solution lies in two overlooked Photoshop tools that most editors dismiss as destructive and useless. The smudge and blur tools become powerful allies when applied to layer masks instead of image pixels. This approach creates natural, realistic edges that match the original photo's depth of field and lighting conditions.

Watch the Tutorial

Video by PiXimperfect. Any links or downloads mentioned by the creator are available only on YouTube

The Science Behind Natural Edges in Photography

Camera optics naturally create soft transitions between subjects and backgrounds through depth of field. Wide apertures like f/1.2 produce shallow focus that blurs edges organically. When photographers extract subjects from their original backgrounds, these natural transitions get lost in the selection process. Traditional masking methods create binary selections - pixels are either included or excluded completely. This digital precision conflicts with how camera lenses actually record light and focus. **The human eye expects gradual transitions** based on the original photo's optical characteristics. Modern AI selection tools excel at identifying subject boundaries but still produce mathematically perfect edges. These tools can detect complex details like hair strands and fabric textures, yet they cannot replicate the subtle focus gradations that make photographs look realistic. The gap between perfect selections and natural-looking composites requires manual refinement using tools that can simulate optical behavior.

Essential Tips for Mask Refinement

- **Work directly on layer masks** rather than image pixels to maintain non-destructive editing workflow - Use the smudge tool at 50% strength to push harsh edges inward and create softer transitions - Apply the blur tool to mask edges that need softening without repositioning - **Match edge softness to the original photo's depth of field** - blurred backgrounds require softer mask edges - Select Cloud processing in the Select Subject dropdown for more accurate initial selections

More Tutorials About Advanced Masking Techniques

Explore additional methods for creating professional-quality selections and composites.

The easy background remover tool hidden in Photoshop!
In this Photoshop tutorial, PiXimperfect shares their insights on the amazing power of the Background Eraser tool. Viewers will learn how to easily cut out hair or complex edges using this versatile tool, as well as the best settings for various situations. The tutorial also covers how to make the Background Eraser tool completely non-destructive. This allows users to change the background or make it transparent without permanently altering the original image. Whether you want to remove the bac
Create vector-style images in Photoshop… without the pen tool!
Explore creative ways to craft vector-style art in Photoshop without relying on the pen tool. This tutorial introduces a method for achieving a vector or vexel style effect using a selection of key tools within Adobe Photoshop. Drawing inspiration from the distinctive portraits of Shepard Fairey, this approach demonstrates how to produce striking vector-like visuals with ease. Throughout the tutorial, you'll learn how to leverage Photoshop's built-in tools to create bold, graphic treatments rem
Stop Ruining Colors with Curves With This Photoshop Trick Instead
Using Curves adjustments in Photoshop often creates unwanted color shifts that can make images look oversaturated or unnatural. While the traditional solution involves switching to Luminosity blend mode, this approach tends to drain the vibrancy from your photos, leaving them flat and lifeless. This tutorial reveals a superior technique using Camera Raw's refined saturation control that gives you precise command over color intensity while maintaining natural-looking results. You'll discover how
Unlock Your Hidden Illustration Powers with Just One Photoshop Tool
This video from TextyreLabs offers an exciting opportunity to enhance your illustration skills using just one tool in Photoshop. The focus is on the smudge tool, which allows you to transform basic images into detailed illustrations without needing advanced drawing techniques or a tablet. Throughout the presentation, viewers will learn how to manipulate the smudge tool and adjust brush settings for improved results. You can start with an ordinary image, or even apply some pre-manipulation techn

Member discussion

Get tutorials & freebies delivered to you.

Subscribe to the Photoshop Roadmap newsletter, a weekly roundup of new tutorials, insights and quality downloads, trusted by 6500+ readers.

You might also like

New Camera Raw Adjustment Layers in Photoshop: Color Grading, Clarity, and Grain

Working with multiple layers in Photoshop traditionally required complex workarounds to apply Camera Raw adjustments. The old process involved merging layers, converting to smart objects, and losing the flexibility that makes adjustment layers so powerful. Three new adjustment layers bring Camera Raw's most useful tools directly into your...

How to Create a Molten Metal Text Effect in Photoshop

Molten metal text effects transform ordinary typography into blazing, dimensional masterpieces that appear to glow with intense heat. This technique combines strategic layer styles, textural overlays, and color grading to simulate the appearance of scorching hot metal with fiery edges and realistic surface details. The process builds layers of metallic...

Create a Pop Art Stencil Effect from Photos in Photoshop

Pop art transforms ordinary portraits into bold, graphic statements using simplified colors and high contrast. This distinctive style, popularized by artists like Andy Warhol, reduces complex images to their essential elements while maintaining visual impact through strategic color choices. The stencil approach creates clean separations between color areas, producing artwork...

How to Use AI Masking in Adobe Camera Raw for Professional Photo Editing

Adobe Camera Raw's AI masking tools automatically detect subjects, backgrounds, skies, and landscapes, letting you make precise adjustments to specific areas of your photos. These intelligent masks eliminate the need for manual selection work, while allowing you to combine and refine them for complete creative control. The technique...

How to Remove Objects from Photos Using AI Tools in Photoshop

Photoshop's AI-powered object removal tools can eliminate unwanted distractions from your photos with minimal effort. The Remove Tool and Generative Fill feature automated detection for common distractions like people and wires, plus manual painting options for custom removals. These tools work on separate layers, preserving your original image...

Speed Up Your Color Grading Workflow with Photoshop Actions

Color grading can transform your images, but manually adjusting curves and levels for every photo takes time. Photoshop actions offer a faster approach by applying professional color treatments with a single click. This workflow uses pre-built actions, tints, and LUTs to achieve various moods and styles instantly, letting you layer...

You’ve successfully subscribed to Photoshop Roadmap
Welcome back! You’ve successfully signed in.
Great! You’ve successfully signed up.
Success! Your email is updated.
Your link has expired
Success! Check your email for magic link to sign-in.