Quick and Easy way to create Glowing Lights Photoshop Brushes

Quick and Easy way to create Glowing Lights Photoshop Brushes

This time, I'll commit myself to tech you a nice illustration technique in a few steps, rather than my usual detailed explanations. This tutorial explains how to create glowing lights brushes using the Lens Flare filter included in the default installation of Adobe Photoshop.

This technique is amazingly simple, but the resulting brushes are so cool that you might find yourself spending your Saturday nights experimenting with brush dynamics and blending settings instead of hanging out with a bunch of bums.

If you can’t wait to start painting, download these glowing lights brushes below. But don’t be lazy—read the tutorial to create your own.

Step One: Create the Base Glowing Light

Create a new 500×500 pixels RGB document and fill the background with black. Go to Filters > Render > Lens Flair… and use the same settings below. It is important that you center the position cross the most accurately you can. Anyway, using different positions may result in other interesting effects.

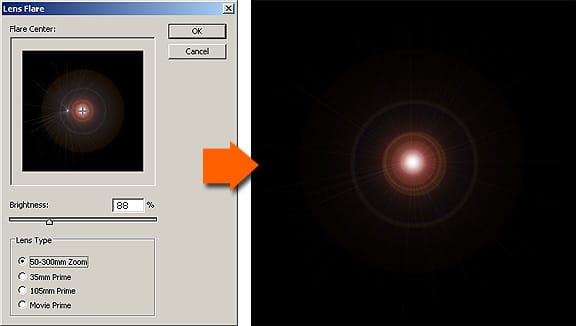
In this example, setting the Brightness = 88% will make the surrounding rings and glow fade to none before reaching the borders of the image. This will allow the final brush to blend smoothly with the background.

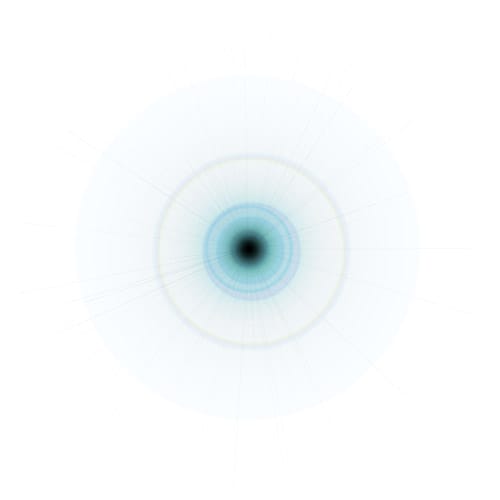
Step Two: Invert the image and convert it into a brush tip

Select the image with Select > All and invert the colors using Image > Adjustment > Invert. The result will be the following:

Now select the whole image again and go to Edit > Define Brush Preset. Now your brush has been successfully added to your brushes list.

The following image shows some simple examples of what you can achieve with this brush:

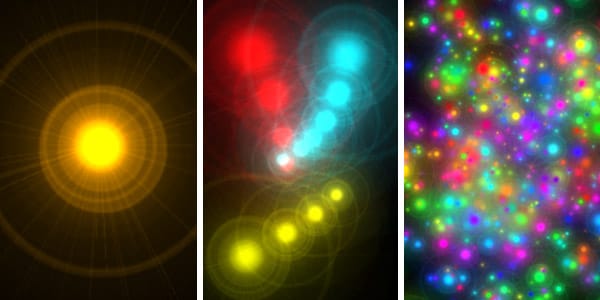
The first and second examples were achieved by superimposing brush clicks with different colors sizes and blending options. The third example was created using different color and shape dynamics. There is nothing new in this. It’s all in the brush tip and your creativity.

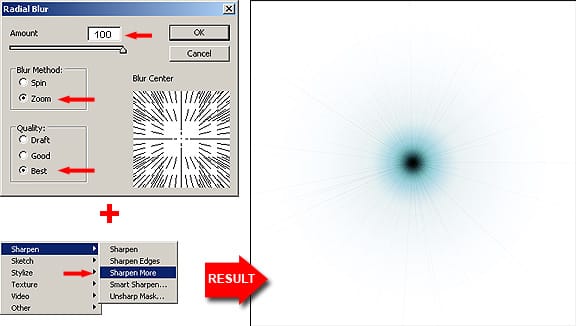
Two variations of the same brush

For the first alternative we will apply a Radial blur filter and a Sharpen More filter. The Radial blur will get rid of the most visible halos surrounding the glow. And the Sharpen More filter will increase the visibility of the light rays.

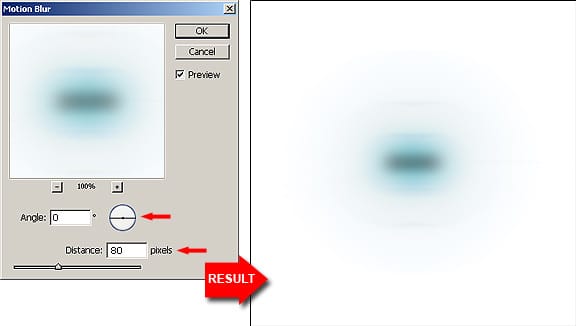
For the second alternative we will just apply a Motion blur filter. This will give  the glow a different shape.

The following examples were made with these two new brushes:

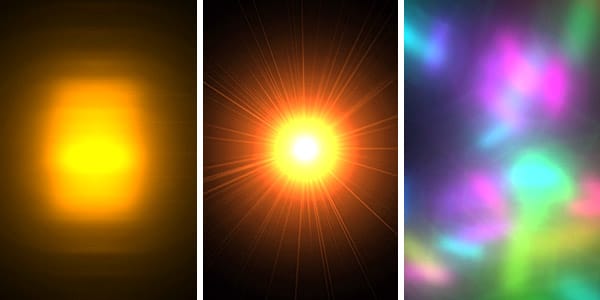
These examples were created the same way than the previous ones. Play with the brush tool blending modes (not with the layer blending modes) and also play with the brush dynamics. These settings can give you a lot of cool effects.

Get tutorials & freebies delivered to you.

Subscribe to the Photoshop Roadmap newsletter, a weekly roundup of new tutorials, insights and quality downloads, trusted by 6500+ readers.

You might also like

How to Create Realistic Lighting Effects and Dust Particles in Photoshop

Creating convincing lighting effects requires more than just adding a bright spot to your image. The key to realism lies in ensuring your subject already has highlights that match the direction of your artificial light source, making the effect appear natural and believable. This technique combines a simple soft brush...

How to Set Up Mouse Scroll Zoom in Photoshop for Faster Navigation

Constantly reaching for the magnify tool or right-clicking to access zoom options disrupts your creative flow and slows down detailed work. Most users don't realize that Photoshop includes powerful scroll wheel zoom features that aren't enabled by default. These simple preference settings transform navigation into smooth,...

How to Fix Layer Panel Thumbnails Showing the Full Canvas in Photoshop

When working with complex layered files, layer thumbnails that display the entire canvas instead of just the layer content make it difficult to identify specific layers at a glance. This common issue occurs when the layers panel is set to show the "entire document" rather than focusing on...

Game Boy Pixel Effect Tutorial in Photoshop

The distinctive monochrome pixelated aesthetic of the original Game Boy has become an iconic visual style that evokes powerful nostalgia for classic handheld gaming. This technique transforms ordinary photographs into high-contrast, pixelated artwork that mimics the characteristic black and white display of Nintendo's legendary portable console. The process...

How to Cut Out Trees Using Blend If in Photoshop

Trees with complex branching patterns challenge traditional selection tools, often leaving messy edges and incomplete cutouts. The Blend If feature offers a powerful alternative for extracting trees from contrasting backgrounds by targeting specific color channels rather than attempting pixel-by-pixel selection. This technique works particularly well when trees are photographed against...

Should You Use Photoshop's New AI Credit System or Stick to Traditional Tools

Adobe's credit-based AI system is creating a dilemma for photographers and digital artists. With 250 monthly credits that can disappear after just a few generative fill operations, many are questioning whether these new tools are worth the investment or if traditional skills remain more valuable. This perspective from...

You’ve successfully subscribed to Photoshop Roadmap
Welcome back! You’ve successfully signed in.
Great! You’ve successfully signed up.
Success! Your email is updated.
Your link has expired
Success! Check your email for magic link to sign-in.