The only Photohop Sharpening Tool You Need

The only Photohop Sharpening Tool You Need

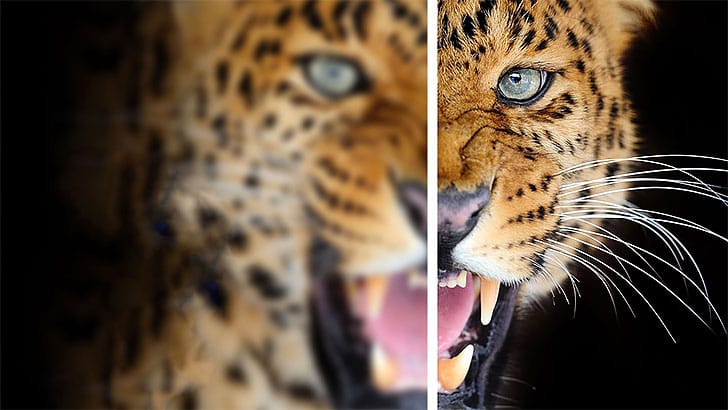
Achieving sharp, detailed images is a common goal for photographers and designers, yet many find the process frustrating. Traditional sharpening tools can often lead to over-processed results, introducing halos, noise, or an unnatural appearance. The challenge lies in enhancing clarity without sacrificing image quality or introducing unwanted artifacts.

This tutorial reveals a powerful and often overlooked technique for precise image sharpening in Photoshop. By mastering the application of the High Pass filter combined with specific blending modes, users can achieve crisp, professional-grade sharpness that integrates seamlessly with their workflow, making images truly pop without compromise.

Watch the Tutorial: High Pass Sharpening in Photoshop

Any links or downloads mentioned by the creator are available only on YouTube

Understanding the High Pass Filter for Sharpening

At its core, image sharpening in digital editing is about enhancing "edge contrast." Every distinct edge in a photo consists of a light side and a dark side. Our eyes perceive a sharper image when the contrast between these light and dark areas is increased, making the boundaries more defined.

The High Pass filter, typically found under the "Other" filter category, doesn't directly sharpen an image. Instead, it isolates edges within the photo by converting the image into a grayscale representation. In this grayscale view, areas without significant detail or contrast become 50% gray, while edges are represented by light and dark pixels surrounding that neutral gray.

This unique output from the High Pass filter provides the precise data needed for sharpening. When combined with specific blending modes, Photoshop can selectively apply contrast only to these identified edges, effectively enhancing sharpness without affecting the flat, detail-less areas of the image, leading to a much cleaner and more natural result than many conventional sharpening methods.

Practical Tips about High Pass Sharpening

  • Locate the High Pass filter by navigating to Filter > Other > High Pass in Photoshop. It is a powerful yet often overlooked sharpening tool.
  • When setting the Radius in the High Pass dialog box, aim for a subtle effect where you can just barely discern the image details through the gray. This subtle setting is crucial for achieving a natural sharpening effect without over-processing.
  • Consider duplicating your image layer (Command/Control + J) and desaturating it (Image > Adjustments > Desaturate) before applying the High Pass filter. This optional step helps prevent color shifts in your sharpened image.
  • Apply the High Pass effect by changing the layer's blending mode to Linear Light. This blending mode smartly removes the 50% gray areas while applying the high-contrast edge information, which is the actual sharpening, to the layers below.
  • Fine-tune the sharpening intensity by adjusting the Opacity slider of your High Pass layer. This allows for precise control, ensuring the sharpening looks realistic and blends naturally with the overall image.

More Tutorials about Image Sharpening

Explore additional resources to deepen your understanding of image sharpening techniques and other related Photoshop adjustments.

Hidden trick to perfectly sharpen photos in Photoshop
The best way to sharpen photos in Photoshop. Colin Shares a powerful Photoshop tip to help you get much better sharpening results. Learn 3 different ways, Smart Sharpen, High Pass and Unsharp mask with a sneaky twist. More
How to Sharpen Images in Photoshop
In this tutorial by kelvin Pimont from Kelvin Designs, you will learn a few ways to sharpen your images and photos in Photoshop. From Unsharp Mask, to High Pass filter, to sharpen tool and using Camera Raw. Many ways to sharpen images in Photoshop! There’s a bunch of different ways to sharpen an image using […] More
Learn how to sharpen images properly in Photoshop
In this lesson you are going to learn how to beautifully sharpen your images using a non destructive method, in a few easy steps using Adobe Photoshop More

Get tutorials & freebies delivered to you.

Subscribe to the Photoshop Roadmap newsletter, a weekly roundup of new tutorials, insights and quality downloads, trusted by 6500+ readers.

You might also like

How to Create Collage Text Effects in Photoshop

Collage text transforms simple typography into visually striking artwork by combining wrapped paper textures, strategic warping, and careful masking techniques. This creative approach gives letters dimension and character, perfect for artistic projects and unique design elements. The technique involves layering textured materials within letter shapes, then using Photoshop's...

How to Convert Low-Resolution Graphics to Vector Shapes in Photoshop

Pixelated logos and graphics lose their impact when scaled up for print or web projects. Photoshop's Creative Cloud Libraries feature offers a built-in solution for transforming low-resolution black and white images into crisp, scalable vector shapes. This technique works particularly well for simple graphics, logos, and icons that...

How to Use Photoshop's Select Subject Tool for One-Click Selections

Complex selections in Photoshop just became effortless. The Select Subject tool uses advanced AI to automatically identify and select main subjects in images, even those with intricate details like bicycle spokes or hair. This tutorial demonstrates how to achieve professional-quality selections with a single click, saving hours of manual masking...

Understanding Photoshop Blending Modes: A Complete Guide to Layer Blending

Blending modes transform how layers interact in Photoshop, letting you seamlessly combine images without complex masking. This technique reveals only light areas, dark areas, or specific colors from each layer. Master these essential blending groups to create professional composites and artistic effects with just a few clicks. Watch the Tutorial...

Photoshop 2026 New Features: AI Tools and Credit System Overview

Photoshop 2026 introduces powerful AI-driven features including advanced generative fill models, sophisticated upscaling tools, and seamless harmonization effects. These updates promise to streamline complex editing tasks while delivering professional-quality results. The software now operates on a credit-based system that divides features into standard and premium tiers, fundamentally changing how users...

How to Add Objects to Photos Using Photoshop's Generative Fill

Photoshop's Generative Fill transforms photo editing by letting you add realistic objects using simple text descriptions. This AI-powered feature creates seamless additions that match your image's lighting, perspective, and style. The process requires just a basic selection and a descriptive prompt to generate professional-looking results in...

You’ve successfully subscribed to Photoshop Roadmap
Welcome back! You’ve successfully signed in.
Great! You’ve successfully signed up.
Success! Your email is updated.
Your link has expired
Success! Check your email for magic link to sign-in.