

Discover how to combine futuristic aesthetics with raw, distressed character in Photoshop.
This tutorial guides you through crafting a unique grungy text effect, blending modern styles with industrial textures for striking typography designs.
Watch the Video Tutorial
Video by Ch-Ch-Check It. Any links or downloads mentioned by the creator are available only on YouTube
Practical Tips for Futuristic Grunge Text Effects
To achieve this distinctive text effect, follow these key steps in Photoshop:
- Start with a grungy background texture, duplicating and importing it into your document.
- Set your text using a bold font like Asin at 500 points, with Sharp anti-aliasing and a character kerning (AV) of 50 for spaced letters.
- Apply numerous layer styles to the text, including a *Drop Shadow*, *Outer Glow*, *Bevel & Emboss*, *Satin*, *Color Overlay*, *Gradient Overlay*, and a *Pattern Overlay*, ensuring the fill is set to 0%.
- Create metallic bolts using the *Ellipse Tool*, duplicating and resizing for the Phillips head, then rasterize and subtract to form the cross indentation.
- Add glowing blue bars with the *Rounded Rectangle Tool* (4px radius), then apply *Inner Shadow*, *Outer Glow*, *Inner Glow*, *Satin*, and *Color Overlay* layer styles.
- Mask a grunge texture onto the blue light bars and set its blend mode to *Soft Light* to introduce subtle grunge details to the lights.
More Grunge Text Effect Tutorials
Explore additional resources to enhance your grunge text effects in Photoshop.
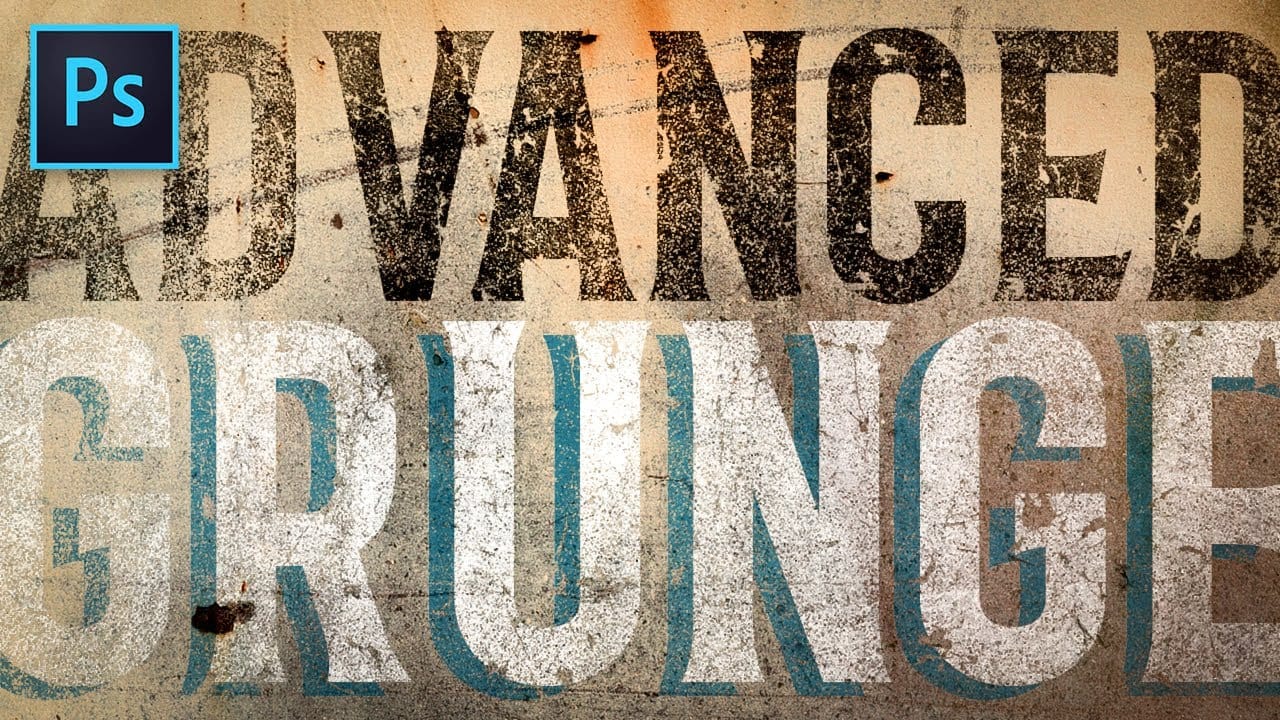
Advanced Grunge Text Effect in Photoshop
In this advanced tutorial from Texturelabs, you'll learn innovative grunge techniques for distressing text and logos in Photoshop.
Going beyond traditional layer masks, this tutorial introduces a novel approach to incorporating grunge and texture elements seamlessly. Notably, the tutorial avoids using layer masks, offering a fresh perspective on achieving distressed effects.
Texturelabs also provides downloadable grunge textures including Light distress, Heavy cracks, and Weathered painted met
Creating a Grunge Text Effect in Photoshop Using Displacement Maps
Grunge typography transforms clean, modern fonts into weathered, distressed masterpieces that feel authentic and rebellious. This aesthetic captures the raw energy of underground culture, where imperfection becomes a powerful design statement. This video tutorial demonstrates how to create convincing grunge text effects using Photoshop’s displacement mapping technique. You’ll learn to
How to Create a Grungy Screen Print Text Effect in Photoshop
Screen printing creates distinctive textures that digital typography often lacks—rough edges, halftone dots, and color bleeding that gives text authentic character. These imperfections make designs feel handcrafted and rebellious, perfect for band merchandise, vintage posters, and streetwear graphics.
This tutorial demonstrates how to recreate that gritty screen print aesthetic using Photoshop's blur, distortion, and halftone effects. You'll transform clean digital text into something that look
How to Create a Grungy Splatter Text Effect in Photoshop
Grungy text effects capture the raw energy of street art and underground design movements. The weathered, distressed look adds character and rebellion to typography, making it perfect for band posters, urban branding, and edgy graphic projects.
This video demonstrates how to combine custom splatter brushes, texture overlays, and adjustment layers to transform clean text into a convincing grunge effect that feels authentic and impactful.
Watch the Video
Building Authentic Grunge Effects
Suc


