How to Create Realistic Embroidery Effects Using Photoshop's Parametric Embroidery Filter

How to Create Realistic Embroidery Effects Using Photoshop's Parametric Embroidery Filter

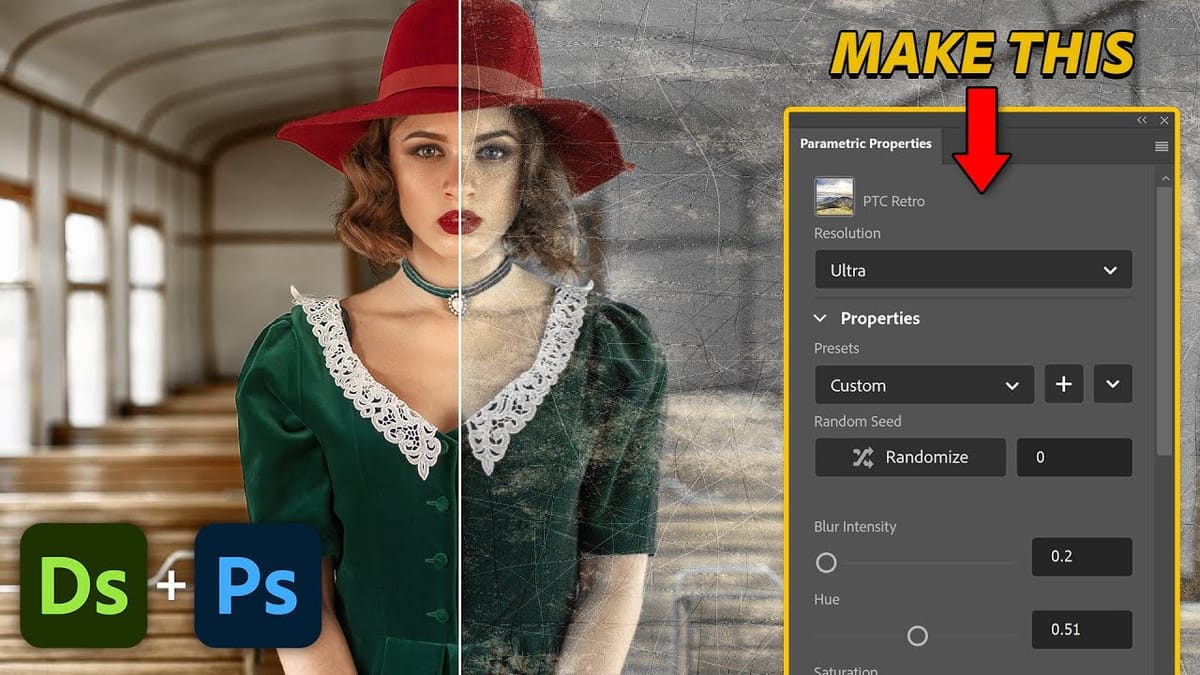
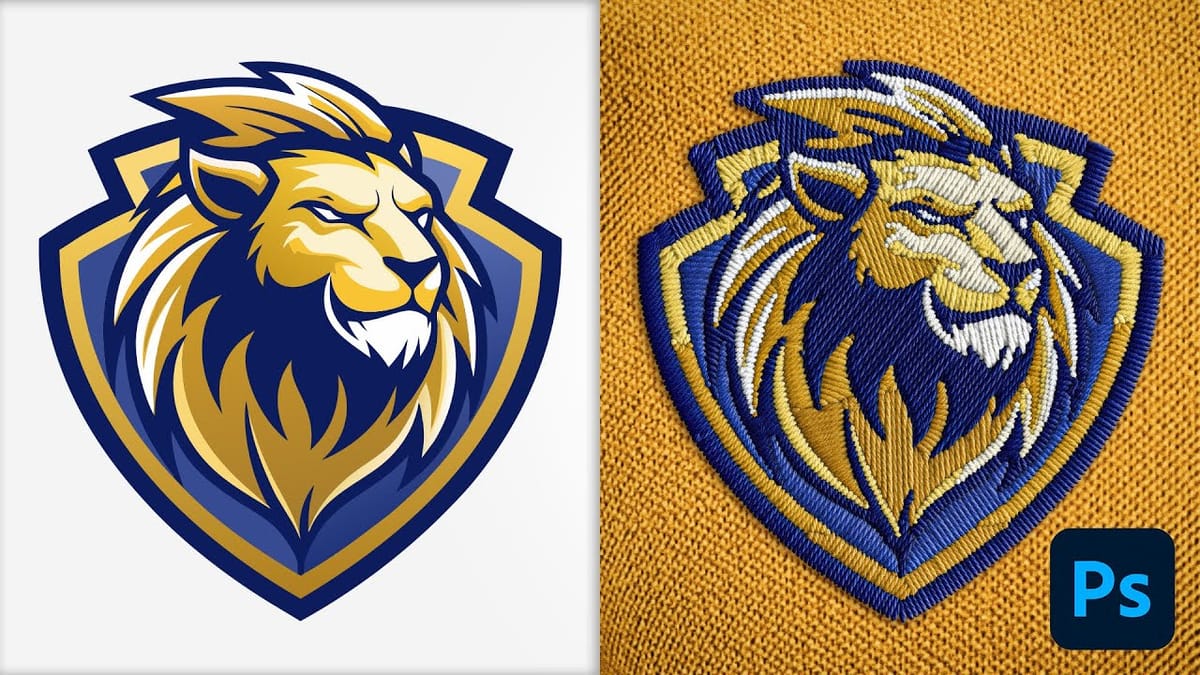
Adobe's introduction of parametric filters in Photoshop beta has opened up new possibilities for creating realistic textile effects without complex manual techniques. The embroidery filter stands out as particularly powerful for transforming logos, graphics, and text into convincing stitched designs with remarkable detail and customization options.

This tutorial demonstrates how to use the new parametric embroidery filter to create authentic-looking knitted embroidery effects. You'll learn the complete workflow from preparing your graphic to fine-tuning thread colors, weave patterns, and surface textures for professional results.

Watch the Tutorial

Video by Photoshop Arthouse. Any links or downloads mentioned by the creator are available only on YouTube

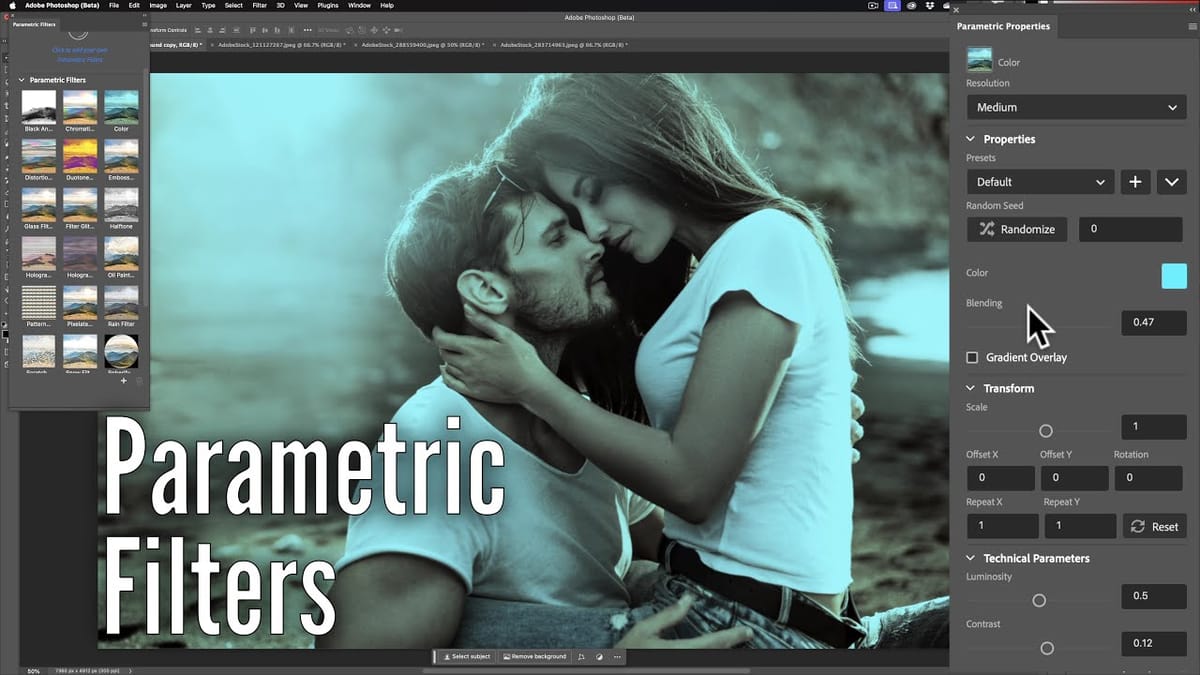
Understanding Parametric Filters in Creative Workflows

Parametric filters represent a significant shift in how Photoshop handles complex effects, moving beyond static presets to dynamic, adjustable systems. Unlike traditional filters that apply fixed transformations, parametric filters maintain live connections to their source parameters, allowing real-time adjustments without quality loss or the need to restart the process.

The embroidery filter specifically addresses the challenge of creating realistic textile effects, which traditionally required extensive manual work with layer styles, textures, and displacement maps. This filter analyzes the input graphic and generates thread patterns, weave structures, and surface lighting that closely mimic actual embroidered materials.

Working with smart objects becomes particularly important when using parametric filters, as it preserves the original artwork while allowing unlimited experimentation with effect parameters. This non-destructive approach enables creative exploration without compromising the source material.

Practical Tips for Embroidery Effects

  • Convert your graphic to a smart object before applying the embroidery filter to maintain editing flexibility and preserve the original artwork
  • Start with simple, high-contrast graphics or text for best results, as complex images may not translate well to embroidery patterns
  • Experiment with different weave types for each color element to create more realistic and varied textile textures
  • Use the imperfections parameter sparingly to add subtle irregularities that mimic real embroidery without overwhelming the design
  • Adjust thread orientation and height settings to create depth and dimensional contrast between different colored elements

Explore more techniques and creative applications for Photoshop's parametric filter system.

Create Custom Photoshop Parametric Filters with Substance Designer
This tutorial guides you through the process of creating custom Photoshop Parametric Filters using Adobe Substance Designer. It aims to empower you with the skills needed to harness this powerful tool for your creative projects. You will begin with a basic example, which is ideal for grasping the fundamentals of
How to use Parametric Filters in Adobe Photoshop 2024 Beta 25.3
Photoshop’s latest beta version introduces a new feature called parametric filters that allows users to non-destructively modify images with various stylized filters. These filters can be used to add distinct looks to images by applying presets like sepia, vintage or oil painting effects. parametric filters are applied as adjustment layers so users can readjust or […] More
Realistic Embroidery Patch Effect in Photoshop
With the new Embroidery Parametric Filter in Photoshop, creating a realistic embroidery effect has never been easier. This tutorial, led by Jesus Ramirez from PTC Photoshop Training Channel, walks you through each step to transform any design into a beautiful embroidered patch. You’ll learn how to use this filter

Get tutorials & freebies delivered to you.

Subscribe to the Photoshop Roadmap newsletter, a weekly roundup of new tutorials, insights and quality downloads, trusted by 6500+ readers.

You might also like

Create Realistic Rim Light Effects on Portraits in Photoshop

Rim lighting transforms ordinary portraits into dramatic, professional-looking images by adding bright highlights around the edges of your subject. This technique simulates light hitting the outer contours of a person, making them stand out from their background with a natural, glowing effect. The key to convincing rim light lies...

How to Use Photoshop's Layer Cleanup Tool to Organize Messy Projects

Complex editing projects with Generative Fill and Expand often result in dozens of unnamed layers cluttering your workspace. The new Layer Cleanup tool automates the tedious process of renaming layers and removing empty ones, transforming chaotic layer panels into organized, manageable structures. This workflow improvement saves significant time during post-...

How to Use Curves for Composite Color Matching in Photoshop

Curves adjustments are essential for making composite elements look natural and cohesive. Understanding how curves manipulate light values and color channels gives you precise control over matching different elements to their new backgrounds. The key to successful color matching lies in analyzing the color temperature and brightness relationships between your...

How to Fix Color Fringing in Subject Cutouts Using Clipping Masks

Perfect layer masks can still produce disappointing results when color fringing appears around hair and fur edges. This common problem isn't caused by poor masking technique—it's the original background bleeding through at the edges. Clipping masks offer a powerful solution by allowing you to paint...

Create Beautiful Floral Oval Frames for Portraits in Photoshop

Transform ordinary portraits into elegant artwork with decorative floral oval frames that blend seamlessly with your subject. This technique combines traditional framing with digital floral elements, creating a painterly effect that's perfect for fine art prints and creative portraits. The process involves creating an oval cutout, adding custom...

You’ve successfully subscribed to Photoshop Roadmap
Welcome back! You’ve successfully signed in.
Great! You’ve successfully signed up.
Success! Your email is updated.
Your link has expired
Success! Check your email for magic link to sign-in.