How to Put a Face onto Paper Money in Photoshop

How to Put a Face onto Paper Money in Photoshop

This tutorial explores the intricate process of digitally placing a portrait onto a paper money template. It delves into transforming standard photographs into a style reminiscent of traditional steel engravings.

Viewers will discover techniques to convert a photo into a realistic engraved look, seamlessly blend it with a currency design, and add customized text, enhancing the illusion of authenticity and detail.

Watch the Video

Video by Blue Lightning. Any links or downloads mentioned by the creator are available only on YouTube

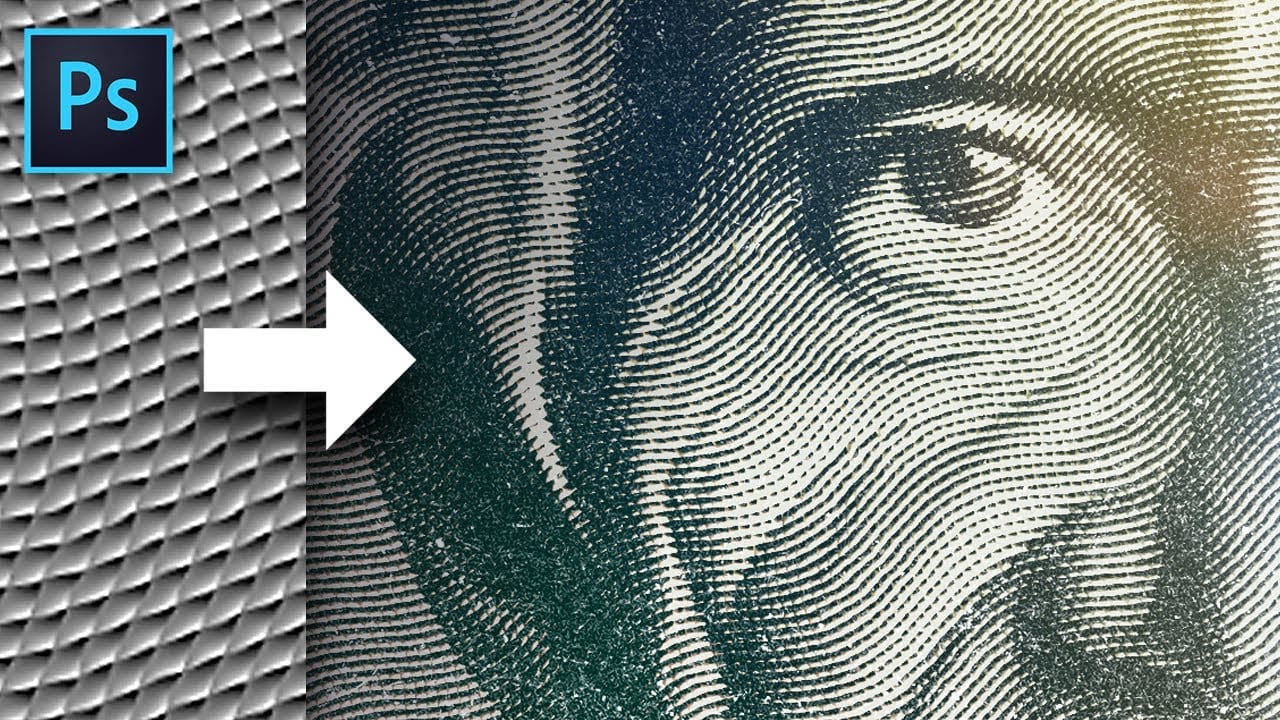
Replicating Engraving Effects for Photo Manipulation

Creating the distinctive look of an engraved portrait, often seen on currency, involves replicating a complex interplay of lines and tones. Traditional steel engraving relies on intricate patterns of parallel and cross-hatched lines to build up shading and detail, giving images a unique texture and depth.

In digital photo manipulation, this effect is achieved by generating specific line patterns and applying them strategically over an image. Key steps include desaturating the source image, adjusting its contrast, and then overlaying it with a patterned texture that simulates the fine lines of an engraving. Proper blending modes and tonal adjustments are crucial for integrating the portrait seamlessly into its new background.

The goal is not just to place an image but to transform its visual characteristics to match the aesthetic of the medium it's being placed upon. This technique extends beyond currency, offering creative possibilities for vintage-style graphics, certificate designs, or artistic photo treatments.

Practical Tips for Engraved Portrait Effects

  • Prepare your photo by desaturating it (Ctrl/Cmd + Shift + U) and applying auto-tone (Ctrl/Cmd + Shift + L) to establish an optimal base for the engraving effect.
  • Generate the core engraving texture by creating a new document filled with 50% grey, then applying the Halftone Pattern (Line) and Wave filters.
  • Utilize Overlay and Linear Burn blend modes for the pattern and composite image, respectively, to achieve realistic integration into the currency template.
  • Create a precise layer mask from a channel selection to accurately fit the portrait into the designated shape on the template.
  • Refine the portrait's dark areas using an Exposure adjustment layer with Gamma Correction, clipped to the face layer, to ensure its tones harmonize with the money's background.

More Tutorials about Engraving and Face Manipulation

Explore additional techniques for creating engraved effects and manipulating faces in Photoshop with these related resources.

How to Paint Your Face in Photoshop
This exciting tutorial by PHLEARN dives into the world of digital face paint. Learn how to utilize a custom face paint brush (potentially included in the video) and Adjustment Layers to create vibrant and realistic designs, perfect for both adorable Halloween looks or spooky transformations. The video will guide you through the process, allowing you to unleash your creativity and design unique face paint effects for any project. Watch tutorial
This magic texture creates an engraved money effect in Photoshop
Discover how to create a unique engraved money effect in Photoshop with this simple yet powerful texture. In this tutorial by Texturelabs, you'll learn how to transform your photos and artwork to achieve an authentic dollar-bill style treatment. The guide starts with the basics of setting up the texture, ensuring you have the foundation for the effect. Then, it dives into various techniques to refine your image, giving it that classic engraved illustrated look. Whether you’re working on a creat
How to Paint Graphics onto a Face in Photoshop
This video, by Marty from Blue Lightning TV, will teach you a technique for painting images onto someone's face in Photoshop. The introduction walks you through the initial setup: opening the images you'll be working with, including a portrait and the graphic you want to paint onto the face. Then, it covers how to convert your subject into a smart object and create a duplicate layer. The next steps involve blurring the duplicated layer and converting it to black and white. After that, you'll le
Money Style Lettering in Photoshop
In this tutorial video by Noyse Works, you'll learn how to create an intricate, engraved text effect similar to those found on currency and certificates. The instructor effectively demonstrates the use of various stock images and Photoshop tools to achieve a detailed and realistic design. The tutorial is thorough and includes useful tips for refining selections and enhancing the overall look with gradient and bevel effects. All files needed to follow this tutorial are provided by the author. P

Get tutorials & freebies delivered to you.

Subscribe to the Photoshop Roadmap newsletter, a weekly roundup of new tutorials, insights and quality downloads, trusted by 6500+ readers.

You might also like

How to Expand Photos Beyond Their Edges Using AI Generative Expand in Photoshop

Sometimes your best photos need more breathing room or a different aspect ratio. Generative Expand in Photoshop lets you extend your canvas beyond the original image boundaries, using AI to intelligently fill in missing areas with content that matches your scene. This technique works for changing portrait photos to landscape...

How to Create Digital Scrapbook Carousels in Photoshop

Digital scrapbook pages capture memories beautifully, but a single page limits your storytelling. Creating a carousel format lets you design multiple connected panels that work together as one cohesive piece while giving viewers more content to explore. This technique uses frames, custom shapes, and smart export settings to build templates...

How to Use Auto Align Layers in Photoshop for Perfect Layer Alignment

When working with multiple layers that need perfect alignment, manual positioning often falls short. Slight camera movement, different crops, or rotated images can make precise alignment seem impossible through visual adjustment alone. Auto Align Layers automatically handles rotation, scaling, and positioning to create perfect layer alignment, even when images have...

How to Use Nano Banana Pro in Adobe Firefly for Advanced AI Image Generation

Adobe Firefly now includes Gemini 3 with Nano Banana Pro, offering sharper 2K image generation with improved text clarity and precision blending. This advanced AI model works seamlessly within Firefly's generative workspace, enabling powerful workflows like multi-image composition and virtual try-on effects. The integration provides access to sophisticated...

Create Colorful Retro Text Compositions in Photoshop

Retro design trends continue to captivate audiences with their bold colors and geometric shapes. This tutorial demonstrates how to build a complete vintage-inspired composition using text, geometric elements, and vibrant color schemes that capture the essence of classic graphic design. You'll learn to combine typography with custom shapes,...

Photoshop's New Color and Temperature Tool for Advanced Color Grading

Photoshop's latest update introduces temperature and tint controls directly into the adjustment layer panel, bringing white balance tools from Camera Raw into the main editing workspace. This addition transforms color grading workflows by enabling precise local adjustments with custom brushes and blend modes. The new Color and Vibrance...

You’ve successfully subscribed to Photoshop Roadmap
Welcome back! You’ve successfully signed in.
Great! You’ve successfully signed up.
Success! Your email is updated.
Your link has expired
Success! Check your email for magic link to sign-in.