Integrating text seamlessly into photographic scenes can improve a design, making static words appear as if they are a natural part of the environment.
Learn how to use Photoshop's Vanishing Point filter to map text seamlessly onto different surfaces, maintaining the image's perspective for a realistic result.
Watch the Video
Video by Brendan Williams. Any links or downloads mentioned by the creator are available only on YouTube
Practical Tips for Integrating Perspective Text
- Select a bold font for your text to ensure maximum legibility and visual impact once the perspective transformation is applied.
- Before using the Vanishing Point filter, rasterize your text by copying its pixels to a new transparent layer, as the filter operates on pixel data, not live text.
- Accurately define your perspective planes using the Create Plane tool, aligning the grid lines with the prominent horizontal and vertical elements of the surface in your photo.
- Extend planes by holding
CommandorControland dragging from a middle anchor point to seamlessly wrap text around corners or onto adjacent surfaces. - Refine the text's blend with the underlying image by adjusting the "Underlying Layer" slider in the Blend If options, removing the text from the darker shadow areas for a more natural appearance.
- Utilize a layer mask on your perspective text layer to manually remove text from specific details or objects, such as windows or other obstructions, ensuring clean integration.
More Tutorials about Perspective and Text Effects
Explore additional techniques for manipulating perspective and enhancing text in your Photoshop projects.
How to Place Anything into Perspective in Photoshop
In this tutorial, we'll demonstrate a technique that allows you to seamlessly incorporate any object into a new scene, ensuring perfect perspective alignment. First, we'll guide you through the process of precisely cutting out the desired object using advanced selection tools. Next, we'll utilize the powerful Vanishing Point Filter to position the object within the target scene, aligning it perfectly with the existing perspective.
But we don't stop there. To achieve a truly professional-looking

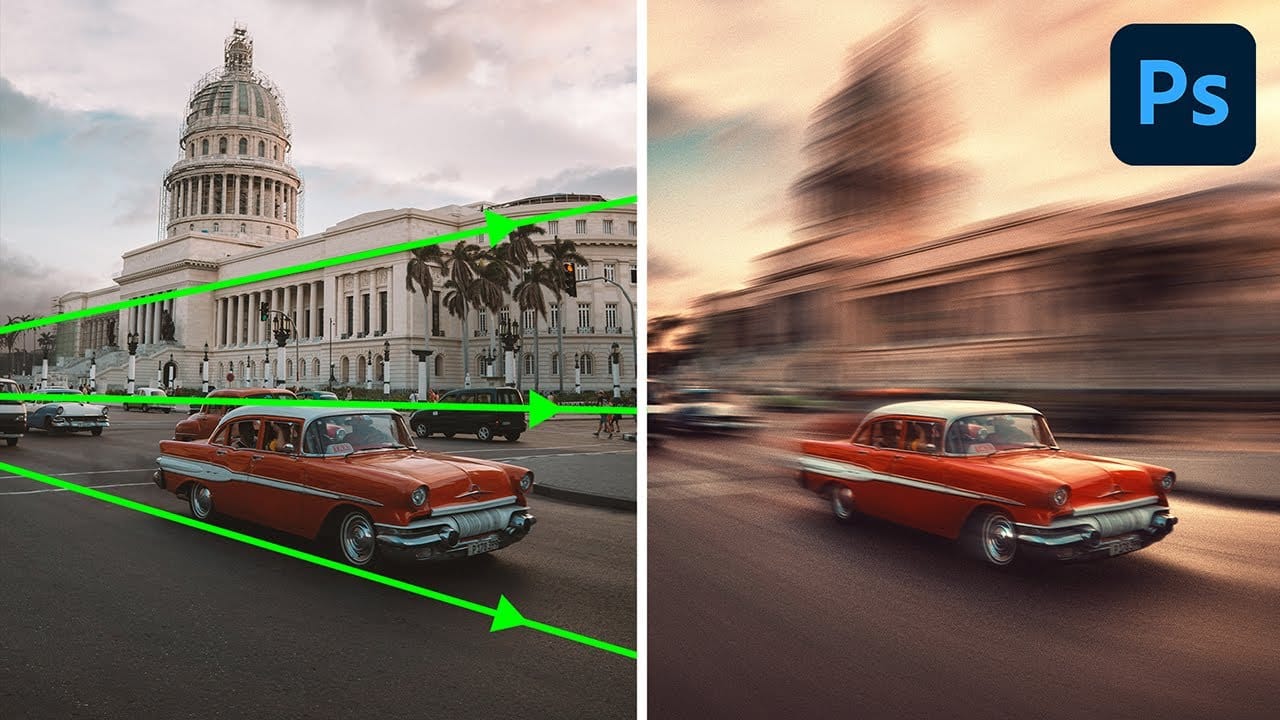
Generate a Perspective Motion effect with Photoshop
In this detailed tutorial, PiXimperfect demonstrates how to create a dynamic perspective motion effect in Photoshop. The lesson focuses on adding motion blur that aligns with the perspective of an object, making it appear as if it's moving rapidly through space. Using multiple paths to capture the perspective, you’ll learn how to apply blur effects along these lines to simulate realistic motion.
The tutorial covers advanced techniques with Path Blur to not only create motion but also enhance th
Create a cool text portrait in Photoshop
Creating a text portrait in Photoshop is a sophisticated blend of photography and typography. In this tutorial by Marty from Blue Lightning TV, you'll learn how to transform a standard photo into a powerful typographic portrait. Starting with an optimal photo choice, Marty guides you through desaturating the image, refining the subject's edges, and setting up a new document.
The tutorial then delves into the core process of integrating text, adjusting brightness and contrast for maximum impact,

Create an Inception-like perspective bending effect in Photoshop
In this Photoshop tutorial by Jesus Ramirez from Photoshop Training Channel, you will learn how to create a perspective-bending effect. The resulting cube Earth will be a similar effect to the photo manipulations that you have seen in the movie Inception and Dr. Strange.
The Perspective photo manipulation effect in this video can be replicated with almost any landscape photo where the horizon is visible.
Watch tutorial