Redesigning a Classic Star Wars Poster in Photoshop

Redesigning a Classic Star Wars Poster in Photoshop

Creating compelling digital art, especially when working with existing iconic material, often presents unique technical and creative challenges. Sourcing high-quality images for older films can be a significant hurdle, leading to compromises in detail and overall visual fidelity. Furthermore, maintaining a consistent design style across a series while allowing for personal skill development over time requires thoughtful execution.

This tutorial provides insight into overcoming these common frustrations by demonstrating advanced Photoshop compositing techniques. Viewers will learn practical strategies for blending disparate elements, enhancing image quality (even with AI assistance), achieving cohesive lighting, and constructing complex, multi-layered compositions, ultimately improving their digital art and workflow efficiency.

Watch the Photoshop Poster Redesign Process

Any links or downloads mentioned by the creator are available only on YouTube

Evolving Design Through Iteration and Adaptation

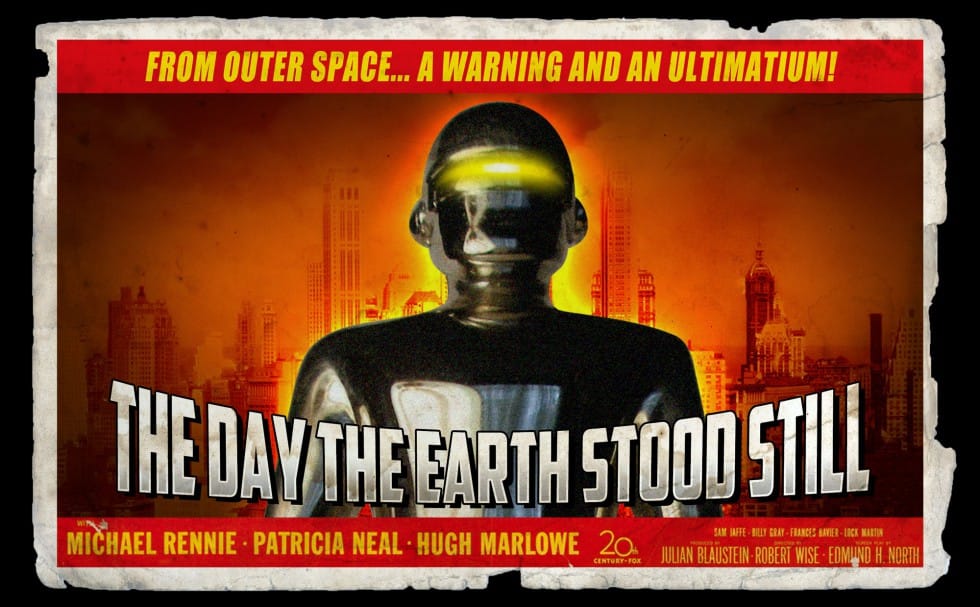
The journey of a designer is often characterized by continuous skill development, where early projects serve as foundational learning experiences that pave the way for more refined works. This evolution is particularly evident when revisiting a creative series over several years, as seen in the redesign of a classic Star Wars poster. The initial goal of giving original posters a "modern twist" led to the adoption of prevalent contemporary styles, such as the "floating head" poster concept, which required a consistent application across the series despite improvements in technique.

A significant challenge in such projects involves the sourcing of high-quality assets, especially for older films where suitable imagery is scarce. This necessitates creative solutions, including the use of AI for image extension and enhancement. The iterative process of design, from initial image selection to final blending, underscores the importance of experimentation and refinement. This often involves balancing elements like: image quality, stylistic consistency, and thematic representation.

Ultimately, the ability to recognize past limitations and apply new knowledge is crucial. The deliberate decision to resume an abandoned series, despite the initial quality discrepancies between earlier and later works, highlights the value of perseverance and the satisfaction derived from observing one's own progress in the creative field.

Practical Tips for Photoshop Poster Compositing

  • Utilize AI for Image Enhancement: When working with limited or older source material, use AI tools to extend and enhance image quality, compensating for poor original resolution.
  • Employ Diagonal Compositions: Align elements like characters and titles diagonally to create a dynamic and visually satisfying composition, especially when matching existing design motifs like angled logos.
  • Master Lighting and Blending: Paint highlights and shadows on separate layers for precise control, and use *levels* to harmonize the lightness of different images, establishing depth and distance between elements.
  • Integrate Atmospheric Effects: Add fog, smoke, and haze in between characters and vehicles to create a sense of depth, cohesion, and a desirable "glowy" or retro aesthetic.
  • Embrace Iterative Refinement: Be prepared to discard initial attempts and iterate on compositions, blending, and lighting until the desired visual outcome is achieved, recognizing that perfection often comes through multiple revisions.

More Tutorials about Poster Design

Explore additional resources and guides to further enhance your skills in digital poster creation and graphic design.

Create a retro ’50s Sci-Fi poster in Photoshop
In this tutorial by Blue Lightning TV you will learn how to make a classic, 1950s, retro, science fiction, movie poster. The example shown is a redesign of the 1951 movie poster, Download “The Day the Earth Stood Still” Sci-fi Movie Poster here… More
Crafting a Typographic Poster in Adobe Photoshop
Join Adobe’s UX Growth Designer, Curtis Ying, as he transforms a Swiss Typographic poster through an engaging design process. With the input from the Instagram community, this presentation showcases how he carefully selects a bold red background that sets the tone for the entire piece. Throughout the process, Curtis
Create a Striking Text Portrait Poster in Photoshop
This tutorial shows you how to create a striking text portrait poster using Photoshop. You will start by removing the background with the Select Subject tool and refining it further using layer masks. This prepares the image for text wrapping, which makes the final design look professional and polished. Next,
Artist creates a huge Star Wars Wallpaper With Every Character in Photoshop
In this entertaining Photoshop tutorial, YouTuber John Doe decides to create an epic Star Wars wallpaper in celebration of May the 4th. He sets out to include as many characters as he can from across the entire Star Wars universe. Viewers will see John scour the internet to find images of hundreds of different characters, […] More

Get tutorials & freebies delivered to you.

Subscribe to the Photoshop Roadmap newsletter, a weekly roundup of new tutorials, insights and quality downloads, trusted by 6500+ readers.

You might also like

10 Photoshop Tricks You Probably Forgot Exist

There’s a funny pattern with Photoshop. The longer you use it, the more you rely on the same small set of tools… while some of the most powerful techniques quietly fade into the background. Not because they stopped working — but because they’re just a bit hidden, or not...

Add Floral Patterns to Black Dresses Using Brushes in Photoshop

Transform plain black clothing into vibrant, patterned garments using custom brushes and strategic layer blending. This non-destructive technique combines precise selections with clipping masks to paint realistic floral designs directly onto fabric while preserving the original photograph. The method works particularly well on black materials because the hard light blend...

How to Replace Objects Using Reference Images in Photoshop Generative Fill

Reference images transform Generative Fill from a text-based tool into a precise visual command system. Instead of describing what you want, you show the AI exactly which object to create, leading to more accurate and predictable results. This technique works by combining traditional selection tools with the new reference image...

How to Use Blend If Sliders for Pixel-Perfect Transparency in Photoshop

Blend If sliders control transparency based on brightness levels, making complex selections unnecessary. Understanding how these two simple sliders work with RGB channels opens up precise compositing possibilities that would otherwise require multiple masks and selections. The technique works by targeting specific brightness ranges from 0 to 255, allowing you...

How to Create a Double Exposure Effect in Photoshop Using Screen Blend Mode

Double exposure effects transform ordinary portraits into striking artistic compositions by blending two images seamlessly. This technique works best with high-contrast images—silhouettes against bright backgrounds paired with nature scenes or textures. The key to successful double exposures lies in the contrast between light and dark areas. When you combine...

You’ve successfully subscribed to Photoshop Roadmap
Welcome back! You’ve successfully signed in.
Great! You’ve successfully signed up.
Success! Your email is updated.
Your link has expired
Success! Check your email for magic link to sign-in.