The best way to whiten teeth in Photoshop

The best way to whiten teeth in Photoshop

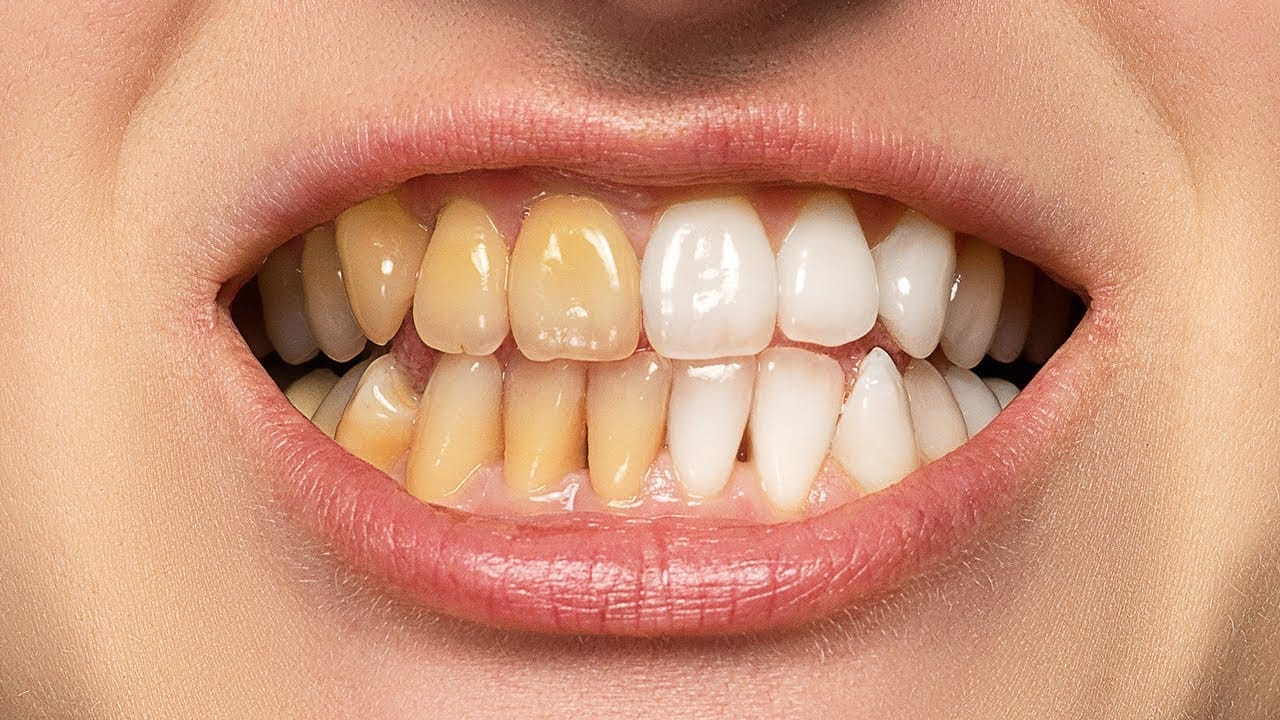
This tutorial by PiXimperfect offers a simple and effective technique to remove the yellow stains from teeth in Photoshop. The author suggests using the Hue/Saturation Adjustment Layer to target and manipulate the colors, resulting in a natural-looking outcome.

The process is straightforward. The user can apply the Hue/Saturation Adjustment Layer to the desired area and play with the saturation levels to reduce the yellow tones. This approach allows for precise control over the color changes, ensuring a seamless and natural-looking result.

The tutorial highlights the power of the Hue/Saturation Adjustment Layer, which enables users to effortlessly address discoloration issues without the need for complex selections or intricate editing techniques. By following PiXimperfect's guidance, users can achieve professional-grade teeth whitening effects in Photoshop.

Get tutorials & freebies delivered to you.

Subscribe to the Photoshop Roadmap newsletter, a weekly roundup of new tutorials, insights and quality downloads, trusted by 6500+ readers.

You might also like

How to Change Object Colors in Photoshop Using Hue/Saturation

Changing the color of specific objects in your photos requires precision and the right technique. The key is creating an accurate selection and using a targeted adjustment layer that affects only your chosen subject while preserving the rest of the image. This method combines the Object Selection tool with Hue/...

How to Remove Eye Bags Using Dodge and Burn in Photoshop

Eye bags can dramatically age a portrait, making subjects appear tired or unhealthy. Traditional removal methods often destroy skin texture or create unnatural results that look obviously retouched. This professional dodge and burn technique removes even severe eye bags while preserving every detail of natural skin texture. The method uses...

How to Fix Crossed Eyes and Lazy Eyes in Photoshop

Portrait photographers and retouchers often encounter images where subjects have crossed or lazy eyes, which can distract from an otherwise great shot. Whether caused by timing, lighting, or natural eye alignment issues, these problems can be corrected effectively without compromising image quality. This tutorial demonstrates two practical approaches: using AI-powered...

How to Use Nano Banana Pro in Photoshop for Background Replacement and Scene Changes

Nano Banana Pro transforms how you place subjects into new environments in Photoshop. This advanced AI model maintains perfect subject likeness while seamlessly integrating them into any background you can imagine. The tool excels at matching lighting, preserving facial features, and even adapting clothing to complement new scenes, all through...

How to Restore Old Photos Using AI and Photoshop While Preserving Original Details

Traditional AI photo restoration tools often change facial features, alter poses, or distort important details when enhancing old photographs. This hybrid workflow combines AI enhancement with precise manual alignment techniques to restore vintage images while keeping every original detail intact. The method uses strategic cropping, AI processing with specific prompts,...

How to Create Studio-Style Black and White Portraits in Photoshop

Professional studio portraits achieve their dramatic impact through carefully controlled lighting that creates striking contrast between subject and background. This technique transforms ordinary photos into compelling black and white portraits by using the existing highlights and shadows in your image to blend seamlessly with a dark background. The method relies...

You’ve successfully subscribed to Photoshop Roadmap
Welcome back! You’ve successfully signed in.
Great! You’ve successfully signed up.
Success! Your email is updated.
Your link has expired
Success! Check your email for magic link to sign-in.