Understanding Vibrance vs Saturation in Photoshop and When to Use Each Tool

Understanding Vibrance vs Saturation in Photoshop and When to Use Each Tool

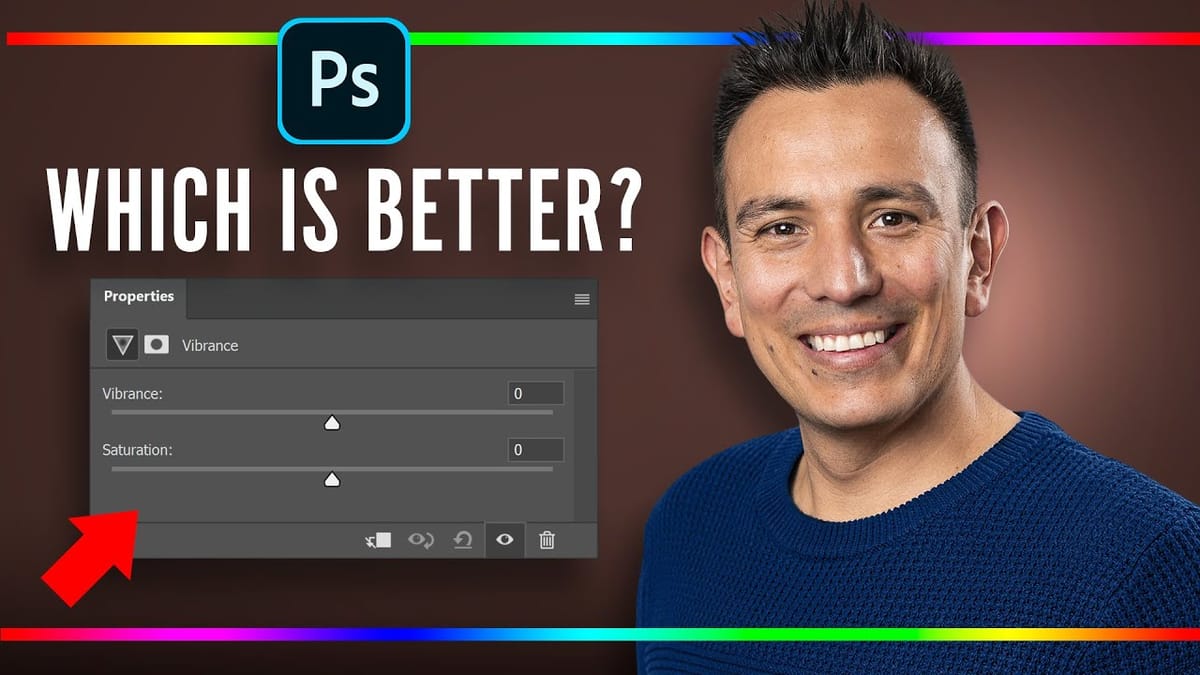
Color enhancement is one of the most fundamental aspects of photo editing, yet many Photoshop users struggle with knowing when to use vibrance versus saturation. Both tools can boost the intensity of colors in your images, but they work in dramatically different ways and produce very different results.

Learning the distinction between these tools—and understanding how to use the advanced Hue/Saturation adjustment layer for targeted color control—will give you the precision needed to enhance your images without creating unnatural-looking results, especially when working with portraits.

Watch the Tutorial

Video by Phlearn. Any links or downloads mentioned by the creator are available only on YouTube

The Science Behind Color Enhancement Tools

Vibrance and saturation work on fundamentally different principles when analyzing and adjusting color data. Saturation applies a uniform boost to all colors across the entire image, treating every hue with equal intensity. This aggressive approach can quickly push skin tones into unnatural territory, creating the oversaturated look that screams "over-edited."

Vibrance, on the other hand, uses intelligent algorithms to selectively enhance colors while protecting skin tones and avoiding clipping in already-saturated areas. It recognizes the color ranges typically associated with human skin and applies a gentler touch to those areas, making it ideal for portrait work.

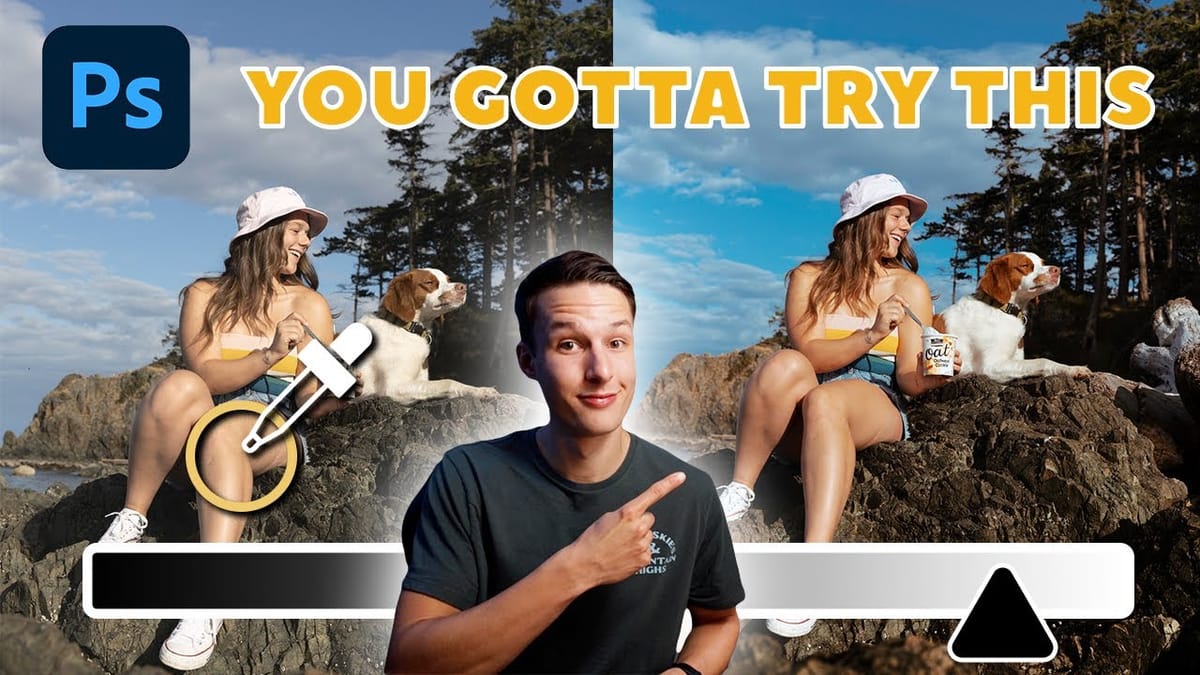
The Hue/Saturation adjustment layer takes this concept even further by allowing you to target specific color ranges with surgical precision. This tool essentially divides your image into color channels, letting you enhance the greens in foliage without affecting the blues in clothing or the warm tones in skin.

Essential Techniques for Color Enhancement

  • Use vibrance for portraits: When working with images containing people, start with the Vibrance adjustment layer to boost overall color intensity while maintaining natural skin tones.
  • Layer your adjustments: Combine a gentle vibrance boost with targeted Hue/Saturation adjustments for maximum control—enhance the overall image first, then fine-tune specific color ranges.
  • Use the eyedropper tool: In Hue/Saturation adjustment layers, select any color category then use the eyedropper to sample the exact color you want to adjust, ensuring precise targeting.
  • Reserve saturation for landscapes: The aggressive saturation slider works best on images without people, where you want to boost all colors equally for dramatic effect.
  • Monitor your adjustments: Toggle adjustment layers on and off frequently to compare your changes against the original image and avoid over-processing.

Explore these additional tutorials to expand your color grading and enhancement skills in Photoshop.

Saturation vs Vibrance: The Best for Color Enhancement in Photoshop
In this tutorial by Jesus Ramirez from Photoshop Training Channel you will learn the remarkable differences between SATURATION and VIBRANCE in Photoshop. More
3 must-try techniques to enhance colors in Photoshop
When you’re editing a photo in Photoshop, making your colors pop is likely on the top of your to-do list. There are a variety of great tools to use in Photoshop, but with these three techniques, you will be able to get more rich colors in your edits, while also having more control over how […] More
Create a bright and beautiful color grade in Photoshop
Learn how to add a bright and beautiful color grade to your photos with the Camera RAW filter in Photoshop. Great for model photography and landscapes. Download the sample image here… More

Get tutorials & freebies delivered to you.

Subscribe to the Photoshop Roadmap newsletter, a weekly roundup of new tutorials, insights and quality downloads, trusted by 6500+ readers.

You might also like

How to Create a 1-Bit Bitmap Effect in Photoshop

The 1-bit bitmap effect transforms modern digital images into stark black-and-white graphics reminiscent of early computer displays and vintage print materials. A bitmap uses exactly one bit of data per pixel, allowing only pure black or white with no gray values in between. This technique works equally well on photographs...

14 New Features in Photoshop 27.6 You Need to Know

Photoshop 27.6 brings significant updates that enhance workflow efficiency and creative possibilities. From improved reflection removal tools to smarter AI models, these features address real challenges photographers and designers face daily. This comprehensive overview covers 14 key additions, including enhanced distraction detection, new AI capabilities, and improved workspace organization...

Create Film Looks with Custom LUTs and Profiles for Any Photo Editor

Film photography's nostalgic warmth and character continue to captivate photographers working in the digital realm. Creating authentic film looks requires understanding how vintage stocks like Kodak Kodacolor and Fujifilm Superia handled color, contrast, and tone. This comprehensive workflow shows you how to build these looks from scratch using...

Create Pixelated Liquid Typography with Chromatic Distortion in Photoshop

Liquid typography combines flowing, organic distortions with digital glitch aesthetics to create text that appears to melt and separate into colorful chromatic components. This technique transforms static letters into dynamic, pixelated designs that suggest movement and technological breakdown. The method uses the Liquify filter to create fluid distortions, then separates...

How to Create Cinematic Color Grading Using Camera Raw Filter in Photoshop

Color grading transforms ordinary photos into cinematic masterpieces by adding mood and visual depth. The Camera Raw filter built into Photoshop provides professional-level color grading tools that rival dedicated editing software, allowing you to adjust shadows, midtones, and highlights with precision. This technique uses smart filters to ensure non-destructive editing,...

You’ve successfully subscribed to Photoshop Roadmap
Welcome back! You’ve successfully signed in.
Great! You’ve successfully signed up.
Success! Your email is updated.
Your link has expired
Success! Check your email for magic link to sign-in.