Using Clarity and Dehaze for Natural Depth in Images

Using Clarity and Dehaze for Natural Depth in Images

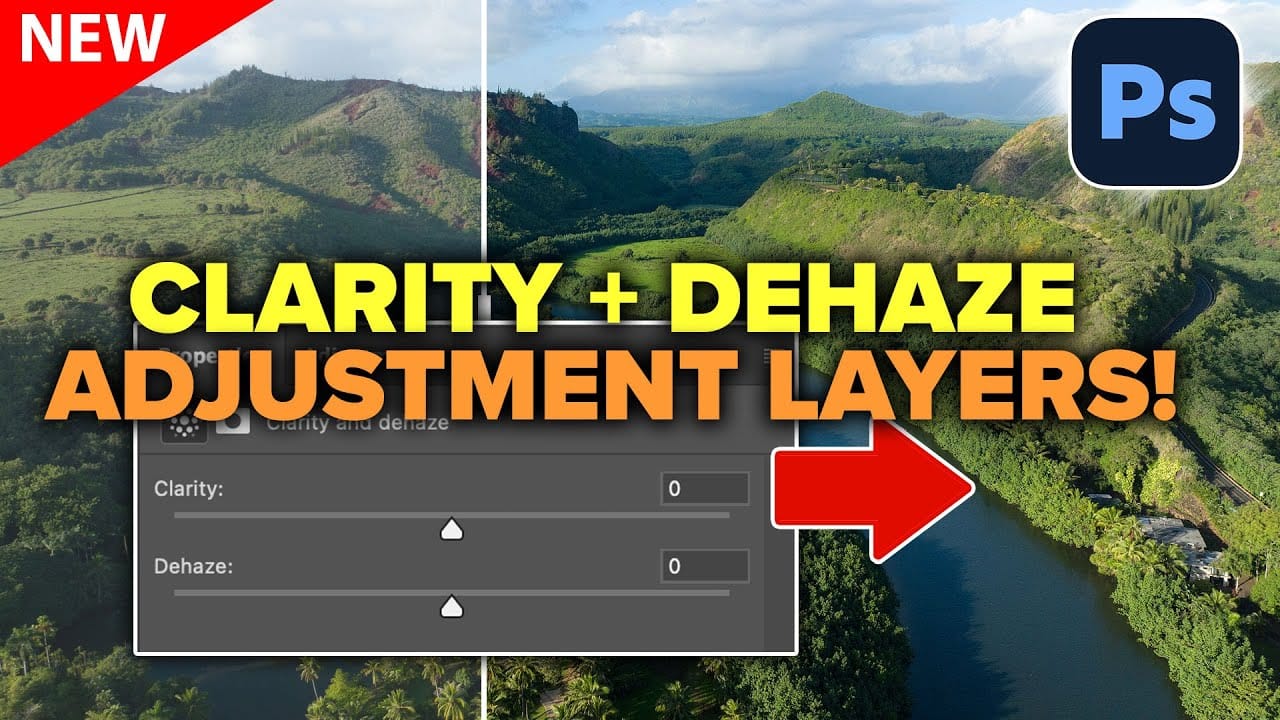
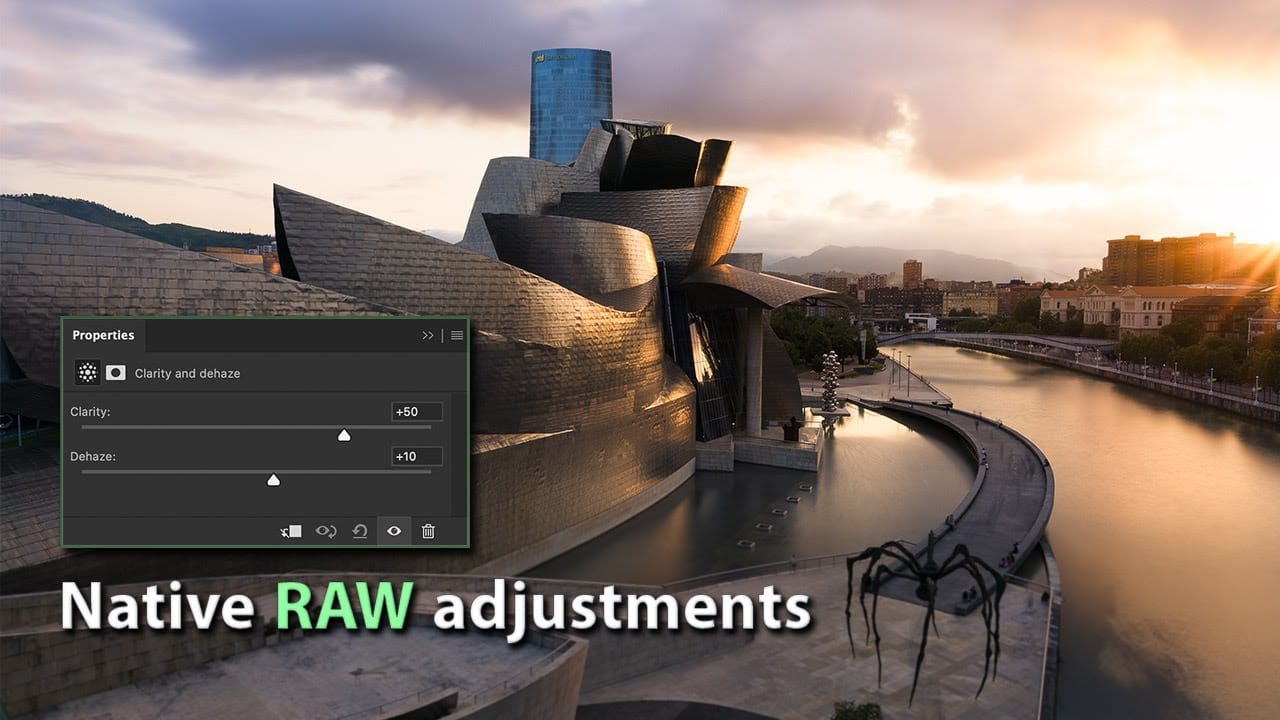
Photoshop's new Clarity and Dehaze adjustment layers offer precise control over image depth, but they're often misused to create harsh, over-processed effects. Understanding how these tools work at different frequency levels helps you enhance natural atmospheric perspective instead of destroying it.

Clarity affects microcontrast in small details, while Dehaze works on larger contrast areas globally. Using them selectively and often in reverse creates more convincing spatial relationships between foreground and background elements.

Watch the Video

Video by f64 Academy. Any links or downloads mentioned by the creator are available only on YouTube

Practical Tips

Here are key techniques for using clarity and dehaze effectively:

  • Use negative clarity values on backgrounds to create light, airy atmospheric effects that mimic natural distance
  • Apply positive clarity selectively to foreground elements while masking out distant objects to maintain depth
  • Change dehaze layers to Luminosity blend mode to avoid unwanted blue color shifts in skies
  • Create separate adjustment layers for foreground and background areas using Select Subject and inverted masks
  • Avoid pushing both sliders positive globally as this flattens all elements to the same visual plane

Explore more techniques for creating natural depth and dimension in your images:

How to Use Clarity and Dehaze Adjustments in Photoshop
Two of the most popular adjustments from Camera Raw—Clarity and Dehaze—are now available as adjustment layers in Photoshop beta. These tools work on different image frequencies to enhance contrast and cut through atmospheric haze, giving you precise control over midtone contrast and low-frequency areas. Understanding how these adjustments affect different parts of your image helps you combine them effectively for maximum impact while maintaining natural-looking results. Watch the Video Prac
Automatically blur backgrounds in Photoshop
Aaron Nace dives into Photoshop's new Depth Blur Neural Filter, a tool designed to simplify the process of blurring backgrounds and simulating a shallow depth of field. This tutorial covers how to use this feature to quickly achieve a soft, out-of-focus background with minimal effort. Aaron provides a step-by-step guide on applying the Depth Blur Neural Filter, highlighting its ease of use and efficiency. He also examines the tool's performance, discussing its strengths and any potential limita
Photoshop January 2026 Update: 5 New Features Including Grain and Clarity Adjustment Layers
Photoshop's January 2026 update brings five significant features that streamline common editing tasks. The highlight is new adjustment layers for grain and clarity effects, eliminating the need to work in Camera Raw for these adjustments. The update also introduces an improved generative AI model with higher resolution output and enhanced reference image capabilities, plus a more effective Remove Tool for cleaner object removal. Watch the Video Practical Tips Here are key techniques for wo
How to Add Color Depth Using Color Dodge Layers in Photoshop
Color depth transforms flat images into rich, dimensional works that hold the viewer's attention. The secret lies in selectively enhancing specific areas rather than applying blanket adjustments that can muddy your colors. The color dodge technique offers precise control over where and how you add vibrancy. This method works particularly well for portrait enhancement, bringing life to eyes, lips, hair, and jewelry without creating an over-processed look. Watch the Tutorial Understanding Non
Magically change focus of photos in Photoshop
In this Photoshop tutorial, Colin Smith demonstrates the most powerful way to change the depth of field or background blur in your photos. This technique leverages depth maps, neural filters, and lens blur to achieve professional results. Colin starts by explaining how to create and use depth maps, which are essential for controlling the focus and blur levels in specific areas of your photo. Depth maps allow you to simulate a shallow depth of field, making your subject stand out against a blurr
Mastering Skin Smoothing with Frequency Separation
In photography, achieving flawless subject skin can often be a challenge. Blemishes, uneven tones, and harsh shadows frequently detract from an otherwise great photo, leading to frustration for both photographers and subjects. This guide explores frequency separation, a powerful technique that allows precise skin retouching without sacrificing natural texture. Learn how to apply this method, enhance it with advanced steps, and integrate tools that streamline your workflow for professional resul
5 Ways Topaz DeNoise Can Improve Your Photos
Changing the ISO settings of the camera is one of the tricks expert photographers use to take crisp clear photographs in low light conditions. Unfortunately, using higher levels of ISO has an annoying downside: It adds more noise to the photographs. Sure, Photoshop does have some basic filters that let you get rid of the noise in photos. But the adjustment settings on those filters are very limited, especially when it comes to high ISO photos. This is why many professional photographers are no
Natural Skin Smoothing in Photoshop
Professional beauty retouching demands techniques that smooth skin while preserving natural texture. This advanced method combines inverted layers with Vivid Light blend mode to create seamless skin enhancement without the artificial "plastic" look common in over-processed images. The technique works by canceling out layer information through inversion, then selectively applying blur and sharpening filters to reconstruct realistic skin texture while eliminating blemishes and color irregularitie
How to Use New Camera Raw Adjustment Layers in Photoshop Beta
Three new adjustment layers in Photoshop beta bring Camera Raw's most powerful tools directly into your layers panel. Color and Vibrance, Clarity and Dehaze, and Grain adjustments now work as standard adjustment layers, eliminating the need for smart objects while maintaining all the precision masking and blending capabilities you expect. This breakthrough allows photographers to apply global-quality Camera Raw adjustments with local control, creating more efficient workflows without file bloat
Frequency Separation Beauty Retouch With The Mixer Brush
In this Photoshop tutorial, the author Kevin Roodhorst shares the professional way to soften skin for high-end retouching. The tutorial focuses on the technique of frequency separation, which is a widely used method in the world of photo editing. The author explains that frequency separation involves separating the image into two layers: the high-frequency layer, which contains the details and textures, and the low-frequency layer, which contains the overall color and tone. By working on these

Get tutorials & freebies delivered to you.

Subscribe to the Photoshop Roadmap newsletter, a weekly roundup of new tutorials, insights and quality downloads, trusted by 6500+ readers.

You might also like

How to Create Realistic Lighting Effects and Dust Particles in Photoshop

Creating convincing lighting effects requires more than just adding a bright spot to your image. The key to realism lies in ensuring your subject already has highlights that match the direction of your artificial light source, making the effect appear natural and believable. This technique combines a simple soft brush...

How to Set Up Mouse Scroll Zoom in Photoshop for Faster Navigation

Constantly reaching for the magnify tool or right-clicking to access zoom options disrupts your creative flow and slows down detailed work. Most users don't realize that Photoshop includes powerful scroll wheel zoom features that aren't enabled by default. These simple preference settings transform navigation into smooth,...

How to Fix Layer Panel Thumbnails Showing the Full Canvas in Photoshop

When working with complex layered files, layer thumbnails that display the entire canvas instead of just the layer content make it difficult to identify specific layers at a glance. This common issue occurs when the layers panel is set to show the "entire document" rather than focusing on...

Game Boy Pixel Effect Tutorial in Photoshop

The distinctive monochrome pixelated aesthetic of the original Game Boy has become an iconic visual style that evokes powerful nostalgia for classic handheld gaming. This technique transforms ordinary photographs into high-contrast, pixelated artwork that mimics the characteristic black and white display of Nintendo's legendary portable console. The process...

How to Cut Out Trees Using Blend If in Photoshop

Trees with complex branching patterns challenge traditional selection tools, often leaving messy edges and incomplete cutouts. The Blend If feature offers a powerful alternative for extracting trees from contrasting backgrounds by targeting specific color channels rather than attempting pixel-by-pixel selection. This technique works particularly well when trees are photographed against...

Should You Use Photoshop's New AI Credit System or Stick to Traditional Tools

Adobe's credit-based AI system is creating a dilemma for photographers and digital artists. With 250 monthly credits that can disappear after just a few generative fill operations, many are questioning whether these new tools are worth the investment or if traditional skills remain more valuable. This perspective from...

You’ve successfully subscribed to Photoshop Roadmap
Welcome back! You’ve successfully signed in.
Great! You’ve successfully signed up.
Success! Your email is updated.
Your link has expired
Success! Check your email for magic link to sign-in.