How to Create Retro Molded Plastic Text Effects in Photoshop

How to Create Retro Molded Plastic Text Effects in Photoshop

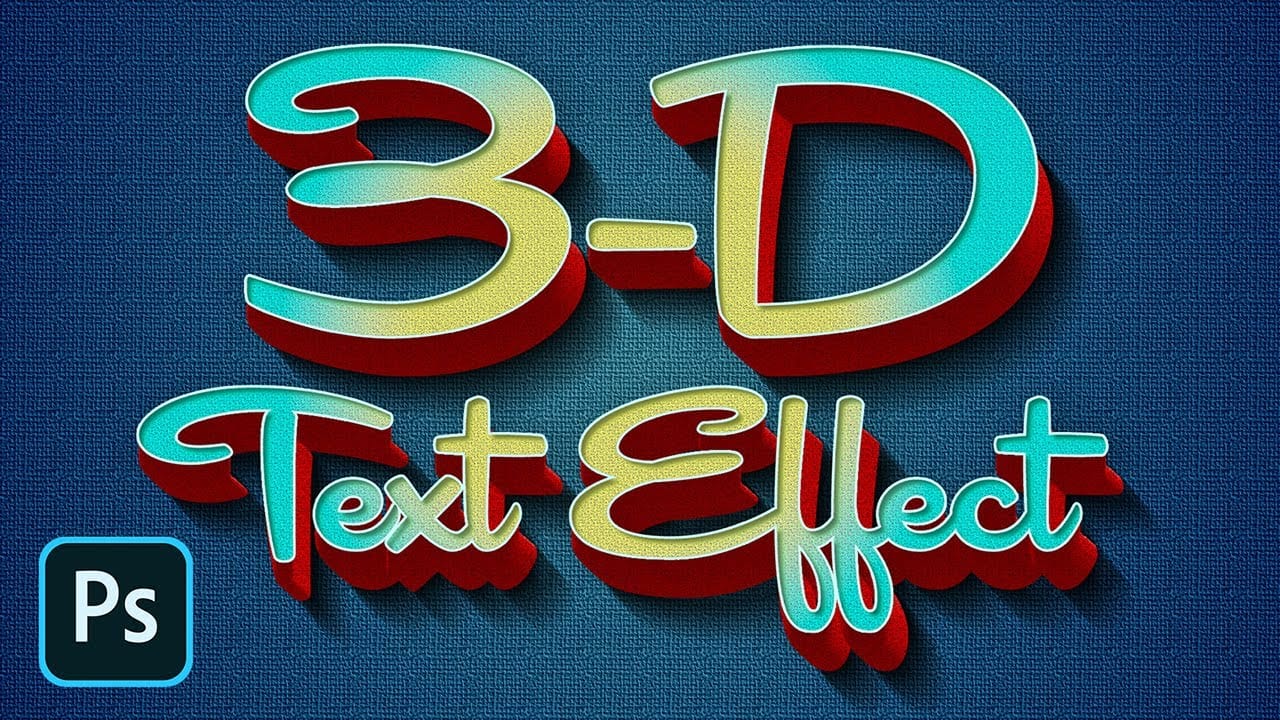
The distinctive look of vintage molded plastic carries a unique charm that defined countless products from toys to electronics in decades past. This glossy, dimensional aesthetic brings instant retro appeal to modern designs, combining smooth beveled surfaces with vibrant colors and realistic depth.

This tutorial demonstrates how to recreate that authentic molded plastic appearance using Photoshop's layer styles and smart objects. You'll learn to transform ordinary text and graphics into convincing three-dimensional plastic elements that capture the essence of classic retro design.

Watch the Video

Video by Photoshop Arthouse. Any links or downloads mentioned by the creator are available only on YouTube

Practical Tips for Molded Plastic Effects

  • Use thick, rounded fonts for better plastic appearance—thin letterforms don't capture the molded quality effectively
  • Adjust filter settings proportionally when working with different document resolutions to maintain consistent visual results
  • Convert elements to smart objects before applying effects to preserve editability and allow for easy adjustments
  • Create expanded background shapes around your main elements to simulate the realistic thickness of molded plastic
  • Use the Ring-Triple gloss contour for authentic plastic highlights and the Rolling Slope Descending contour for realistic surface variation

Explore more techniques for creating vintage-inspired typography and dimensional text effects.

Colorful Glossy and Shiny 3D Text Effect in Photoshop
In this Envato Tuts+ tutorial, Monikazza Grubena demonstrates how to create a glossy text effect in Photoshop using the layer style panel. The tutorial is straightforward and efficient, ideal for both beginners and experienced users. Monikazza explains the process clearly, making it easy to follow along and replicate the effect on your own projects. The tutorial also highlights the value of Envato Elements, which offers a wide range of professional shiny and glossy text effects, along with othe
How to Create a Retro 3D Text Design in Photoshop
The allure of retro design continues to captivate, offering a nostalgic aesthetic that can add unique character to modern projects. Creating dynamic 3D text effects is a powerful way to infuse this vintage charm into your digital art, transforming flat typography into eye-catching, dimensional elements. This tutorial provides a comprehensive guide to crafting a compelling retro 3D text design in Photoshop. You will learn essential techniques for building depth, applying intricate layer styles,
Create a cool text portrait in Photoshop
This tutorial explores the process of creating a powerful typographic portrait poster using Adobe Photoshop. It transforms a standard photo into a visually striking artwork where text forms the contours of a subject's face. Viewers will learn essential Photoshop techniques, from precise subject selection and background preparation to the artful integration of text and subtle refinements that enhance legibility and visual impact. Watch the Video The Art of Typographic Portraiture Typographi
How to Create a 3D Retro Text Effect in Adobe Photoshop
In this Adobe Photoshop tutorial by Spoon Graphics, you'll learn how to create a great-looking retro text effect. Using a mix of layer styles and clever Photoshop techniques, this tutorial guides you through the process step-by-step. The best part is that it utilizes Smart Objects, allowing you to non-destructively create the effect, meaning the original type element can still be updated to change the wording. This approach ensures flexibility and ease of editing while achieving a stylish retr

Get tutorials & freebies delivered to you.

Subscribe to the Photoshop Roadmap newsletter, a weekly roundup of new tutorials, insights and quality downloads, trusted by 6500+ readers.

You might also like

Create Realistic Rim Light Effects on Portraits in Photoshop

Rim lighting transforms ordinary portraits into dramatic, professional-looking images by adding bright highlights around the edges of your subject. This technique simulates light hitting the outer contours of a person, making them stand out from their background with a natural, glowing effect. The key to convincing rim light lies...

How to Use Photoshop's Layer Cleanup Tool to Organize Messy Projects

Complex editing projects with Generative Fill and Expand often result in dozens of unnamed layers cluttering your workspace. The new Layer Cleanup tool automates the tedious process of renaming layers and removing empty ones, transforming chaotic layer panels into organized, manageable structures. This workflow improvement saves significant time during post-...

How to Use Curves for Composite Color Matching in Photoshop

Curves adjustments are essential for making composite elements look natural and cohesive. Understanding how curves manipulate light values and color channels gives you precise control over matching different elements to their new backgrounds. The key to successful color matching lies in analyzing the color temperature and brightness relationships between your...

How to Fix Color Fringing in Subject Cutouts Using Clipping Masks

Perfect layer masks can still produce disappointing results when color fringing appears around hair and fur edges. This common problem isn't caused by poor masking technique—it's the original background bleeding through at the edges. Clipping masks offer a powerful solution by allowing you to paint...

Create Beautiful Floral Oval Frames for Portraits in Photoshop

Transform ordinary portraits into elegant artwork with decorative floral oval frames that blend seamlessly with your subject. This technique combines traditional framing with digital floral elements, creating a painterly effect that's perfect for fine art prints and creative portraits. The process involves creating an oval cutout, adding custom...

You’ve successfully subscribed to Photoshop Roadmap
Welcome back! You’ve successfully signed in.
Great! You’ve successfully signed up.
Success! Your email is updated.
Your link has expired
Success! Check your email for magic link to sign-in.