How to Create WPAP Pop Art Portraits Using Nano Banana in Photoshop

How to Create WPAP Pop Art Portraits Using Nano Banana in Photoshop

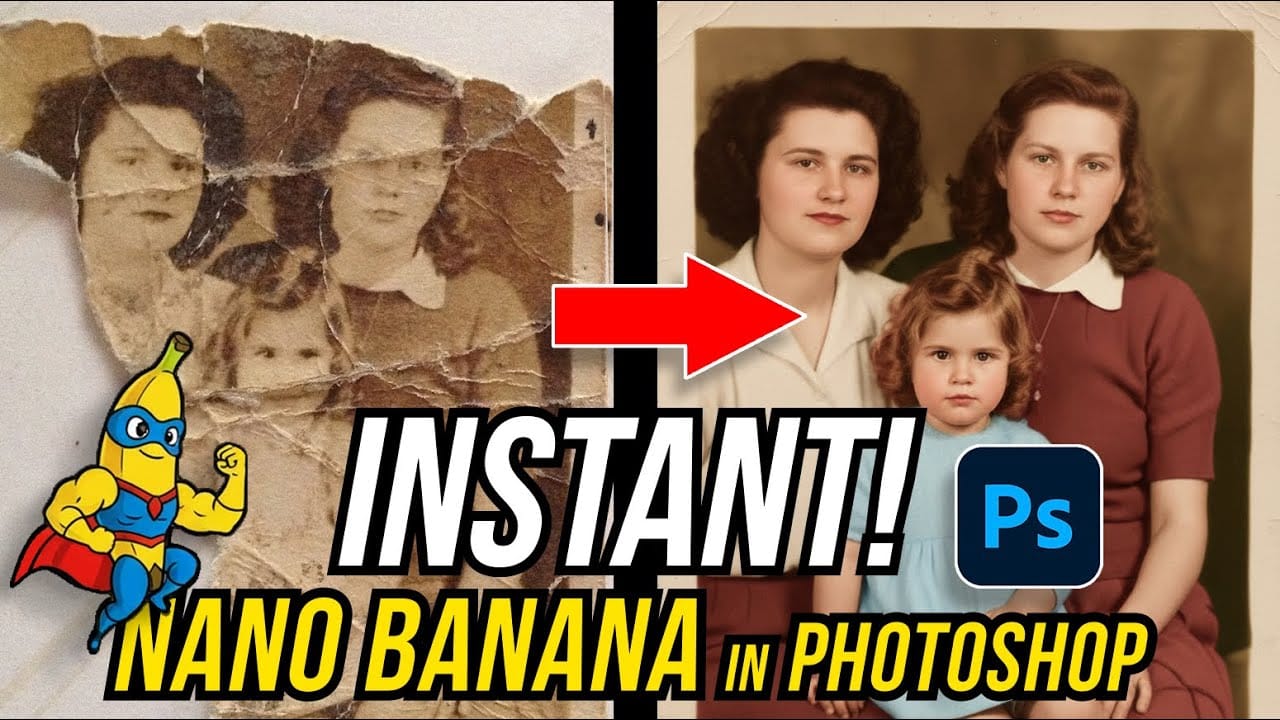
WPAP (Wedha's Pop Art Portrait) transforms ordinary photos into striking geometric art with sharp lines and vibrant contrasting colors. This Indonesian art style, created by Wedha Abdul Rasyid in the 1990s, features cubist-inspired deconstructions that turn portraits into dynamic visual statements.

Using Google's Nano Banana AI model in Photoshop, you can generate these complex artistic transformations in seconds rather than spending hours manually creating each geometric section and color block.

Watch the Video

Video by Photoshop Arthouse. Any links or downloads mentioned by the creator are available only on YouTube

Practical Tips

Key techniques for creating effective WPAP portraits with AI generative fill:

  • Select the entire document (Ctrl/Cmd + A) before using generative fill to ensure the AI processes the complete portrait
  • Use the specific prompt "Create WPAP art flat, vibrant, unusual colors, no texture. Make highlights and hair various vibrant colors" for authentic results
  • Choose Gemini 2.5 from the AI models list for superior geometric line work and color contrast
  • Generate multiple variations using the Properties panel to explore different color combinations and geometric interpretations
  • Enable the contextual taskbar through Window menu if it's not visible to access generative fill options

Explore more advanced AI editing techniques and creative applications:

50+ Nano Banana Uses in Photoshop Beta for Advanced Image Editing
Google's Nano Banana AI model now integrates directly into Photoshop Beta, bringing powerful generative capabilities to image editing. The tool excels at maintaining subject likeness while transforming backgrounds, clothing, and entire scenes with simple text prompts. This integration offers professional-grade AI editing within Photoshop's familiar interface, complete with advanced selection tools and workflow optimization. Watch the Tutorial Essential Tips for Using Nano Banana in Photosho
How to Restore Old Damaged Photos Using Nano Banana in Photoshop
Old family photos with scratches, tears, and missing sections can seem beyond repair. Google's Nano Banana AI model, now integrated into Photoshop, makes full restoration possible in minutes rather than hours. This powerful tool excels at maintaining facial characteristics while automatically filling in damaged areas and adding realistic color to black and white images. Watch the Tutorial Essential Tips for Photo Restoration with Nano Banana * Access the Contextual Taskbar — If you don't
Photoshop Beta: How to Use Google's Nano Banana AI for Advanced Image Editing
Google's Nano Banana AI model now integrates directly into Photoshop Beta, offering superior detail preservation and more realistic results than Adobe's Firefly. This powerful generative fill tool excels at maintaining subject likeness while transforming backgrounds, clothing, and entire scenes. The integration brings professional-grade AI editing capabilities directly into Photoshop's familiar interface, complete with advanced selection tools and workflow optimization. Watch the Tutorial E
How to Use Gemini 2.5 Nano Banana AI in Photoshop 2026
Photoshop 2026 introduces Gemini 2.5 Nano Banana, a powerful AI model that transforms how you edit images. This advanced tool maintains scene coherence while allowing dramatic changes to poses, backgrounds, and camera angles. The technology understands context and lighting, creating realistic results that feel naturally integrated into your original photos. Watch the Video Key Tips for Using Nano Banana * Make loose selections around your target area — the model needs context to understan

Get tutorials & freebies delivered to you.

Subscribe to the Photoshop Roadmap newsletter, a weekly roundup of new tutorials, insights and quality downloads, trusted by 6500+ readers.

You might also like

How to Use Color Average for Color Toning in Photoshop

Color average creates a unified color tone by analyzing all the colors in your image and calculating their mathematical average. This technique adds depth and cohesion to photos, composites, and AI-generated images by applying a subtle color wash that ties all elements together. The method works particularly well for composites...

How to Remove Complex Background Elements Using AI in Photoshop

Removing complex background elements like fencing or wire mesh has traditionally been one of the most time-consuming tasks in photo editing. New AI-powered tools in Photoshop can now eliminate these distracting elements while preserving fine details in your subject. This tutorial demonstrates two practical workflows: one using the latest Firefly...

How to Use Photoshop's Auto Layer Rename Feature

Messy layer names like "Layer 52 copy 4" and "Untitled 5" clutter your workspace and slow down complex projects. Photoshop's new auto-rename feature uses AI to automatically identify and name layers based on their content, from "Woman in yellow shirt" to "...

New Generative Fill Features in Photoshop Beta: Reference Images and Credit Tracking

Photoshop Beta introduces significant improvements to Generative Fill that address the most requested features from users. The updated interface now displays your generative credit balance and usage, while the new reference image capability lets you add up to eight specific images to guide AI generation with precise visual examples. These...

Essential Photoshop Tools for Beginners: Brush, Crop, and Move Tool Tutorial

Learning Photoshop tools feels overwhelming when you don't know where to start. This tutorial focuses on three essential tools that form the foundation of most Photoshop work: the brush tool for painting and retouching, the crop tool for resizing and straightening images, and the move tool for positioning...

How to Add Custom Textures to Photos in Photoshop

Adding textures to photographs can transform ordinary images into compelling artistic compositions. This technique uses multiple texture layers combined with strategic blending modes and color adjustments to create depth and visual interest. The process involves layering different texture types—color overlays, surface patterns, and lighting effects—then using masking techniques...

You’ve successfully subscribed to Photoshop Roadmap
Welcome back! You’ve successfully signed in.
Great! You’ve successfully signed up.
Success! Your email is updated.
Your link has expired
Success! Check your email for magic link to sign-in.