Two Simple Color Grading Techniques Using Photoshop Curves and Levels

Two Simple Color Grading Techniques Using Photoshop Curves and Levels

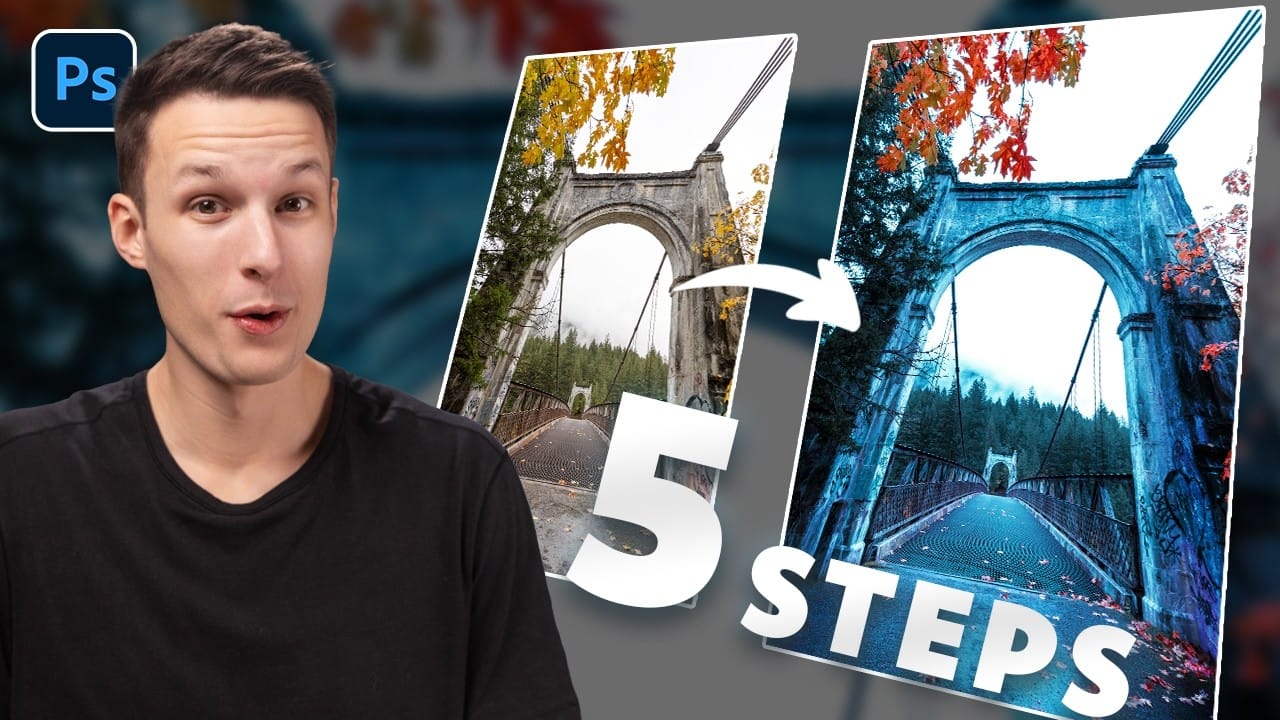
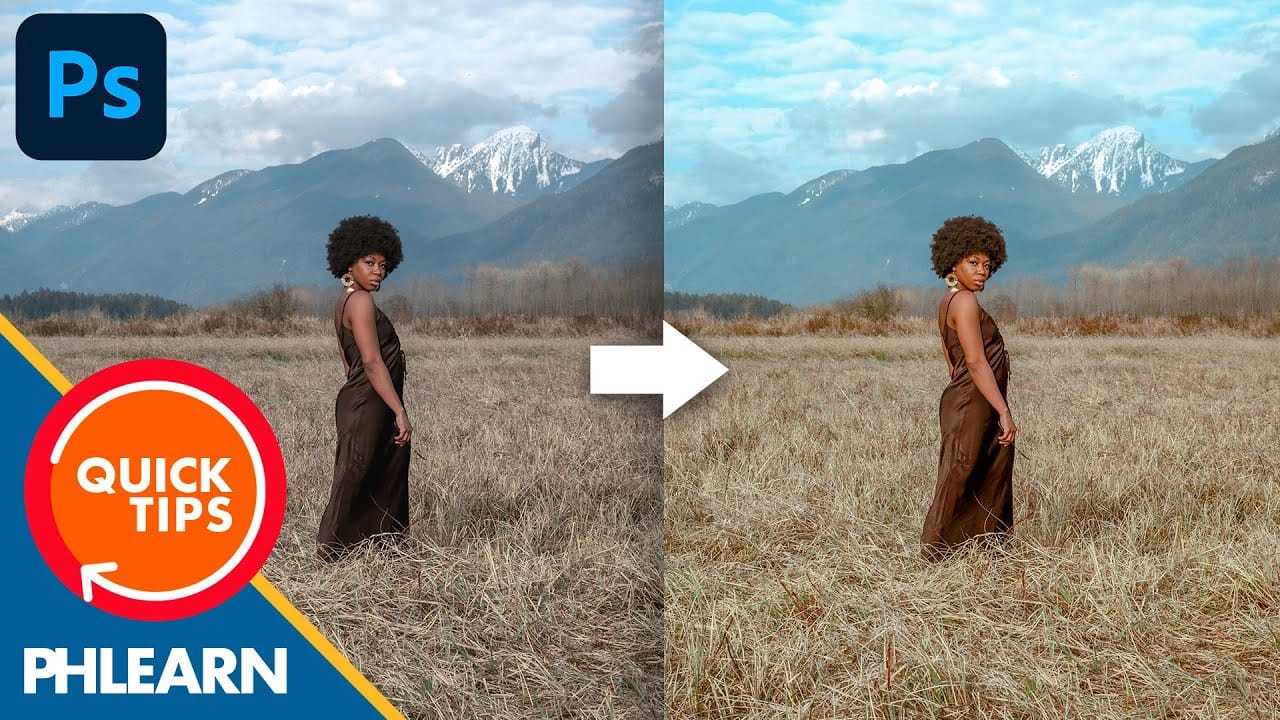
Color grading transforms flat images into vibrant, cinematic visuals that capture attention and convey mood. The difference between an ordinary photo and one with professional depth often comes down to how well shadows, midtones, and highlights work together to create visual interest.

These two Photoshop techniques using Curves and Levels offer a quick path to achieving that coveted "pop of color" without complex workflows or advanced skills.

Watch the Tutorial

Video by SandraD Imagery. Any links or downloads mentioned by the creator are available only on YouTube

Understanding Auto Color Options in Photoshop

The hidden power of Photoshop's Auto Color options lies in their ability to intelligently analyze and enhance images beyond simple brightness adjustments. When you hold Alt/Option and click Auto in Curves or Levels, you unlock targeted color selection tools that many users never discover.

These options work by identifying the tonal ranges in your image and allowing precise color assignment to shadows, midtones, and highlights. The Find Dark and Light Colors option proves particularly effective for dramatic color grading.

  • Enhanced Brightness and Contrast - Basic tonal correction
  • Find Dark and Light Colors - Best for color grading workflows
  • Enhance Per Channel - Individual RGB channel adjustments
  • Target Colors - Custom shadow, midtone, and highlight color selection

Practical Tips for Color Grading

  • Test different Auto Color options before committing to see which works best for your specific image
  • Choose cooler colors (blues, purples) for shadows and warmer colors (yellows, oranges) for highlights to create natural contrast
  • Always click "No" when prompted to save as defaults to avoid applying unwanted settings to future projects
  • Experiment with Soft Light and Overlay blend modes to control the intensity of your color grading effects
  • Reduce opacity on your adjustment layers when the effect appears too strong for a more subtle result

Explore more advanced color grading and adjustment techniques.

Curves vs Levels in Photoshop: Learn The Difference
In this Photoshop tutorial, you will learn the key differences between using Curves and Levels for image adjustment. Aaron Nace from Phlearn provides a clear and effective approach to enhance your photos and graphics. Throughout the lesson, techniques like the Super Zoom feature are highlighted, allowing you to upscale graphics without losing resolution, ensuring that your work retains high quality. You will also discover the benefits of applying Gradient Maps for better color matching, which c
How to Create Dramatic Colors in Photoshop: A 5-Step Color Grading Process
Photography often captures moments in natural tones, but sometimes an image calls for something bolder. Dramatic color grading transforms ordinary photos into striking visual statements that grab attention and evoke emotion. This comprehensive approach combines Camera Raw adjustments with Photoshop's powerful color tools to create rich, cinematic looks. The process works especially well for outdoor scenes where you can push blues, oranges, and complementary colors to their limits. Watch the T
Stop Ruining Colors with Curves With This Photoshop Trick Instead
Using Curves adjustments in Photoshop often creates unwanted color shifts that can make images look oversaturated or unnatural. While the traditional solution involves switching to Luminosity blend mode, this approach tends to drain the vibrancy from your photos, leaving them flat and lifeless. This tutorial reveals a superior technique using Camera Raw's refined saturation control that gives you precise command over color intensity while maintaining natural-looking results. You'll discover how
Create a bright and beautiful color grade in Photoshop
In this tutorial, Aaron Nace from Phlearn demonstrates how to enhance your photos with a bright and vibrant color grade using the Camera RAW filter in Photoshop. This technique is particularly effective for model photography and landscape shots, offering a way to elevate the visual appeal of your images with a polished, professional finish. Aaron guides you through the process of applying and adjusting color grades, showing how the Camera RAW filter can be used to fine-tune colors and achieve a

Get tutorials & freebies delivered to you.

Subscribe to the Photoshop Roadmap newsletter, a weekly roundup of new tutorials, insights and quality downloads, trusted by 6500+ readers.

You might also like

How to Enhance Skin Tones Using Gradients in Photoshop

Skin tones often appear washed out or lifeless in photographs due to challenging lighting conditions or camera settings. This gradient-based technique brings vibrancy back to portraits while creating natural-looking dimensional highlights that draw the viewer's eye to key facial features. The method uses Color Range selections combined with...

7 Signs You're a Photoshop Pro - Skill Assessment Guide

Professional Photoshop mastery isn't about memorizing every menu or filter. It's about developing efficient workflows, understanding core concepts, and building muscle memory for essential techniques. Real pros focus on the right tools for their specific needs rather than trying to learn everything. This comprehensive assessment covers...

How to Use Generative Upscale with Multiple AI Models in Photoshop

Pixelated vintage photos and low-resolution images no longer need to stay small. Photoshop's Generative Upscale feature now offers multiple AI models to enlarge images up to 4x their original size while adding remarkable detail and clarity. This new feature includes three distinct AI models—Adobe's Firefly...

Create a Pointillism Effect in Photoshop

Pointillism, the late 19th-century painting technique that uses small dots of color to form images, creates a distinctive artistic look where colors blend optically when viewed from a distance. This digital recreation technique transforms ordinary photographs into artwork that mimics the style of masters like Paul Signac. The process combines...

How to Convert WebP to JPEG in Bulk Using Image Processor

Converting large folders of WebP images to JPEG format can be time-consuming when done manually. Image Processor provides an efficient solution for batch conversion, automatically handling multiple files while maintaining quality settings and organization. This method works with any image format conversion and creates organized output folders, making it ideal...

How to Use Generative Credits in Adobe Creative Cloud: Standard vs Premium Features

Adobe's generative AI features transform how creatives work, but understanding which tools consume credits can save you time and budget frustration. The credit system divides features into standard and premium tiers, with different consumption rates based on processing complexity. Knowing the difference between assistive AI tools that cost...

You’ve successfully subscribed to Photoshop Roadmap
Welcome back! You’ve successfully signed in.
Great! You’ve successfully signed up.
Success! Your email is updated.
Your link has expired
Success! Check your email for magic link to sign-in.