Add Realistic Film Grain in Photoshop Using the New Adjustment Layer

Add Realistic Film Grain in Photoshop Using the New Adjustment Layer

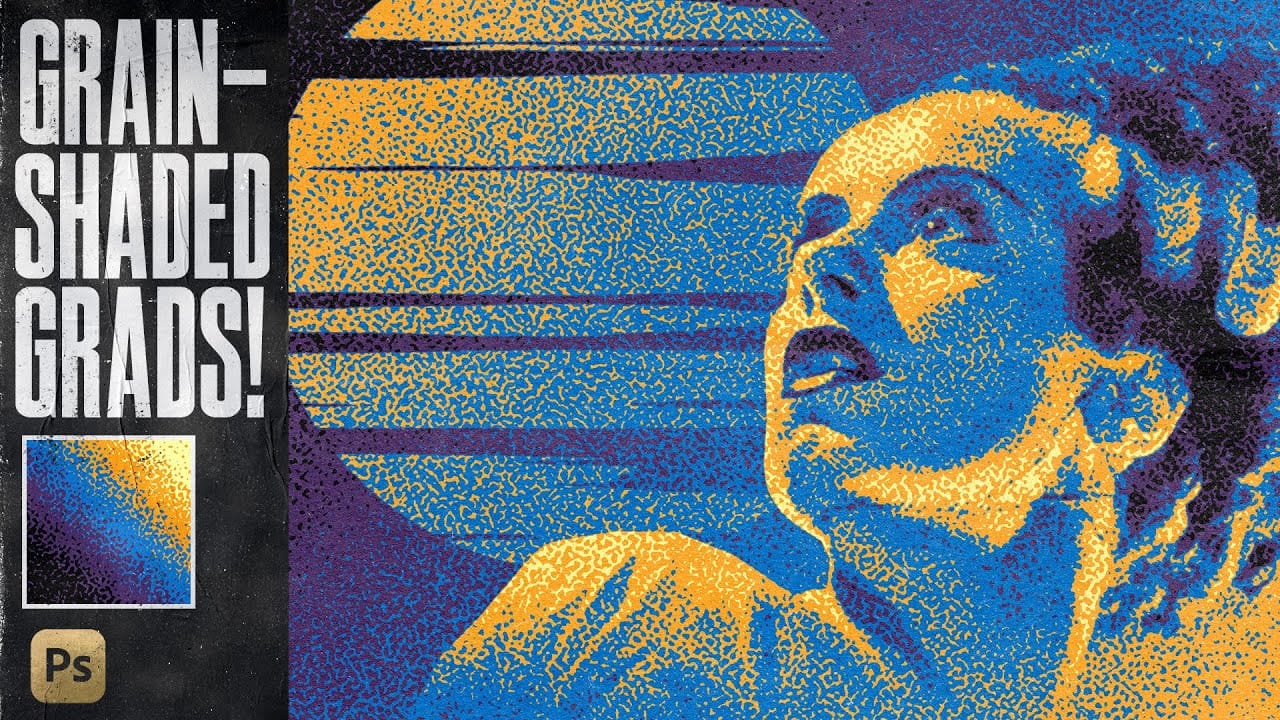
Film grain adds authentic character to digital images, recreating the organic texture that made analog photography compelling. The new grain adjustment layer in Photoshop 27.3 brings this classic effect directly into your workflow, eliminating the need to work in Camera Raw.

Understanding how grain actually worked in film photography is key to applying it realistically. Grain lived in the film emulsion, appearing strongest in shadows and midtones while naturally fading in highlight areas where paper white would show through.

Watch the Video

Video by f64 Academy. Any links or downloads mentioned by the creator are available only on YouTube

Practical Tips

These essential techniques will help you create authentic-looking film grain effects.

  • Start by pushing all three sliders (amount, size, roughness) to maximum to see the full effect, then dial back to your preferred intensity
  • Use Blend If to protect highlight areas from grain - split the underlying layer slider while holding Alt to create smooth transitions
  • Add a temporary magenta color overlay to visualize exactly where the grain effect is being applied in your image
  • Focus grain placement in midtones and shadows while keeping paper white areas clean, just like real film emulsion
  • Zoom into high-contrast areas when fine-tuning settings to better see how the grain interacts with different tonal ranges

Explore more techniques for adding texture and vintage effects to your photographs.

Revolutionary Technique: Photoshop's Grain Shaded Gradient Maps
In this tutorial, TextureLabs presents a revolutionary technique to enhance your Photoshop projects using grain-shaded gradient maps. This method offers a fresh approach to creating noise effects that can add depth and interest to your artwork. By utilizing Adjustment Layers, along with specially designed noise patterns and custom gradient presets, you can achieve stunning results. The tutorial walks you through the essential steps to manipulate these elements effectively, allowing for greater
Create a Quick Grunge Photo Border in Photoshop
In this Photoshop tutorial, Gavin Hoey demonstrates how to achieve a grungy effect on an image. Starting with duplicating the background layer and expanding the canvas, Gavin adds a clouds filter and adjusts blending modes to enhance the image's texture and depth. Using techniques like applying fibers filters and Gaussian blur, he further intensifies the grungy appearance, complemented by strategic strokes and brushwork to emphasize contrast and detail. Gavin's tutorial offers practical insigh
Create an awesome grainy scan-line text effect in Photoshop
In this tutorial by Blue Lightning TV, you'll learn how to create an awesome CRT scan-line text effect with digital glitches from scratch using Adobe Photoshop. The tutorial guides you through a few easy steps to achieve this retro and glitchy aesthetic. You'll explore techniques to simulate CRT monitor scan-lines, add digital glitches, and apply effects to text, creating a unique and visually dynamic result Whether you're nostalgic for retro tech aesthetics or looking to add a futuristic glit
Create Grungy Retro Halftone Effect in Photoshop
Vintage poster art captured attention through bold contrasts, visible printing dots, and rough textures that gave images character. The halftone effect recreates this aesthetic by breaking up continuous tones into distinct dots, mimicking old-school printing techniques. This technique transforms clean digital photos into gritty, retro-style artwork. The method combines Photoshop's built-in filters with layering techniques to create authentic-looking vintage effects with adjustable intensity.
Create Grungy Halftone Line Effects in Photoshop
Classic halftone line patterns evoke the raw aesthetic of vintage print media, from underground zines to punk rock posters. These gritty textures transform clean digital photos into pieces that feel authentically analog, complete with the imperfections that make print work compelling. This technique combines Photoshop's halftone filters with noise and blur effects to create convincing photocopy-style line patterns. The method builds multiple adjustment layers that work together to produce both
Create Underground Grunge Photo Effects in Photoshop
Underground grunge aesthetics bring raw, rebellious energy to portrait photography through distressed textures and gritty visual noise. The weathered, industrial look captures the essence of street culture and alternative art movements. This technique transforms clean portraits into compelling grunge artwork using Photoshop's noise filters, blur effects, and blend modes to achieve that authentic underground feel. Watch the Video Tutorial Essential Tips for Grunge Photo Effects These key te
Photoshop January 2026 Update: 5 New Features Including Grain and Clarity Adjustment Layers
Photoshop's January 2026 update brings five significant features that streamline common editing tasks. The highlight is new adjustment layers for grain and clarity effects, eliminating the need to work in Camera Raw for these adjustments. The update also introduces an improved generative AI model with higher resolution output and enhanced reference image capabilities, plus a more effective Remove Tool for cleaner object removal. Watch the Video Practical Tips Here are key techniques for wo
Realistic Blend Effect in Photoshop
In this advanced Photoshop tutorial, WebFlippy guides you through creating a realistic blend effect for text, graphics, or logos on any surface. This tutorial is designed to help you seamlessly integrate elements into various backgrounds, making them look like a natural part of the scene. WebFlippy starts by demonstrating how to properly blend text or logos using Photoshop's powerful tools and techniques. You'll learn how to adjust and match the texture, lighting, and perspective of your surfac
Bleached Film Photo Effect in Photoshop
In this tutorial, Jessica Kobeissi shows how to create a bleached film vintage photo effect in Photoshop. The author guides the reader through a simple process that can transform a digital image into a nostalgic, washed-out look. The tutorial begins by explaining the necessary tools and settings required to achieve the desired effect. Readers are then taken through the step-by-step instructions, which involve adjusting the levels, applying a color overlay, and making additional tweaks to the im
Add a realistic snowfall to a photo in Photoshop
Winter scenes gain magical atmosphere when snowflakes drift naturally through the frame. This video demonstrates how to build a realistic snow brush from scratch using Photoshop's noise filters and brush settings. The technique creates multiple layers of snow at different sizes and blur levels to simulate depth, from distant background flakes to prominent foreground snowfall. Watch the Video Practical Tips for Creating Realistic Snow Building convincing snowfall requires attention to depth

Get tutorials & freebies delivered to you.

Subscribe to the Photoshop Roadmap newsletter, a weekly roundup of new tutorials, insights and quality downloads, trusted by 6500+ readers.

You might also like

How to Create Digital Collages Using Layers and Blend Modes in Photoshop

Digital collages combine multiple images through strategic layering and blending techniques to create compelling visual stories. This beginner-friendly approach demonstrates how to build complex compositions by layering textures, portraits, and objects while using blend modes to seamlessly integrate each element. The process focuses on practical workflow techniques including smart object...

Building Complex Composites Using Generative Fill and Layer Blending

Complex surreal composites require more than just combining random images. The key to professional results lies in systematic layering, consistent masking techniques, and building a reusable library of generated elements. This approach transforms scattered AI-generated content into cohesive artistic visions. The tutorial demonstrates how to deconstruct an existing composite to...

How to Add Any Face to Mount Rushmore Using Photoshop and AI

Adding faces to Mount Rushmore creates striking digital art that combines portrait photography with AI-powered stone carving effects. This technique uses generative AI to transform any portrait into a realistic granite sculpture that matches the lighting, texture, and monumental style of the famous presidential memorial. The process combines traditional selection...

Creating Floral Wreath Overlays in Photoshop

Floral overlays transform ordinary portraits into magical compositions perfect for pet photography, baby portraits, and creative projects. This technique shows you how to build custom floral wreaths using AI-generated base elements and real floral PNG files, creating frames that can hold any subject in the center. The process combines symmetry...

Concept Development and Mood Boarding with Firefly Boards for Fashion Design

Fashion design concept development traditionally requires gathering inspiration from multiple sources, creating mood boards, and iterating through ideas before presenting to clients. Firefly Boards streamlines this entire workflow into a single workspace where you can source inspiration, generate new variations through AI remixing, and organize final concepts into professional presentations....

How to Use Dynamic Text Shapes in Photoshop

The Dynamic Text tool introduced in 2025 was revolutionary for automatic text sizing and layout, but 2026 brings an exciting update that adds shape options to this powerful feature. You can now create circular text, arches, and bow configurations with the same intelligent resizing capabilities that made the original tool...

You’ve successfully subscribed to Photoshop Roadmap
Welcome back! You’ve successfully signed in.
Great! You’ve successfully signed up.
Success! Your email is updated.
Your link has expired
Success! Check your email for magic link to sign-in.